Close Menu
PSD VaultPSD Vault
  • VIP Area
  • Photoshop Basics
  • Photo Effect
  • Text Effect
  • Premium Tuts
  • Resources
  • Drawing
  • Inspiration
  • Web Graphics
  • Abstract
  • Freebies
  • Advertise
  • Get in Touch
  • About PSD Vault
Facebook Instagram Pinterest YouTube TikTok
Facebook Instagram Pinterest YouTube TikTok RSS
PSD VaultPSD Vault
  • VIP Area
    • Sign Up
    • Log In
  • Photoshop Basics
  • AI
  • Photoshop Error Fixes
  • Video Tutorial
  • Photo Effect
  • Text Effect
  • Premium Tuts
  • Drawing
  • Opinion
PSD VaultPSD Vault
Home»AI»Elevate Your Photo with AI Noise Reduction and Sharpening in Photoshop
AI

Elevate Your Photo with AI Noise Reduction and Sharpening in Photoshop

By Lana WilsonJanuary 3, 20254 Mins Read
Share
Facebook Twitter LinkedIn Pinterest Email

Say goodbye to grainy photos and hello to stunning clarity with the AI Noise Reduction and Sharpening tools in Photoshop. These revolutionary features harness the power of artificial intelligence to transform your images, revealing hidden details and bringing them to life.

But as with any powerful tool, understanding their strengths and limitations is key to achieving the best results.

The Lowdown on AI Noise Reduction

Ever battled the frustrating specks and grain that creep into photos taken in low light or at high ISO settings? AI Noise Reduction comes to the rescue, intelligently analysing your image and removing unwanted noise while preserving precious details.

It’s like magic, but how does it work? Photoshop’s AI algorithms are trained on millions of examples of noisy and clean images. This allows them to identify noise patterns and meticulously eliminate them, leaving you with a smoother, more polished result.

Sharpening like a Pro with AI

Want to take your image clarity to the next level? AI Sharpening is your new best friend. This powerhouse tool enhances edges and definition, bringing out the subtle textures and intricate details that might have been lost in the digital fray.

Think of it as giving your image a laser focus. AI Sharpening identifies edges with incredible precision, then subtly sharpens them without introducing harsh artifacts or halos. The result? Images that pop with newfound crispness and definition.

Where is AI Noise Reduction and Sharpening Feature Located?

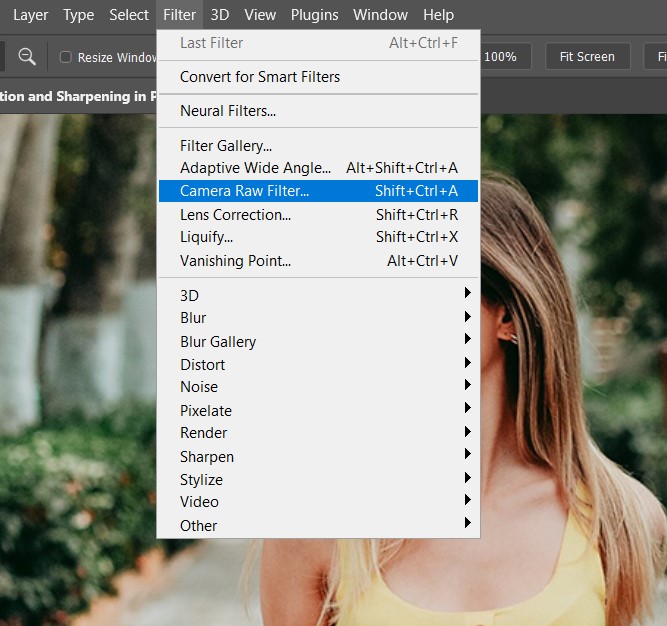
You can find these features within the Camera Raw Filter.

Access Camera Raw:

  • Open your image in Photoshop.
  • Navigate to Filter > Camera Raw Filter. This opens the Camera Raw filter workspace.

Locate the Detail Panel:

  • Within Camera Raw, find the Detail panel on the right side. This panel houses both noise reduction and sharpening tools.

Pros and Cons: Weighing the AI Advantage

Like any editing tool, AI Noise Reduction and Sharpening come with their own set of benefits and drawbacks. Let’s dive into the pros and cons to help you decide if they’re the right fit for your editing workflow.

Pros:

  • Effortless Power: Both tools achieve exceptional results with minimal effort, saving you precious time and frustration.
  • Superior Results: AI algorithms outperform traditional noise reduction and sharpening methods, preserving detail and minimizing unwanted artifacts.
  • Versatility: They work on a wide range of images, from portraits and landscapes to architectural details and wildlife shots.
  • Easy to Use: Both tools are accessible even for beginner editors, with intuitive sliders and simple adjustments.

Cons:

  • Resource-Intensive: AI processing can be demanding, especially on older computers, so patience is sometimes required.
  • Fine-Tuning Required: While powerful, achieving the perfect balance can take some practice. Don’t be afraid to experiment and find your sweet spot.
  • Not a Cure-All: Heavily compressed or damaged images might not benefit as much from AI processing.

Mastering the Art of AI Image Enhancement

Now that you’re familiar with the superpowers of AI Noise Reduction and Sharpening in Photoshop, here are some tips to harness their magic and unlock your image’s full potential:

  • Start Subtle: Less is often more with these tools. Begin with small adjustments and gradually increase the sliders until you achieve the desired effect.
  • Zoom in for Precision: Zooming in helps you see the subtle changes AI makes, allowing you to fine-tune your settings for optimal results.
  • Compare and Contrast: Utilize the “Before/After” sliders in Camera Raw to compare the original and edited versions, giving you a clear understanding of the AI’s impact.
  • Experiment and Practice: Don’t be afraid to play around with different settings and combinations. The more you experiment, the more comfortable you’ll become with these powerful tools.

Conclusion

AI Noise Reduction and Sharpening in Photoshop offer a new era of image editing possibilities. Their ability to effortlessly enhance clarity and remove unwanted noise is truly magical. However, as with any tool, understanding their strengths and limitations is key to achieving exceptional results.

By embracing the power of AI, you can transform your images from grainy and muted to crisp and vibrant, bringing out the hidden beauty and detail that resides within each pixel. So, go forth and experiment, unleash the magic of AI, and unlock the full potential of your creative vision!

Additional Resources

  • Adobe Photoshop Help Centre
  • Noise Reduction in Adobe Camera Raw
  • Expert Photography Guide
  • Exploring AI-Driven Editing in Photoshop for Modern Photography
ai noise photoshop reduction sharpening
Share. Facebook Twitter Pinterest LinkedIn Tumblr Email
Lana Wilson

Lana Wilson is a Photoshop artist with over 10 years of experience. She is known for her creative and innovative use of Photoshop to create stunning images. Her work has been featured in magazines, websites, and advertising campaigns. Lana is passionate about using Photoshop to tell stories and create emotional connections with her audience. She is always looking for new ways to use the software to push the boundaries of what is possible.

Related Posts

How to Edit Non-Destructively with Smart Objects & Neural Filters in Photoshop

October 25, 2025

Create Surreal Motorbike Racing Scene in Photoshop

October 18, 2025

How to Pixelate an Image in Photoshop

October 16, 2025

Comments are closed.

Don't Miss

How to Fix Text Tool Lagging or Crashing in Photoshop 2025 (Quick & Permanent Fixes)

November 1, 2025

How to Edit Non-Destructively with Smart Objects & Neural Filters in Photoshop

October 25, 2025

Create Surreal Motorbike Racing Scene in Photoshop

October 18, 2025

For Beginners

Basics

How to Create Relistic Burning Car Effect in Photoshop

By James QuOctober 17, 20251 Min Read

How to Pixelate an Image in Photoshop

October 16, 2025

How to Stay Ahead of Every Photoshop Update & Unlock Their Full Power

October 11, 2025

Curves or Levels: Choosing the Right Tool for Stunning Edits

September 28, 2025

You May Also Like

Photo Effect

How to Edit Non-Destructively with Smart Objects & Neural Filters in Photoshop

By James QuOctober 25, 20253 Mins Read
Photo Effect

Create Surreal Motorbike Racing Scene in Photoshop

By James QuOctober 18, 202512 Mins Read
Basics

How to Pixelate an Image in Photoshop

By Lana WilsonOctober 16, 20254 Mins Read
Facebook X (Twitter) Instagram Pinterest
  • About Us
  • Get in Touch
  • Advertise
  • VIP Area
  • Privacy Policy
  • Terms & Conditions
© 2025 PSD Vault. All Right Reserved.

Type above and press Enter to search. Press Esc to cancel.

Manage Consent
To provide the best experiences, we use technologies like cookies to store and/or access device information. Consenting to these technologies will allow us to process data such as browsing behavior or unique IDs on this site. Not consenting or withdrawing consent, may adversely affect certain features and functions.
Functional Always active
The technical storage or access is strictly necessary for the legitimate purpose of enabling the use of a specific service explicitly requested by the subscriber or user, or for the sole purpose of carrying out the transmission of a communication over an electronic communications network.
Preferences
The technical storage or access is necessary for the legitimate purpose of storing preferences that are not requested by the subscriber or user.
Statistics
The technical storage or access that is used exclusively for statistical purposes. The technical storage or access that is used exclusively for anonymous statistical purposes. Without a subpoena, voluntary compliance on the part of your Internet Service Provider, or additional records from a third party, information stored or retrieved for this purpose alone cannot usually be used to identify you.
Marketing
The technical storage or access is required to create user profiles to send advertising, or to track the user on a website or across several websites for similar marketing purposes.
  • Manage options
  • Manage services
  • Manage {vendor_count} vendors
  • Read more about these purposes
View preferences
  • {title}
  • {title}
  • {title}