
Dodge and burn in Photoshop is the digital version of a darkroom technique photographers have used for decades — selectively lightening and darkening areas to sculpt light, add depth, and guide the viewer’s eye. Here are all three methods, ranked from fastest to most powerful.
Quick Answer: Dodge and Burn in Photoshop The Dodge Tool (O) lightens areas you paint over. The Burn Tool (O) darkens them. Both are in the same toolbar group. Set Range to Midtones and Exposure to 5–15% for subtle, natural results. For professional, non-destructive dodging and burning, use a 50% grey Overlay layer instead — this method protects the original pixels and is fully reversible.
| Difficulty | Beginner (Methods 1 & 2) · Intermediate (Method 3) |
| Time Required | Method 1 (Direct tools): immediate · Method 2 (Grey layer): 2 min setup · Method 3 (Curves): 3 min setup |
| Shortcut | O — cycles between Dodge, Burn, and Sponge tools |
| Best For | Portrait retouching, landscape drama, product shadow/highlight, skin contouring, adding depth to flat images |
| Key Rule | Keep Exposure below 15% and work in multiple light passes — heavy single passes are the #1 mistake |
| Non-Destructive? | Method 1: No. Methods 2 & 3: Yes — fully editable and reversible |
What dodge and burn actually does — and why it matters
Dodge and burn in Photoshop is the digital equivalent of a technique film photographers developed in darkrooms. During printing, they would selectively block light (dodging — lightening) or add extra exposure (burning — darkening) to specific areas of a print, creating depth and dimension that the raw photograph lacked.
In Photoshop, the same principle lets you reshape the light in any photograph after the fact. You can add a sense of three-dimensionality to flat lighting, direct attention toward the subject by brightening it and darkening the surroundings, recover detail in overly dark shadows or overly bright highlights, and give skin a sculpted, contoured appearance that cameras can’t capture directly.
Photoshop offers three distinct approaches to dodging and burning. The direct Dodge and Burn tools are the fastest but permanently alter your pixels. The 50% grey Overlay layer is the professional standard — fully non-destructive and the method most retouchers use. The Curves layer method gives the most control over tonal range. Understanding when to use each is what this guide covers.
| 📌 James’ Note: The name ‘dodge’ comes from the hand gesture darkroom photographers used — waving a small card (a ‘dodge’) between the light source and the paper to reduce exposure in a specific area. ‘Burn’ came from concentrating extra light through a hole in a card. Photoshop’s tool icons still reflect those original hand gestures. |
The Dodge Tool (O) and Burn Tool (O) are the most direct approach. You select one, set a brush size and exposure, and paint directly on the image to lighten or darken. It’s immediate and intuitive — but because it alters the actual pixels, there is no easy way to undo individual strokes once you’ve saved and closed the file. Always work on a duplicate layer.
METHOD 1: DIRECT DODGE & BURN TOOLS Fastest method · Best for quick edits and beginners · Destructive — alters pixels permanently
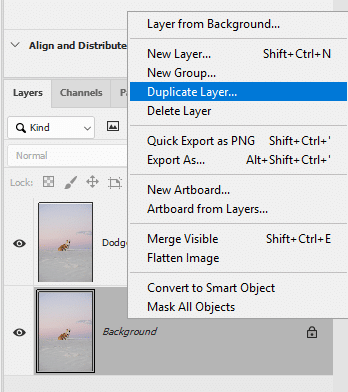
Step 1: Prepare a Duplicate Layer
Never use the Dodge and Burn tools directly on your Background layer or original pixels. Duplicate the layer first: Cmd/Ctrl+J. Name the duplicate ‘Dodge and Burn’. All tool work happens here. If you make a mistake, delete the duplicate and start again from the original.
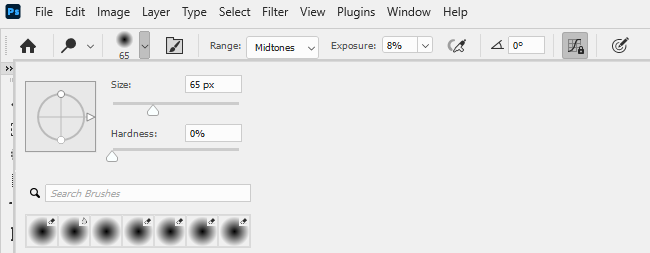
Step 2: Select the Dodge or Burn Tool
Press O to select the Dodge/Burn/Sponge tool group. If you get the wrong tool, press Shift+O to cycle through the group until you reach Dodge (lightening) or Burn (darkening). The active tool appears in the Options Bar at the top.
In the Options Bar, configure:
- Range: this is the most important setting. Shadows affects only the dark tones. Midtones affects the middle tonal range (most common use). Highlights affects only the bright tones. Choosing the correct Range prevents the operation from affecting the tonal areas you want to preserve.
- Exposure: the strength of each brush stroke. Keep this between 5–15% for natural results. Higher values create visible, obvious changes that are hard to blend naturally. Multiple light passes at 5–10% are always better than one heavy pass at 50%.
- Protect Tones: keep this checked. It prevents colour shifting in the dodged/burned areas, which would otherwise cause skin tones to go grey or highlights to turn yellow.

| Task | Tool | Range | Exposure |
| Brighten shadow detail | Dodge | Shadows | 8–12% |
| Add highlight to skin | Dodge | Highlights | 5–8% |
| Overall skin brightening | Dodge | Midtones | 5–10% |
| Deepen shadow areas | Burn | Shadows | 8–15% |
| Darken flat sky | Burn | Midtones | 10–20% |
| Recover blown highlights | Burn | Highlights | 5–10% |
| Add drama to background | Burn | Midtones | 15–25% |
Step 3: Paint in Multiple Light Passes
Use a large, soft round brush (0% hardness). Start with the Dodge Tool at 8–10% Exposure in Midtones. Paint slowly over the areas you want to lighten. Work in broad, overlapping strokes that follow the natural direction of light in the image.
Switch to Burn at the same low Exposure and darken the shadow areas. The goal is to increase the contrast between the lightest and darkest areas, creating a sense of depth that the original photo may have lacked.
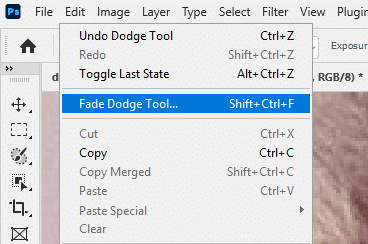
Keep toggling between the original and your dodge/burn layer (eye icon on/off) to check your progress. If an area has been worked too heavily, use Edit > Fade Dodge or Edit > Fade Burn immediately after the stroke to reduce its intensity before moving on.
| 💡 Pro Tip: For portrait retouching, use the Dodge Tool to brighten the whites of the eyes, the catchlights (the specular reflections in the iris), and the teeth. Use Burn to lightly deepen the iris colour and add definition under the eyebrows. These four micro-adjustments make portraits noticeably more vivid without touching any other part of the image. |
METHOD 2: THE 50% GREY OVERLAY LAYER — PROFESSIONAL STANDARD Non-destructive · Fully reversible · The method used by professional retouchers
The 50% grey Overlay layer is the technique professional retouchers use for virtually all dodge and burn work. It works on a neutral grey layer above the image, using the Overlay blend mode’s mathematical property that 50% grey is completely invisible — only values lighter or darker than 50% become visible as lightening or darkening effects on the layers below.
Because the effect exists on a completely separate layer, it is entirely non-destructive. You can reduce the layer’s opacity to dial back the overall effect, paint black to increase darkening, paint white to increase lightening, erase any stroke you don’t like, or delete the layer entirely — all without touching a single pixel of the original image.
| 🔑 Key Concept: The 50% grey Overlay method works because of Overlay blend mode’s neutral grey property: any pixel that is exactly 50% grey becomes invisible in Overlay mode. Pixels lighter than 50% grey lighten the layers below (like dodging). Pixels darker than 50% grey darken the layers below (like burning). This means painting white on the grey layer = dodging. Painting black = burning. Grey values in between = partial dodge/burn. |
Step 1: Create the 50% Grey Layer
Press Cmd/Ctrl+Shift+N to open the New Layer dialogue (or go to Layer > New > Layer). In the dialogue:
- Name the layer ‘Dodge Burn’
- Set Mode to Overlay
- Check ‘Fill with Overlay-neutral color (50% gray)’
- Click OK

A new layer appears in the Layers panel set to Overlay mode. It looks completely invisible on the canvas — which is correct. The 50% grey fill is neutral in Overlay mode and won’t affect the image until you paint on it.
| 💡 Pro Tip: Alternatively: create a normal new layer (Cmd/Ctrl+Shift+N without any settings), set its blend mode to Overlay in the Layers panel, then fill it with 50% grey using Edit > Fill > 50% Gray. The result is identical either way. |
Step 2: Paint with White to Dodge, Black to Burn
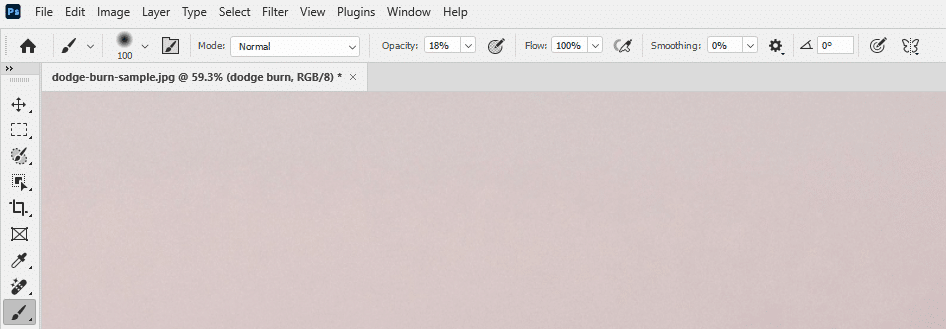
Select the Brush Tool (B), and:
- Set Hardness to 0%
- Set Opacity to 10–20%
- Set Flow to 100%.
To dodge (lighten): set foreground colour to white (#FFFFFF). Paint over the areas you want to lighten. Each stroke adds a small amount of lightening. Multiple overlapping strokes build up the effect gradually — this is exactly how professional retouchers work, building up 20–30 light strokes rather than one heavy one.
To burn (darken): press X to swap foreground to black (#000000). Paint over the areas you want to darken. The same gradual build-up applies.
At any time, Alt/Opt+click the layer thumbnail to see the actual grey layer with all your brush strokes visible. Dark areas show where you’ve burned, light areas show where you’ve dodged. This view helps you check whether the effect is even and natural-looking.
| 🔍 Why this works: Working at 10–20% Opacity with soft round brushes on the grey layer produces exactly the same visual effect as the direct Dodge and Burn tools — but every stroke is recorded as paint on the grey layer rather than as a permanent change to the pixels below. You can target individual strokes, reduce the layer opacity globally, or wipe the whole layer and start again. This level of control is impossible with the destructive Method 1. |
Step 3: Refine and Adjust
The three most useful refinement controls for the grey layer:
- Layer Opacity: reduce from 100% to dial back the entire dodge/burn effect uniformly. 70–80% often feels more natural than 100% for portraits.
- Gaussian Blur on the layer: go to Filter > Blur > Gaussian Blur and apply 3–5px to the grey layer. This softens all the dodge/burn transitions simultaneously, removing any brush stroke edges that look slightly unnatural. Apply as a Smart Filter if you converted to Smart Object first.
- Targeted erasing: use the Eraser Tool at 20% Opacity to soften specific areas where the effect is too strong. This is faster than repainting those areas from scratch.
| 📌 James’ Note: I use the 50% grey method for portrait retouching. The non-destructive workflow matters enormously when a client comes back three months later and asks for a change — you can revisit the grey layer and adjust individual strokes without touching the original file. Method 1 (direct tools) on a pixel layer makes that nearly impossible. |
METHOD 3: CURVES ADJUSTMENT LAYERS — MAXIMUM TONAL CONTROL Most powerful · Fully non-destructive · Best for precise tonal range targeting
The Curves method replaces the grey layer with two dedicated Curves adjustment layers — one brightening (dodge) and one darkening (burn) — each with an inverted black mask. You paint white on whichever mask corresponds to the area you want to adjust. This method gives you the most control because you can change the curve shape at any time to adjust exactly how much and in which tonal range the effect is applied.
It’s the method to use when you need to dodge or burn specific tonal ranges very precisely — for example, brightening only the highlight areas of skin while leaving the midtones completely untouched, which neither the direct tools nor the grey layer method can achieve as precisely.
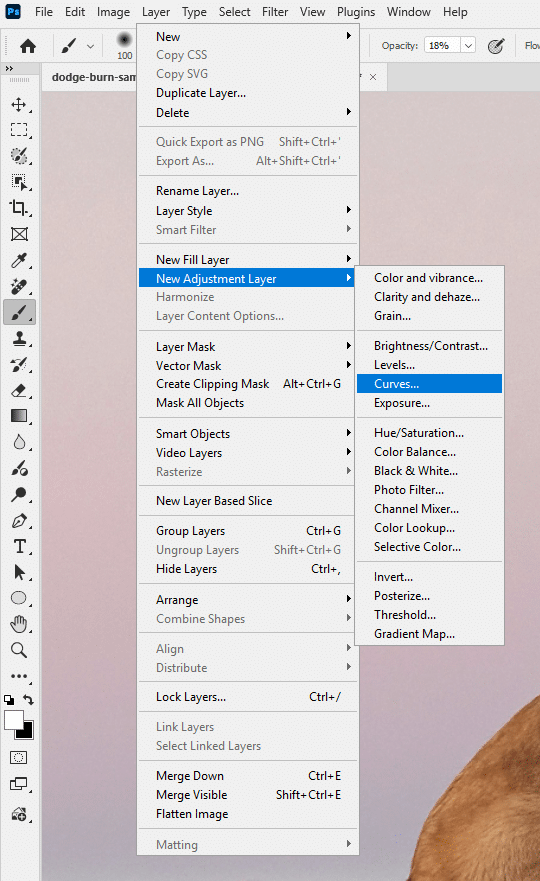
Step 1: Create the Dodge Layer (Brightening Curve)
Add a Curves adjustment layer: Layer > New Adjustment Layer > Curves. In the Curves panel, pull the midpoint of the curve upward to create a brightening effect — Input 128, Output 160 is a good starting point. You can always adjust this later.
Now invert the layer mask to black: with the mask thumbnail selected, press Ctrl/Cmd+I. The Curves brightening effect disappears completely — because the black mask is hiding it everywhere. Name this layer ‘Dodge’.
| 💡 Pro Tip: The exact shape of your brightening curve determines the quality of the dodging. A gentle S-curve that lifts the midtones while preserving highlights gives a more natural result than a straight diagonal pull. Experiment with the curve shape after you’ve painted the mask — you can see the effect update live as you adjust the curve. |
Step 2: Create the Burn Layer (Darkening Curve)
Add a second Curves adjustment layer. This time pull the midpoint of the curve downward — Input 128, Output 96 is a conservative starting point. Invert its mask to black (Ctrl/Cmd+I). Name this layer ‘Burn’.
You now have two invisible Curves layers: Dodge (brightening, black mask) and Burn (darkening, black mask).
Step 3: Paint White on Each Mask to Apply the Effect
Select the Dodge layer’s black mask thumbnail (white border appears around it). Choose the Brush Tool with 0% hardness, Opacity 15–25%, white foreground colour. Paint over the areas you want to lighten. The brightening curve becomes visible only where you paint.
Select the Burn layer’s black mask thumbnail. Switch foreground to white. Paint over the areas you want to darken.
The key advantage: if the effect is too strong, adjust the Curve — not the mask. If you want stronger brightening, pull the Dodge curve higher. If you want the effect to apply only to highlights, adjust the Dodge curve’s anchor points to target the highlight range only. The mask stays exactly as painted; the Curve shape changes the character of the effect underneath.
| 🔍 Why this works: Using two Curves layers instead of a grey layer gives you a fundamental advantage: you can change your mind about the strength and tonal targeting of the dodge and burn effect at any time, without repainting a single pixel. The grey layer records a fixed lightening/darkening value per pixel. The Curves method lets you repaint the same mask and get a different effect just by adjusting the curve — 10% brighter, 30% brighter, affecting only shadows — all without touching the mask. |
Method Comparison — Which to Use When
| Method | Speed | Reversible? | Tonal Control | Best For |
| 1. Direct Dodge/Burn Tools | ★★★★★ | ✗ No | Range selector only | Quick edits, learning, rough adjustments |
| 2. 50% Grey Overlay Layer | ★★★★☆ | ✓ Yes | Brush opacity | Professional retouching, portraits, skin work |
| 3. Curves Adjustment Layers | ★★★☆☆ | ✓ Yes | Full curve control | Precise tonal targeting, editorial, high-end work |
The honest answer: most professional retouchers use Method 2 (grey layer) for 90% of their dodge/burn work because it’s fast, flexible, and non-destructive. Method 3 (Curves) is reserved for situations where they need to change the effect’s tonal character after painting — which happens less often than you’d think. Method 1 (direct tools) is the starting point for beginners but should be graduated from as soon as the non-destructive workflow is comfortable.
Real-World Applications: What to Dodge and Burn
Knowing the technique is only half the battle — knowing where to apply it makes the difference between a flat edit and a compelling image. Here are the most common applications:
Portrait Retouching
- Dodge: the forehead high point (where light hits first), cheekbones, bridge of the nose, cupid’s bow of the upper lip, whites of the eyes, catchlights in the iris.
- Burn: under the cheekbones (to sculpt), the temples, under the jawline, the neck shadow, the iris (to deepen colour), the edges of the face to push attention toward the centre.
- Avoid: the undereye area — lightening here with Dodge can make dark circles worse by increasing contrast. Use frequency separation for undereye work instead.
| 💡 Pro Tip: For portrait skin dodging/burning, work at a zoom level between 33–50%. At 100% zoom, individual brush strokes look too obvious. At 33–50% you see the overall tonal effect as it will appear in the final image. Check at 100% periodically to confirm no brush tracks are visible, but make decisions at 33–50%. |
Landscape Photography
- Dodge: clouds (to bring out internal detail), water highlights and reflections, the horizon where sky meets land (to add luminosity), foreground elements lit by direct sun.
- Burn: all four corners of the image (the classic vignette — draws the eye to the centre), the sky above the horizon (to deepen blue and add drama), dark foreground shadows (to add depth).
| 📌 James’ Note: The corner-burning vignette is one of the most universally applied dodge/burn techniques in landscape photography. Use Method 2 (grey layer), large soft brush, Burn at 15–25% Opacity, and work all four corners inward about 20% of the frame width. The eye naturally moves toward lighter areas — corner burning guides it to the subject without the viewer consciously noticing the manipulation. |
Product Photography
- Dodge: the primary highlight on the product surface (to make it look premium and well-lit), text and branding elements on packaging (to ensure readability), any surface area that should read as reflective or glossy.
- Burn: the cast shadow beneath the product (to anchor it to the surface), secondary shadow areas (to increase depth), background around the product edges (to separate it from the background without a hard cutout edge).
Dodge and Burn vs Photoshop’s AI Tools in 2026
With Photoshop 2025/2026 introducing AI-powered lighting adjustments through Generative Fill and Neural Filters, a fair question is whether manual dodge and burn is still relevant. The short answer: yes, and here’s why.
Photoshop’s AI lighting tools — including the Lighting Effects filter and Generative Fill’s illumination prompts — are scene-level tools. They add or modify broad light sources affecting the entire image. Manual dodge and burn is a micro-level tool. It shapes the light on individual surfaces, skin textures, product curves, and architectural details at a precision that AI cannot yet replicate.
The professional workflow in 2026 typically combines both: AI tools for broad lighting corrections (adding a fill light, correcting overall exposure, removing harsh shadows), and manual dodge/burn for the final micro-sculpting that makes the image look genuinely crafted rather than algorithmically corrected.
| 💡 Pro Tip: If you use Generative Fill or Neural Filters for lighting corrections, always do manual dodge/burn as the final step — after all AI operations are complete and the image is in its final state. AI tools can alter tonal relationships in ways that make previously-applied dodge/burn work inconsistent. |
Troubleshooting – Common Dodge and Burn Problems
| Problem | Cause | Fix |
| Skin looks grey or desaturated after dodging | Protect Tones is unchecked in Method 1, or curve is too aggressive in Method 3 | Enable Protect Tones in Options Bar (Method 1). In Method 3, reduce the Curves adjustment strength and check the effect at different Saturation levels. |
| Visible brush stroke tracks in the final image | Brush hardness too high, or single heavy-opacity passes | Use 0% hardness brushes exclusively. Work at 5–15% Opacity maximum. Multiple light overlapping passes are essential. |
| Dodge Tool lightening the whole image not just target area | Brush size too large relative to the area | Reduce brush size so it covers only the target area with a small margin. Use keyboard shortcuts [ and ] to resize the brush quickly. |
| Highlights clipping to pure white after dodging | Exposure too high or already-bright areas being dodged | Use Range: Highlights with low Exposure (5–8%) on bright areas. Or switch to Method 3 and adjust the curve to prevent highlight clipping by anchoring the top-right of the curve. |
| 50% grey layer not working — visible grey on canvas | Layer Blend Mode not set to Overlay | Check the layer’s blend mode in the Layers panel dropdown. It must be Overlay, not Normal or any other mode. |
| Effect too strong overall in Method 2 | Grey layer opacity too high or brush passes too heavy | Reduce the grey layer’s overall Opacity (70–80% is often more natural than 100%). Or use Filter > Blur > Gaussian Blur on the grey layer to soften all transitions. |
| Burn Tool making skin look bruised or purplish | Range set to Highlights when burning skin midtones | Set Range to Midtones for skin. Burning the Highlights range on skin shifts the hue toward magenta/purple. |