")
Removing body hair from photos can be a tedious task, especially when working with detailed images or large areas of hair. Whether you’re retouching portraits, creating fashion editorials, or enhancing product photography, achieving a clean and natural look is essential. In this guide, we’ll explore both traditional Photoshop techniques and modern AI-powered tools to help you remove body hair quickly and effectively.
There are a lot of tutorials out there showing how you can do so by using the Healing Brush Tool. However in my opinion, healing brush tool is only useful when the area you try to heal is relatively small, and it can be a bit difficulty to adjust the source position.
I’m going to show you an alternative way via the Smudge Tool and the Blur Tool to tackle the shortcomings of the Healing Brush Tool.
We will also discuss how using AI-driven platform can further streamline this process in the later part of the tutorial.
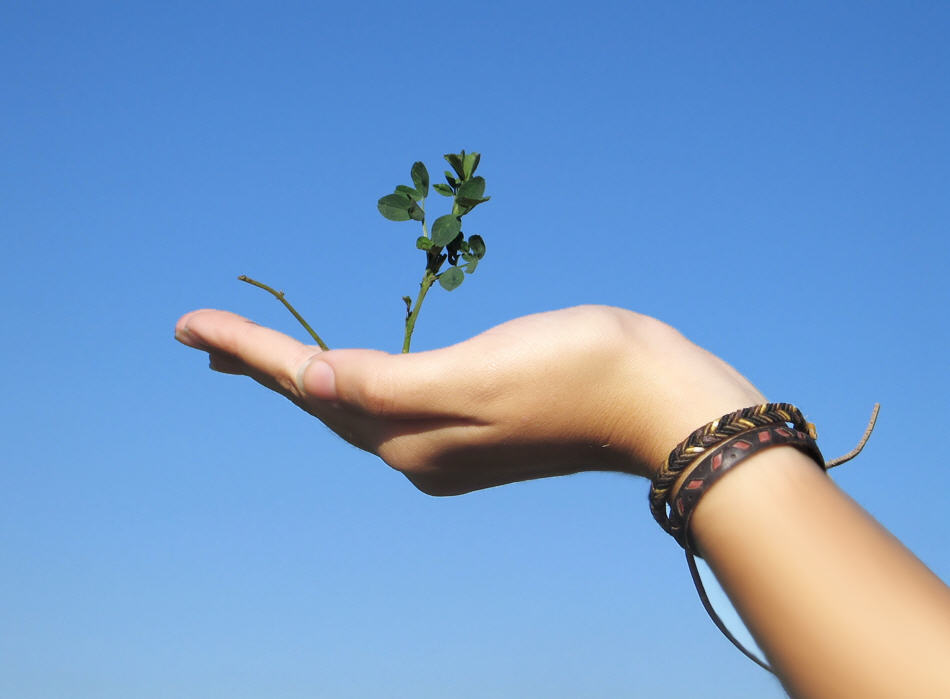
Here is a preview of the before and after effect:
Before

After

OK Let’s get started!
To complete this tutorial, we will need the following stock image:
Step 1 – Image Preparation & Observation
Load the Hand Image we just downloaded into Photoshop, and duplicate the background layer once (always a good habit, just in case something goes wrong). The resolution of this image is quite high, and that brings the attention to the hair on the forearm (especially when you zoom in):
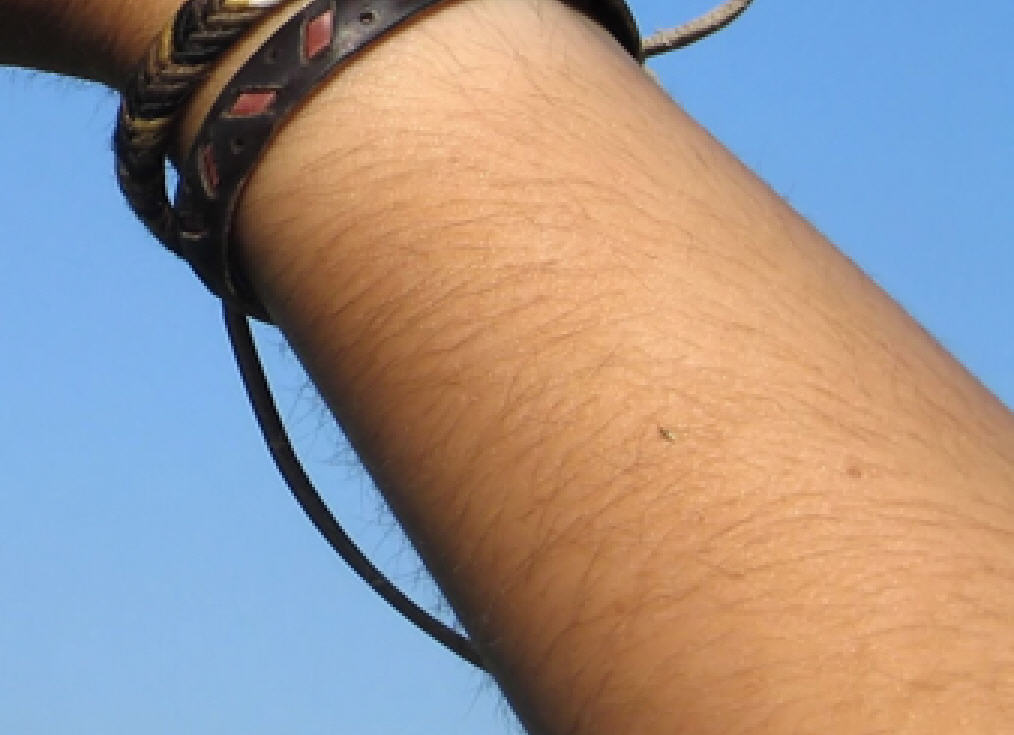
So our task here to remove them with the quickest possible method and make it as clean as possible.
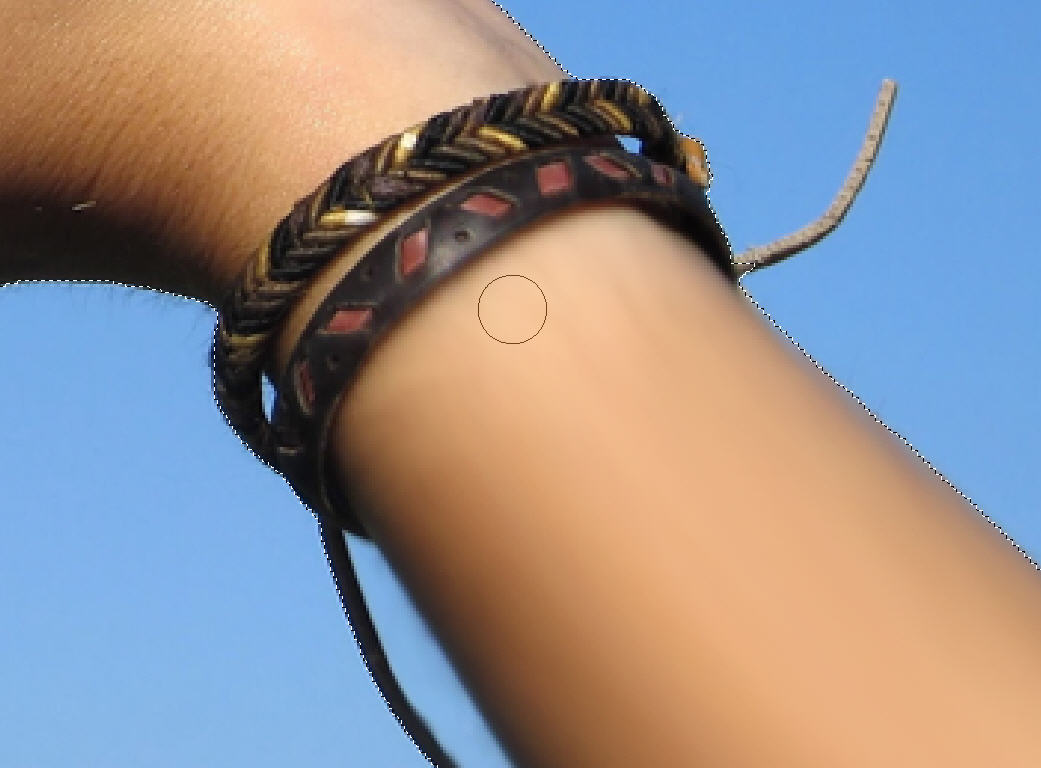
Step 2 – Select & Smudge the Arm!
We need to make a selection around the hand and the arm. The reason we do this because later on when we apply the smudge tool, we only want to apply it on the arm and hand, not anywhere else.
So we can grab the Quick Selection Tool (W key) and make a selection outside and the hand, and hit Ctrl + Shift + I to inverse the selection:

Then grab the Smudge Tool from the Toolbox and apply the following settings:


Increase the brush size to approximately the same as the width of the arm (as shown below):

Left-click and hold, and move the Brush toward the position as shown below:
You will see all the hair magically disappeared! But it doesn’t end here, we still have a bit retouch job to do to make it look better
Step 3 – Use of the Blur Tool
Address any remaining hair around the bracelet and palm using the Blur Tool. Duplicate the selected area with Ctrl + J and apply Surface Blur settings. Adjust the layer blending mode to “Screen” and reduce the opacity for a refined effect. Enhance lighting contrast with a layer mask.
Also under the palm there is a bit of hair there, we can remove them using the Blur Tool as well:

Maintain the selection, hit Ctrl + J to make a Layer via Copy and apply following Surface Blur Settings to this layer:

Change the layer blending mode of this layer to “Screen” and reduce the opacity of 60%, you will have the following effect:
Add a layer mask to this layer as shown below, this will create a better lighting contrast for the hand and make this overall image look better:

And here is the effect after apply the mask:
Body Hair Removal with AI
In this advanced section, we’ll explore how artificial intelligence can elevate the body hair removal process, providing an even more efficient and precise solution.
4.1 Choose an AI-Powered Platform
Select an online platform or software application that specializes in AI-driven image editing. Several reputable platforms offer dedicated tools for body hair removal.
4.2 Upload Your Image
Once you’ve chosen your preferred AI platform, upload the image you’ve been working on in Photoshop. These AI tools utilize sophisticated algorithms that can intelligently analyse and identify areas with body hair, providing a comprehensive solution for removal.
4.3 Customise Settings (if available)
Explore any customization options provided by the AI platform. Some platforms allow users to fine-tune settings based on their preferences. Adjust parameters such as hair thickness, skin tone, and overall image enhancement to achieve the desired outcome.
4.4 Review AI-Enhanced Results
After processing, carefully review the AI-enhanced image. AI algorithms are designed to not only remove body hair but also enhance overall image quality. Ensure that the AI has accurately identified and addressed areas with body hair without compromising the integrity of the photo.
4.5 Download Enhanced Image
Once satisfied with the AI-enhanced results, download the processed image. The downloaded file should reflect a significant improvement in body hair removal, often achieving a seamless and natural look.
Advantages of Using AI for Body Hair Removal
- Speed: AI tools can process images in seconds, saving you hours of manual work.
- Ease of Use: Many AI tools are designed for beginners, with intuitive interfaces and one-click solutions.
- Consistency: AI algorithms can apply edits uniformly across the image, reducing the risk of uneven retouching.
- Advanced Features: Some AI tools offer additional enhancements, such as skin smoothing, blemish removal, and tone adjustment.
Tips for Natural-Looking Results
Whether you’re using Photoshop or AI tools, keep these tips in mind to ensure your edits look natural:
- Avoid Over-Editing: Removing too much hair or over-smoothing the skin can make the image look unnatural.
- Preserve Skin Texture: Retain some imperfections to maintain a realistic appearance.
- Work in Layers: In Photoshop, use layers to make non-destructive edits. This allows you to adjust or revert changes if needed.
- Compare Before and After: Regularly toggle between the original and edited versions to check your progress.
OK that’s it for this tutorial! Of course the retouch won’t just stop here, there are still plenty of methods you can try out to make the picture even better.
Hope you enjoy it drop me a comment if you have any question, I will try my best to help you out.
Cheers and have a nice day!
16 Comments
It’s amazing ! I will try it …
Thank you
Hi,
Thank you for the tutorial. But I wasn’t too clear on some parts. Specifically, the part where you say Surface Blur, I couldn’t find that on the Photoshop CS3 on Mac. I used a Smart Blur instead, since that seemed to fit the picture you gave. For the step where you add a layer mask, I’m unable to draw anything on the mask. All I can do is erase stuff. Any ideas?
Thanks!
awesome tutorial, i like it…
tnx!
Very Cool. Thanks for posting.
AM
nice tut, thanks for post..
Good tut and understandable. Only problem is you turned a guy into a woman.
Thanks for an interesting lesson. After skin degradation, not bad to add noise for structure restoration. I on a site have many lessons on a retouch
Nice tip! thanks for sharing
sounds easy and effective ! thanks
Awesome thanks! This is exactly what I was looking for.
Very useful tutorial! Thanks very much for sharing!
excatly what I need!
tanx alot ;)
The method is good if you don’t mind the artificial looking result. For complete retouching some technique for adding noise, as ephoto said above, or other “restructuring” of the skin texture would be needed.
its very nice bt it need some realistic look
Very useful. Thanks for sharing
Maybe now that it’s 2017, you can also show us the steps to clean the dirty fingernail :-{