
Ranked by real-world impact – from the settings that make the biggest difference to the tweaks worth knowing. Covers Mac and Windows separately, with a full troubleshooting guide for specific slowdowns.
Photoshop 2025/2026 compatible. Screenshots are from Photoshop v27.4.0 windows. This article was last updated on 22 March, 2026 by James Qu.
| Applies To | Adobe Photoshop 2024, 2025, and 2026 (v25.x–v27.x) |
| Platform | Mac (Apple Silicon M-series & Intel) and Windows – platform differences noted throughout |
| Skill Level | Beginner to Intermediate – all settings are in Photoshop’s Preferences panel unless noted |
| Time Required | Most software tweaks take under 5 minutes each. Hardware changes are one-time investments. |
| Biggest Wins | Scratch disk (NVMe SSD), RAM allocation, GPU driver updates, and cache settings – in that order |
What Actually Slows Photoshop Down
Improving Photoshop performance is one of the most-searched topics in the Photoshop community – and one of the most poorly answered. Most guides give you the same 10 items in the same order regardless of your setup, your workflow, or your hardware. This one is different.
After 25 years of using Photoshop on everything from PowerMac G4s to M-series MacBook Pros to Windows workstations, I can tell you: not all performance tips are equal. Closing your browser tabs (the perennial Tip #8 in every listicle) will never make as much difference as getting your scratch disk configuration right. And yet both appear on most lists with equal weight.
So before the tips, here’s the honest framework: Photoshop has four performance bottlenecks, and they hit in roughly this order of impact:
- Scratch disk speed and available space – when Photoshop runs out of RAM, it writes to disk. If that disk is slow or nearly full, everything suffers. This is the most common cause of serious slowdowns.
- RAM allocation and total RAM – Photoshop needs enough RAM to keep your working file in memory. Once it spills onto the scratch disk, performance drops significantly.
- GPU availability and driver state – since Neural Filters, Generative Fill, Object Selection, and Denoise all rely on the GPU, an outdated driver or unsupported GPU can make these features unusable.
- Everything else – cache settings, history states, font loading, brush complexity. Real gains here, but smaller than the first three.
Keep that hierarchy in mind as you read. The tips are ordered by impact, not by how often they appear in other guides.
Quick Reference: All 10 Tips by Impact
| Tip | Category | Impact Level | Time to Implement |
| 1. Scratch Disk (NVMe SSD) | Hardware | ★★★★★ Critical | One-time setup |
| 2. RAM Allocation | Preferences | ★★★★★ Critical | 2 minutes |
| 3. GPU Drivers + Settings | System/Prefs | ★★★★☆ High | 5–15 minutes |
| 4. Cache Settings | Preferences | ★★★☆☆ Medium | 2 minutes |
| 5. History States | Preferences | ★★★☆☆ Medium | 1 minute |
| 6. Purge Memory | Edit Menu | ★★★☆☆ Medium (situational) | 30 seconds |
| 7. Smart Objects wisely | Workflow habit | ★★★☆☆ Medium | Ongoing |
| 8. Flatten + Merge layers | Workflow habit | ★★☆☆☆ Low–Medium | Ongoing |
| 9. Font management | Preferences | ★★☆☆☆ Low | 5 minutes |
| 10. File format choice | Save behaviour | ★★☆☆☆ Low (cumulative) | 1 minute |
1. Set Up Your Scratch Disk on a Fast NVMe SSD
| 🚀 Impact Rating: The single most impactful thing you can do. If you do nothing else on this list, do this. |
Photoshop uses a scratch disk as virtual memory — when your working file exceeds the RAM you’ve allocated, Photoshop starts reading and writing temporary data to disk. If that disk is slow, Photoshop is slow. It’s that direct.
Go to Edit > Preferences > Scratch Disks (Windows) or Photoshop > Settings > Scratch Disks (Mac).

You’ll see a list of available drives. Here’s what to prioritise:
- Best: An internal NVMe PCIe Gen 4 SSD with 50GB+ free space. Most modern Macs and mid-range-to-high-end Windows machines have this as their primary drive. This can hit 5,000–7,000 MB/s read/write speeds — fast enough that you’ll rarely notice Photoshop hitting the scratch disk at all.
- Good: An internal SATA SSD. Tops out around 500 MB/s — significantly slower than NVMe, but still dramatically better than a spinning hard disk. Perfectly usable for most workflows.
- Avoid: A traditional spinning hard disk (HDD) as the scratch disk. This single configuration issue is responsible for more ‘Photoshop is unbearably slow’ complaints than anything else. If you’re on an older desktop with a spinning drive, even a cheap SATA SSD added for scratch duty will transform performance.
- External drives: Acceptable only via Thunderbolt 3/4 or Thunderbolt 5 (achieving 3,000–6,000+ MB/s). USB 3.0 external drives are too slow for scratch disk duty. Never use the scratch disk as a project file location — copy files to a local drive before editing.
| 🍎 Mac Note: On Apple Silicon Macs (M1/M2/M3/M4), the internal SSD is always PCIe Gen 4 or faster and is the best scratch disk option. Don’t be tempted to set a second partition of the same physical drive as a scratch disk — it’s still the same drive and doesn’t help. Adobe’s recommendation to use a separate drive from the OS assumes you have multiple physical drives, which most Macs don’t. On a single-SSD Mac, your startup drive is your scratch disk — the key is keeping at least 50–100GB free on it at all times. |
| 🪟 Windows Note: On Windows, the ideal setup is two physical SSDs: your OS and apps on one (the faster NVMe), and scratch disk on the second. If you only have one drive, ensure it’s an NVMe SSD with generous free space. In Photoshop’s Scratch Disks preferences, uncheck any HDDs that might be listed — even having them as secondary scratch disks can cause Photoshop to attempt to use them. |
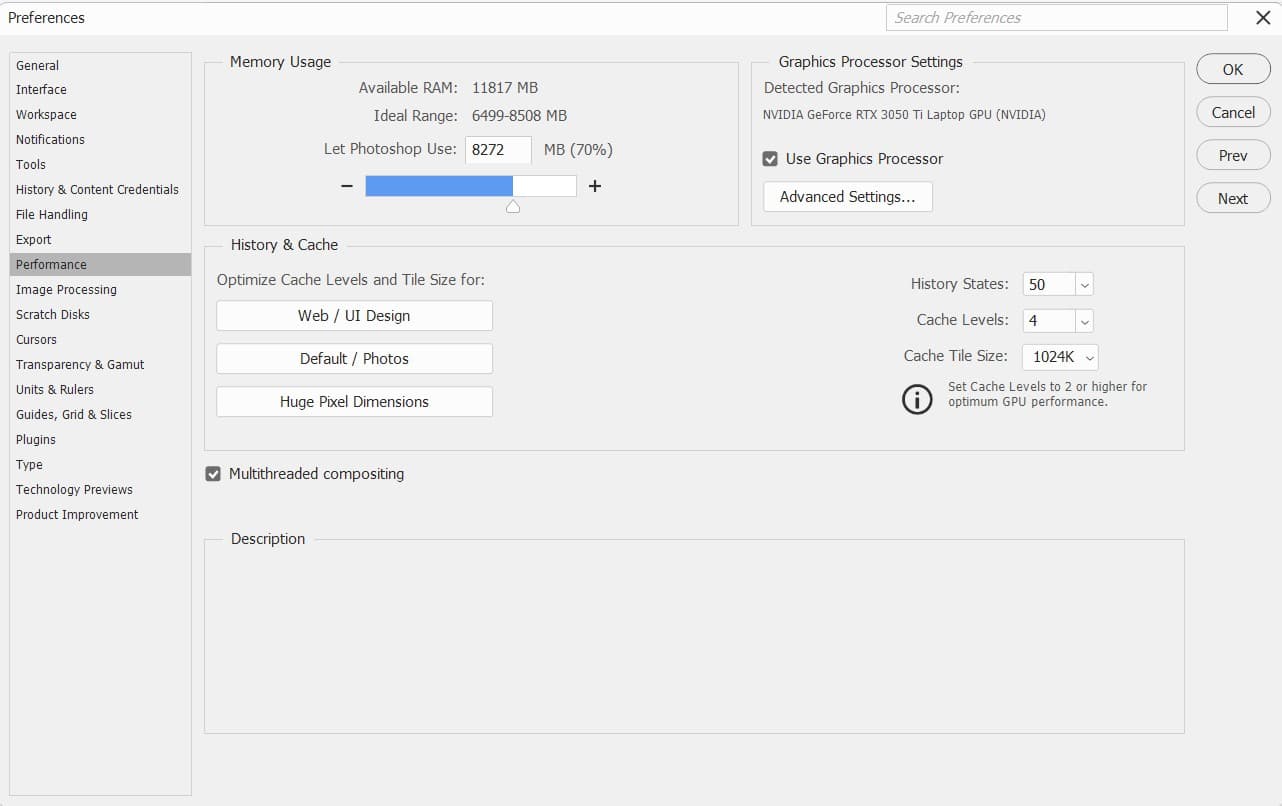
2. Set RAM Allocation Correctly for Your Workflow
| 🚀 Impact Rating: High impact — and the optimal value differs significantly between Mac and Windows. |
Go to Edit > Preferences > Performance. The Memory Usage slider controls how much of your system RAM Photoshop claims. The Efficiency Indicator at the bottom of your document window (or via Window > Info) tells you whether this allocation is working — if it reads below 100%, Photoshop is using the scratch disk and you need more RAM or a higher allocation.
Windows — Recommended RAM Allocation
- 16 GB system RAM: Set to 70% (approx 11 GB). Leave room for Windows itself and any background apps.
- 32 GB system RAM: Set to 75–80% (24–26 GB). This is the sweet spot for most professional workflows.
- 64 GB+ system RAM: Set to 80–85%. At 64 GB, even 80% gives Photoshop 51 GB — more than enough for all but the most extreme compositing work.
- Never set above 85% on Windows — Windows needs breathing room and will slow the whole system if Photoshop monopolises RAM.
Mac (Apple Silicon) — Different Rules Apply
Apple Silicon Macs use unified memory — the CPU, GPU, and RAM share the same physical memory pool. This is architecturally different from Windows and means the RAM allocation slider works differently.
- On an M-series Mac, Photoshop’s RAM allocation competes with macOS’s memory compression engine, which is very effective at making memory go further than on Windows.
- For 16 GB unified memory Macs: set Photoshop to 60–70%. macOS needs more room here than Windows does due to the unified memory architecture.
- For 32 GB unified memory Macs: set to 70–75%. The sweet spot where Photoshop is well-fed but macOS has room to manage the GPU’s share of memory.
- For 64 GB+ unified memory Macs (M-series Pro/Max/Ultra): set to 75–80%. These machines are genuinely excellent for Photoshop — the memory bandwidth of the M3 Max or M4 Ultra far exceeds even high-end Windows workstations for Photoshop’s specific memory access patterns.
3. Update GPU Drivers and Configure GPU Settings
| 🚀 Impact Rating: Critical if you use Neural Filters, Generative Fill, Denoise, Object Selection, or any AI feature — less impactful for basic editing workflows. |
Adobe’s AI-powered features — Neural Filters, Generative Fill, Remove Tool, Select Subject, AI Denoise, and Lens Blur — all rely on the GPU. If your GPU driver is outdated, these features will either run on your CPU (much slower) or fail entirely with an error message.
Confirming GPU is Active
Go to Edit > Preferences > Performance (Windows) or Photoshop > Settings > Performance (Mac). Under Graphics Processor Settings, confirm ‘Use Graphics Processor’ is checked and your GPU name appears. If you see ‘GPU not detected’ or the checkbox is greyed out, your GPU isn’t being used.

GPU Mode Setting (Photoshop 2026)
In newer Photoshop versions, you’ll see a ‘Faster’ vs ‘More Stable’ GPU processing option under Advanced Settings. In general:
- Faster: Uses more aggressive GPU scheduling. Choose this if your GPU is modern (RTX 30-series or newer on Windows, any M-series Mac) and your drivers are up to date. You’ll notice quicker Neural Filter processing and smoother canvas interaction.
- More Stable: Falls back to safer rendering paths. Choose this if you’re experiencing crashes, black previews, or artefacts on the canvas after GPU operations. Also recommended for older GPUs (pre-2018).
Windows — Updating GPU Drivers
- NVIDIA: Download drivers from nvidia.com/drivers — choose ‘Game Ready Driver’ for consumer cards or ‘Studio Driver’ for professional creative workflows (Studio Drivers are more stable for Adobe apps at the cost of slightly lower gaming performance).
- AMD: Download from amd.com/support. Install Adrenalin Edition software for the full feature set.
- Intel (integrated graphics): Update via Intel Driver & Support Assistant (downloadable from intel.com). Integrated Intel graphics can run Photoshop’s basic features but lacks the VRAM for Neural Filters — if this is your situation, GPU-accelerated AI features will be slow or unavailable.
| 🍎 Mac Note: Mac users: GPU drivers on macOS are maintained by Apple through system updates, not Adobe or GPU manufacturers. Keeping macOS updated IS keeping your GPU drivers updated. On Apple Silicon, the Metal GPU framework that Photoshop uses is tightly integrated with the OS — always run the latest macOS version compatible with your machine for best Photoshop GPU performance. On Intel Macs with AMD Radeon GPUs, the same applies. |
Minimum GPU Requirements for AI Features
- Windows: DirectX 12 compatible GPU, minimum 4 GB VRAM (8 GB recommended for 4K or complex Neural Filter work). NVIDIA RTX cards with Tensor Cores (RTX 20-series and above) accelerate neural processing — RTX 4070 and above are 25–40% faster at Neural Filters than older GTX cards with equivalent VRAM.
- Mac: Metal-compatible GPU, minimum 1.5 GB VRAM (4 GB for 4K). All Apple Silicon Macs meet this requirement. Older Intel Macs with integrated Intel Iris graphics may struggle with AI features.
4. Match Cache Settings to Your Actual Workflow
| 🚀 Impact Rating: Medium impact — the wrong cache preset visibly slows specific workflows. |
Cache settings control how Photoshop stores preview data for your document at different zoom levels. Go to Edit > Preferences > Performance > History & Cache.

You’ll see three presets — and the right choice depends on what you’re actually editing:
- Web / UI Design (small documents, many layers): Cache Levels 2, Cache Tile Size 128K. Lower cache levels mean Photoshop redraws from scratch more often, but for small documents this is fast. The priority here is responsiveness when switching between many layers.
- Default / Photo Editing (medium documents, moderate layers): Cache Levels 4, Cache Tile Size 1024K. This is the balanced preset for most portrait retouching, product photography, and general editing work on files up to around 500 MB.
- Huge Pixel Dimensions (large composites, high-megapixel cameras, panoramas): Cache Levels 6, Cache Tile Size 1024K. Higher cache levels mean Photoshop pre-renders more zoom levels in memory, so zooming and panning on a massive file stays smooth. The trade-off is slower initial load time.
| 💡 Pro Tip: After changing cache settings, you must restart Photoshop for them to take effect. Also note: if you regularly switch between very different types of work (say, web UI in the morning and high-res compositing in the afternoon), it’s worth keeping a note of which preset to switch to. A dedicated preset switcher shortcut doesn’t exist natively, but the Preferences change takes under a minute. |
5. Reduce History States — But Not to Zero
| 🚀 Impact Rating: Medium impact, especially on RAM-limited systems. Most people have this set far higher than they need. |
Every history state consumes RAM and scratch disk space. Photoshop’s default of 50 states is excessive for most workflows. Each state stores a complete record of your image at that point — on a large, multi-layer composite, a single history state can be several hundred megabytes.
Go to Edit > Preferences > Performance > History & Cache and set History States to:
- 20 states: Sufficient for most workflows. You can still undo 20 consecutive actions, which covers the vast majority of real editing mistakes.
- 30 states: Good compromise if you work in exploratory, experiment-heavy sessions where you frequently undo long sequences of actions.
- 10 states: Aggressive but useful on systems with 16 GB RAM or less. Compensate by saving snapshots at key milestones (bottom of History panel → camera icon).
| 💡 Pro Tip: The professional alternative to relying on history states is non-destructive editing. Using adjustment layers, Smart Objects, and Smart Filters means you rarely need to undo more than a few actions — because most of your editing decisions remain editable at any time. Building this habit reduces the RAM cost of history states while actually giving you more flexibility than undo history provides. |
6. Purge Memory During Long Sessions
| 🚀 Impact Rating: Situational — high impact when Photoshop has accumulated bloated temporary data, negligible otherwise. |
During a long editing session, Photoshop accumulates clipboard data, undo history, and cached video frames that remain in memory even when you no longer need them. Over a 3–4 hour session this can amount to gigabytes of stale memory that’s slowing every operation.
Go to Edit > Purge > All. This clears the Undo buffer, Clipboard, History, and Video Cache simultaneously. A few important caveats:
- Purge All is irreversible — you will lose all undo history for the current session. Save your work first, and only purge when you’re at a stable point in your editing.
- Purge just the Clipboard separately (Edit > Purge > Clipboard) if you’ve recently copied a large image selection and no longer need it. Clipboard data is often overlooked but can hold a surprisingly large amount of RAM.
- Do not automate Purge blindly — the original article suggested automating purging via scripts. This is risky unless you know exactly what you’re scripting. Accidentally purging history mid-session destroys your safety net.

| 📌 James’ Note: In practice, I find that saving the file and restarting Photoshop achieves a cleaner memory purge than Edit > Purge — it completely reinitialises the application’s memory state. If you’re running a session-heavy day, a lunchtime Photoshop restart (with your file saved) will often feel more noticeably snappy when you return than any in-session purge. |
7. Use Smart Objects Strategically, Not Universally
| 🚀 Impact Rating: Medium — Smart Objects are powerful but have a RAM cost that most guides don’t mention. |
Smart Objects are one of Photoshop’s most powerful features — they preserve original pixel data, allow non-destructive transformations, and support Smart Filters. But they come with a performance cost that’s worth understanding before you make everything a Smart Object.

When Smart Objects help performance
- Embedded placed files that you frequently transform (scale/rotate/warp) — Photoshop recalculates from original data instead of re-interpolating degraded pixels.
- Complex layer structures that you repeat across a document — linking Smart Objects means Photoshop only stores the data once.
- Camera Raw and Lightroom imports — opening as Smart Objects lets you return to Camera Raw settings at any time.
When Smart Objects hurt performance
- When you have many large Smart Objects in one document: each one stores its original pixel data separately inside the PSD, dramatically increasing file size and the RAM needed to manage it. A document with 20 large embedded Smart Objects can be 3–5x the file size of the same document with rasterised layers.
- When applying filters that need to update frequently: Smart Filters on a very large Smart Object update more slowly than the same filter on a regular layer, because Photoshop has to decompress, filter, and recompress the Smart Object data each time.
| 💡 Pro Tip: The professional workflow: use Smart Objects for the elements you know you’ll need to revisit (placed assets, Camera Raw files, repeated elements). Rasterise Smart Objects once you’ve committed to a layer’s transformation and are sure you won’t need to re-edit it. Right-click the layer → Rasterize Layer. This frees the memory stored in the Smart Object container while keeping the visual result. |
8. Flatten and Merge Layers on Completed Work
| 🚀 Impact Rating: Low to medium — significant on complex layer-heavy documents, minimal on clean layer structures. |
Layer count directly affects Photoshop’s memory usage, screen redraw time, and save/load speed. A document with 200 layers — including many that are no longer being actively edited — performs noticeably worse than the same visual result with 30 well-organised layers.
The habit to build: at the end of each working phase, identify layers that are complete and won’t be changed, and merge them.
- Merge visible but keep the original (safety technique): Stamp Visible layers with Shift+Ctrl/Cmd+Alt/Opt+E. This creates a merged composite layer on top without deleting the individual layers below. Hide the individual layers and work from the stamp. If you need to revisit, delete the stamp and unhide the originals.
- Merge related groups: right-click a layer group → Merge Group. This reduces a folder of 15 layers to a single layer while preserving the visual output. Only do this once the group’s contents are final.
- Flatten for export: before exporting a final image for delivery, flatten the document (Image > Flatten Image) and save as a copy (File > Save a Copy). Never flatten your master PSD.

9. Manage Active Fonts to Speed Startup and Text Operations
| 🚀 Impact Rating: Low but noticeable – especially on startup time and when using Dynamic Text features. |
Photoshop loads and indexes every active font on your system at startup. With thousands of fonts installed — which is common if you’ve accumulated free font packs over the years – this adds 30–90 seconds to startup time and slows any text-related operation.
Quick wins
- Disable font previews: Type > Font Preview Size > None. This stops Photoshop rendering every font in its own typeface in the font picker dropdown — a small thing that meaningfully speeds up text tool interactions on large font libraries.
- Use a font manager: FontBase (free) and Suitcase Fusion (paid) let you activate only the fonts needed for a specific project. Deactivating fonts system-wide reduces what Photoshop has to index. On Mac, Font Book (built in) lets you disable large font collections with a click.
- Remove font duplicates: Font Book on Mac (File > Resolve Duplicates) and NexusFont on Windows can identify and remove duplicate font installations, which cause both slowdowns and unexpected rendering conflicts in Photoshop’s text engine.

10. Use Efficient File Formats Throughout Your Workflow
| 🚀 Impact Rating: Low to medium — cumulative time savings across many saves/loads and significantly reduced storage requirements. |
File format choice affects two performance factors: how long Photoshop takes to save and load files, and how much scratch disk space working files consume. Both matter over the course of a working day.
During Active Editing
- PSB (Large Document Format) for files over 2GB: PSD files cap at 2 GB. If your work regularly exceeds this (panoramas, high-megapixel composites, print production files), PSB is the correct format — it removes the size ceiling and is handled identically to PSD by Photoshop.
- PSB/PSD compression setting: Photoshop offers RLE compression for PSD files by default. For very large files, turning off compression (Preferences > File Handling > Disable Compression of PSD and PSB files) can speed up saves at the cost of larger file sizes — worth it if save time is a bottleneck in your workflow.
For Export and Delivery
- AVIF for web images: File > Export > Export As, choose AVIF. At equivalent visual quality, AVIF files are typically 40–60% smaller than JPEG. This matters for web performance. Quality setting of 75–85 gives excellent results for most web images.
- JPEG XL for high-quality delivery: Better compression than JPEG with lossless options. Growing support among browsers and platforms — check your target platform’s compatibility before committing to JPEG XL for client delivery.
- WebP for web-optimised assets: Excellent browser support (all modern browsers), good compression. A reliable middle ground if AVIF isn’t yet supported on your target platform.
| ⚠ Watch Out: The original article listed saving in AVIF/JPEG XL as a ‘performance tip’ for Photoshop itself — this is slightly misleading. These formats reduce file sizes and improve web loading speed, but they don’t make Photoshop run faster. They’re valuable for a different reason: smaller exported files mean faster upload to clients, less storage used, and faster website load times. Worth doing, but keep the reason clear. |
MAC vs WINDOWS: PLATFORM-SPECIFIC PERFORMANCE DIFFERENCES
The performance advice above applies to both platforms with noted exceptions. Here’s a consolidated comparison of where the platforms differ significantly:
Apple Silicon Macs (M1/M2/M3/M4) — Unique Characteristics
- GPU is not upgradeable — unlike Windows desktops, you can’t swap in a better GPU. When buying an Apple Silicon Mac for Photoshop, get the highest GPU configuration you can afford at purchase time. The M3 Max and M4 Max variants have substantially more GPU cores than base models.
- Unified memory is efficient but finite — Apple Silicon’s unified memory means the GPU and CPU share the same RAM pool. 16 GB is workable but tight for large compositing; 32 GB is the practical minimum for professional AI-heavy Photoshop work in 2026.
- No scratch disk benefit from secondary drives in most Macs — MacBook Air, MacBook Pro (base), and Mac Mini (base) typically have a single internal SSD. There’s no separate drive to designate as a scratch disk. Keep your primary SSD with 100 GB+ free space.
- Photoshop is natively compiled for Apple Silicon — there’s no Rosetta translation overhead. Photoshop runs as a native ARM application on M-series Macs, which is part of why even the base M1 often outperforms older Intel Macs with far more impressive specs on paper.
Intel Macs — Specific Advice
- If you’re on a 2019 or older Intel Mac, the biggest performance improvement available to you (short of a new machine) is a scratch disk SSD upgrade where possible, followed by maxing out RAM. These machines are increasingly constrained by lack of native Apple Silicon optimisation and will see diminishing returns from software tweaks.
- Dedicated AMD Radeon GPUs in Intel iMacs and older MacBook Pros are supported via Metal and handle Photoshop GPU features well. Keep macOS updated to ensure Metal driver support remains current.
Windows — Specific Advantages
- Upgradeable components — the biggest Windows performance advantage is flexibility. You can add a dedicated scratch disk SSD, upgrade RAM, or swap in a newer GPU independently. A mid-range Windows desktop PC with 32 GB RAM, an NVMe SSD, and an RTX 4060 significantly outperforms a base-spec MacBook Pro for Photoshop at a lower total cost.
- GPU driver control — Windows users can choose between Game Ready and Studio drivers. For Photoshop specifically, NVIDIA Studio Drivers are tested and validated against Adobe Creative Cloud applications and are worth using if you don’t also game seriously on the same machine.
- DirectX 12 mode in Photoshop (D3D12) — this is the preferred GPU rendering mode on Windows and gives Photoshop access to the most modern GPU capabilities. If you’re running an older GPU that doesn’t support D3D12, you’ll fall back to Software rendering mode and lose GPU acceleration for most features.
Lastly, troubleshooting: Specific Slowdown Symptoms and Fixes
Generic ‘Photoshop is slow’ advice is rarely helpful. Here’s a symptom-based guide to the most common specific slowdowns:
| Symptom | Most Likely Cause | Fix |
| Brush lag / cursor delay | GPU not active or driver outdated | Enable GPU in Preferences > Performance; update GPU drivers; check GPU mode (try ‘More Stable’) |
| Neural Filters taking minutes to complete | GPU not being used; insufficient VRAM | Confirm GPU is active; VRAM must be 4 GB+ for neural processing; update drivers |
| ‘Scratch disk is full’ error on startup | Scratch disk drive has under 2 GB free space | Free up space on scratch disk drive or assign a different drive in Scratch Disk preferences |
| Extremely slow save times on large PSDs | File exceeds 2 GB cap / compression overhead | Switch to PSB format; consider disabling PSD compression in Preferences > File Handling |
| Photoshop startup takes 2–3+ minutes | Too many active fonts indexed | Reduce active fonts; disable font previews; check for font conflicts with Font Book (Mac) |
| Slow after several hours of use | Memory fragmentation / stale cache | Edit > Purge > All; save and restart Photoshop |
| Canvas freezes when zooming on large files | Cache level too low for document size | Increase cache levels in Preferences (use ‘Huge Pixel Dimensions’ preset) |
| Generative Fill / AI Denoise requires internet and is slow | Cloud processing dependency | Ensure stable fast connection (50 Mbps+); these features cannot run fully offline |
| Out of memory errors despite 32 GB RAM | RAM allocation % too low or too many concurrent documents | Raise RAM allocation slider 5% increments; close unused Photoshop documents |
| Black flashes or artefacts on canvas | GPU instability or driver conflict | Switch GPU mode to ‘More Stable’ in Advanced GPU settings; roll back GPU driver if recent update |