")
In this tutorial, I’ll show you how to create a scene in Photoshop where a fleet of ships faces an attack from a sea monster while sailing through uncharted waters.
The PSD file of this tutorial is available via the PSD Vault VIP members area.
This is an intermediate level difficulty tutorial and can be a bit tricky to complete, but why not have a try!
Here is a preview of the final effect I have for this tutorial: (click to enlarge)

PSD Vault VIP Membership
You can download the PSD File for this tutorial via the VIP Members Area for only $6.95/Month (or less)! You will not only get this PSD File, but also 250+ other PSD Files + Extra Goodies + Exclusive Photoshop tutorials there. Signup now and get exclusive!

OK Let’s get started!
To complete this tutorial, you will need the following stocks:
Sky by cosmicspark
Rock (Pick 1 from the list)
Water Splash Brushes by redheadstock
Step 1
Create a new document sized 1440px * 750px with black background. Load the Sky stock image into Photoshop and select it, copy and paste the selection to our canvas. Use the free transform tool to adjust the size of the Sky layer to fit our canvas. Then, use a soft eraser to remove parts of the sky as shown below:

Load the Ocean stock image into Photoshop and select the following section of the ocean:

Copy and paste the selection to our document, use a soft eraser to fade the edges of the ocean:

Apply the following adjustment layers as clipping masks to this ocean layer:
Black & White
Levels

and here is the effect so far:

Step 2
Load the Cliff stock image into Photoshop and select the cliff:

Copy and paste the selection to our canvas, place it at the position shown below:

Use the Burn tool with the following setting, darken parts of the cliff:
![]()

Apply the following Black and White adjustment to remove the colours of the cliff:

Repeat the above process, and add 2 more cliffs to our canvas. Make sure you adjust each cliff’s size and shape using the free transform tool, so they don’t look exactly the same:

Step 3
Load the Rock stock image into Photoshop. I used the following stock from the download link at the beginning of this tutorial, but you can any stock you like from that download page. Select a portion from the rock stock image:


Step 4
Still using the Rock stock image, select a few smaller pieces and add them to the following position, above the ocean. Remove the colours of the rock layers using Black and White adjustment:

Use a cloud/smoke brush, gently paint some cloud effect around the cliff and above the ocean. These cloud will add dramatic effect to the shipwrecks that we will be adding into the next step:

Step 5
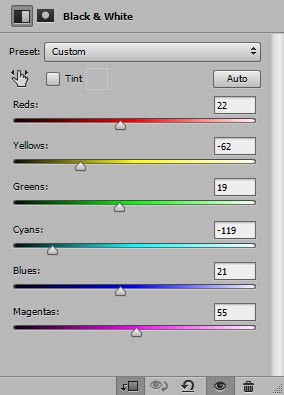
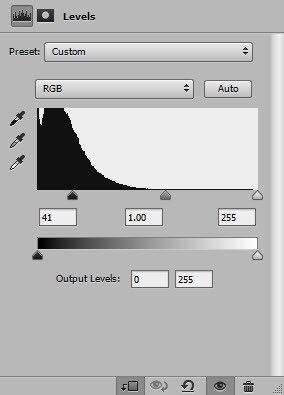
Load the “Ship 1” stock image into Photoshop and select the ship:
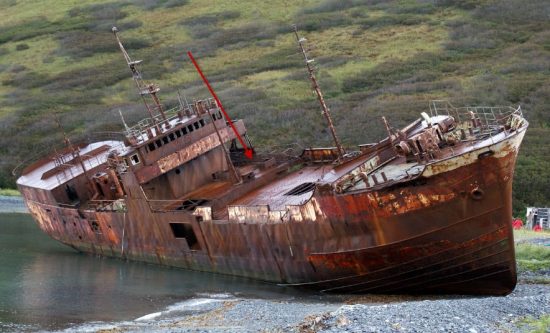
Copy and paste the selection to our document, resize and place it to the following position:

Apply the following adjustment layer as clipping mask to this ship layer:
Black and White

Levels

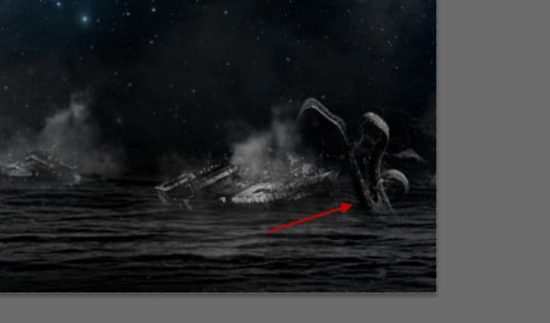
and here is the effect so far:

Repeat the above process, add a few more ships onto the ocean. Adjust their size and layer opacity accordingly:

Step 6
Load the “Ship 2” stock image into Photoshop and make a selection of the ship: (doesn’t matter if your selection is a bit rough)

Copy and paste the selection to our canvas, place it onto the following position. Flip the ship horizontally:

Apply the following adjustment layers as clipping masks to this new ship layer:
Black and White

Levels
and here is the effect so far:

Repeat the above process and add another same but smaller ship to the following position:

Use a cloud brush to paint some extra cloud around the ships:

Step 7
We will be using an Octopus as our monster in this step. Load the Octopus stock image into Photoshop, select the Octopus and paste it to the following position. Flip the layer horizontally and rotate it slightly clock-wise:

Apply the following adjustment layers as clipping mask to this Octopus layer:
Black and White (set layer opacity to around 75%)

Levels

Fade the parts where Octopus connects with the cliff using a soft eraser, and here is the Octopus so far:

I further added a couple Octopus Tentacles in the ocean (with colours removed):

Here is the overall effect:

Step 8
In this final step, I’m adding a couple of water splash around the tentacles using the splash brushes downloaded at the beginning of the tutorial:


Also added some particles effect around the ships using a particle brush:

I then apply some colours to the image using a number of image adjustment layers such as color balance, selective color and hue. This is my final result: (click to enlarge)
That’s it for this tutorial! Hope you enjoy it and find it useful! If you have any questions about the steps, please contact me or leave a comment below. I will try my best to answer them.
Till next time, have a great day!
1 Comment
Very good Photoshop tutorial! The composition, the color tones, the blending techniques, I like all :)