Close Menu
PSD VaultPSD Vault
  • VIP Area
  • Photoshop Basics
  • Photo Effect
  • Text Effect
  • Premium Tuts
  • Resources
  • Drawing
  • Inspiration
  • Web Graphics
  • Abstract
  • Freebies
  • Advertise
  • Get in Touch
  • About PSD Vault
Facebook Instagram Pinterest YouTube TikTok
Facebook Instagram Pinterest YouTube TikTok RSS
PSD VaultPSD Vault
  • VIP Area
    • Sign Up
    • Log In
  • Photoshop Basics
  • AI
  • Photoshop Error Fixes
  • Video Tutorial
  • Photo Effect
  • Text Effect
  • Premium Tuts
  • Drawing
  • Opinion
PSD VaultPSD Vault
Home»Basics»How to Blend Cut-Out Objects Seamlessly with AI Harmonize in Photoshop
Basics

How to Blend Cut-Out Objects Seamlessly with AI Harmonize in Photoshop

By James QuDecember 17, 20253 Mins Read
Share
Facebook Twitter LinkedIn Pinterest Email

Photoshop’s Harmonize feature is a beginner-friendly AI powerhouse that automatically blends cut-out objects or people into new backgrounds. It intelligently adjusts colour, lighting, shadows, and tone for realistic results—perfect for quick composites without manual curves or masks.

In this tutorial, we’ll place a cut-out person into a scenic background and let AI do the heavy lifting. Ideal for beginners wanting pro-looking blends fast!

What You’ll Need

  • Adobe Photoshop (2025 version or later, with Harmonize enabled—available on desktop and web)
  • Two images: a background scene and a subject to cut out (e.g., a person on a plain background)

Let’s Get Started!

Step 1: Open Your Background Image

Launch Photoshop and open your background image (File > Open). This will be the base layer for your composite.

Step 2: Add Your Cut-Out Object

Go to File > Place Embedded and select your subject image (the object/person to blend). It appears on a new layer above the background. Resize and position it using the Transform handles (Ctrl/Cmd + T).

Add Your Cut-Out Object

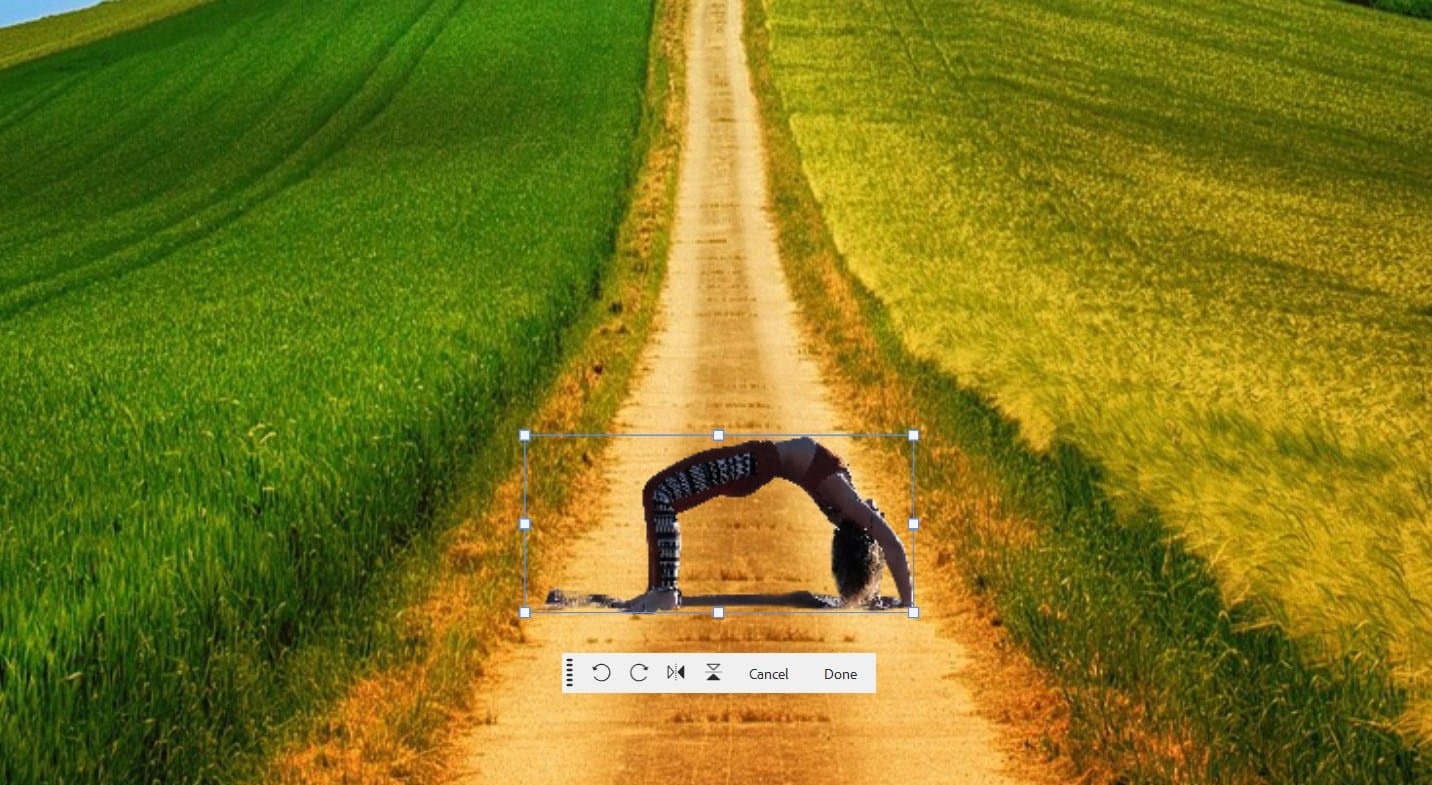
Step 3: Remove the Object’s Background (If Needed)

If your subject has a background, select its layer in the Layers panel. In the Contextual Task Bar (top of the screen), click “Remove Background”—Photoshop’s AI instantly isolates the object.

Remove Background in the contextual task bar

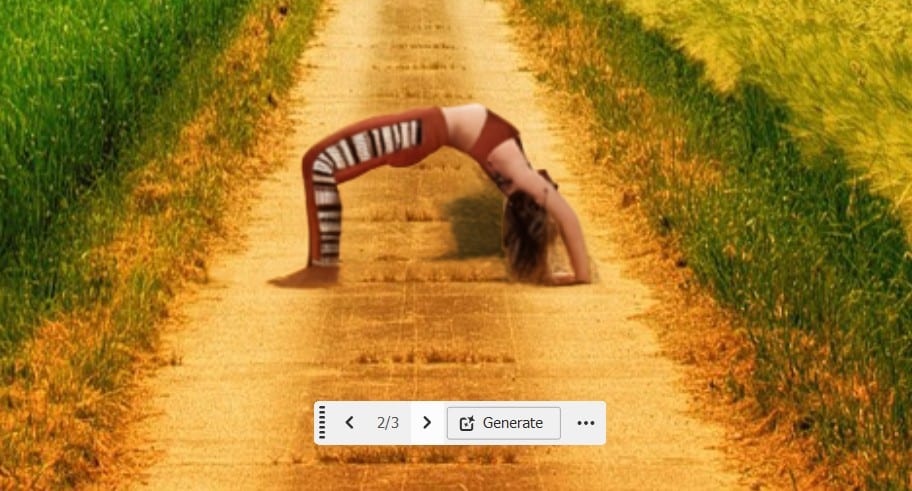
Step 4: Apply Harmonize

With the subject layer selected, look for “Harmonize” in the Contextual Task Bar and click it. Photoshop’s AI analyses the scene and generates variations (usually three options). Preview them in the Properties panel.

Apply Harmonize

Step 5: Choose Your Best Variation

Click your favourite variation—AI applies adjustments for lighting, colour, shadows, and edges. If not perfect, click “Generate” again for more options. The result appears on a new layer for non-destructive editing.

Choose Your Best Variation

Step 6: Refine Manually (Optional for Beginners)

For extra polish, add a layer mask to the harmonised layer and paint subtle tweaks with a soft brush. In this case, I painted some extra shadow under the model subject:

Refine Manually

Step 7: Finalise and Export

Compare by toggling layer visibility. Save as PSD for future edits, then export (File > Export > Export As) as PNG for transparency or JPG for sharing.

A Few Pro Tips for Beginners

  • Best Results: Use realistic photos with similar perspectives – AI shines on people/objects against varied backgrounds.
  • Credits Note: Harmonize uses a few generative credits (check your plan).
  • Fallback: If variations aren’t ideal, try repositioning the object first.

Why Use Harmonize?

This AI tool turns clunky cut-and-paste jobs into seamless magic in seconds – no advanced skills required. Great for social media edits, fun composites, or quick client mocks. Experiment on your next project and share your blends in the comments!

ai harmonise
Share. Facebook Twitter Pinterest LinkedIn Tumblr Email
James Qu
  • Website

James is a seasoned Photoshop expert with over 25 years of experience based in Australia. As the driving force behind PSD Vault, he authors the majority of its in-depth tutorials and insightful articles.

Related Posts

Unlock the Power of Photoshop’s Generative Expand Tool

February 13, 2026

How to Use “Find Distractions” Feature in Photoshop for Easy Photo Clean-up

February 13, 2026

How to Refine Adobe Firefly Generations Directly in Photoshop with Firefly History

February 12, 2026

Comments are closed.

Don't Miss

Unlock the Power of Photoshop’s Generative Expand Tool

February 13, 2026

How to Use “Find Distractions” Feature in Photoshop for Easy Photo Clean-up

February 13, 2026

How to Refine Adobe Firefly Generations Directly in Photoshop with Firefly History

February 12, 2026

For Beginners

Basics

How to Use “Find Distractions” Feature in Photoshop for Easy Photo Clean-up

By James QuFebruary 13, 20265 Mins Read

How to Stay Ahead of Every Photoshop Update & Unlock Their Full Power

February 8, 2026

Dodge & Burn Tool in Photoshop – The Beginner’s Guide

January 24, 2026

How to Pixelate an Image in Photoshop

January 21, 2026

You May Also Like

AI

Unlock the Power of Photoshop’s Generative Expand Tool

By Lana WilsonFebruary 13, 20264 Mins Read
Basics

How to Use “Find Distractions” Feature in Photoshop for Easy Photo Clean-up

By James QuFebruary 13, 20265 Mins Read
AI

How to Refine Adobe Firefly Generations Directly in Photoshop with Firefly History

By Lana WilsonFebruary 12, 20263 Mins Read
Facebook X (Twitter) Instagram Pinterest
  • About Us
  • Get in Touch
  • Advertise
  • VIP Area
  • Privacy Policy
  • Terms & Conditions
© 2026 PSD Vault. All Right Reserved.

Type above and press Enter to search. Press Esc to cancel.

Manage Consent
To provide the best experiences, we use technologies like cookies to store and/or access device information. Consenting to these technologies will allow us to process data such as browsing behavior or unique IDs on this site. Not consenting or withdrawing consent, may adversely affect certain features and functions.
Functional Always active
The technical storage or access is strictly necessary for the legitimate purpose of enabling the use of a specific service explicitly requested by the subscriber or user, or for the sole purpose of carrying out the transmission of a communication over an electronic communications network.
Preferences
The technical storage or access is necessary for the legitimate purpose of storing preferences that are not requested by the subscriber or user.
Statistics
The technical storage or access that is used exclusively for statistical purposes. The technical storage or access that is used exclusively for anonymous statistical purposes. Without a subpoena, voluntary compliance on the part of your Internet Service Provider, or additional records from a third party, information stored or retrieved for this purpose alone cannot usually be used to identify you.
Marketing
The technical storage or access is required to create user profiles to send advertising, or to track the user on a website or across several websites for similar marketing purposes.
  • Manage options
  • Manage services
  • Manage {vendor_count} vendors
  • Read more about these purposes
View preferences
  • {title}
  • {title}
  • {title}