Close Menu
PSD VaultPSD Vault
  • VIP Area
  • Photoshop Basics
  • Photo Effect
  • Text Effect
  • Premium Tuts
  • Resources
  • Drawing
  • Inspiration
  • Web Graphics
  • Abstract
  • Freebies
  • Advertise
  • Get in Touch
  • About PSD Vault
Facebook Instagram Pinterest YouTube TikTok
Facebook Instagram Pinterest YouTube TikTok RSS
PSD VaultPSD Vault
  • VIP Area
    • Sign Up
    • Log In
  • Photoshop Basics
  • AI
  • Photoshop Error Fixes
  • Video Tutorial
  • Photo Effect
  • Text Effect
  • Premium Tuts
  • Drawing
  • Opinion
PSD VaultPSD Vault
Home»Basics»How Do Photoshop’s Various Sharpening Tools Differ, and When Should Each Be Used
Basics

How Do Photoshop’s Various Sharpening Tools Differ, and When Should Each Be Used

By James QuJanuary 11, 20254 Mins Read
Share
Facebook Twitter LinkedIn Pinterest Email

Photoshop has a variety of sharpening tools. Each tool has its own unique strengths. Understanding these tools is critical to achieving the best results in your image editing. Let’s explore the different sharpening options available in Photoshop 2024 and when to use each one.

The Sharpen Tool: Quick and Targeted

The Sharpen Tool is perfect for quick, localized adjustments. It’s easy to use and allows for precise control over specific areas of your image.

To use the Sharpen Tool, select it from the toolbar:

Sharpen tool location

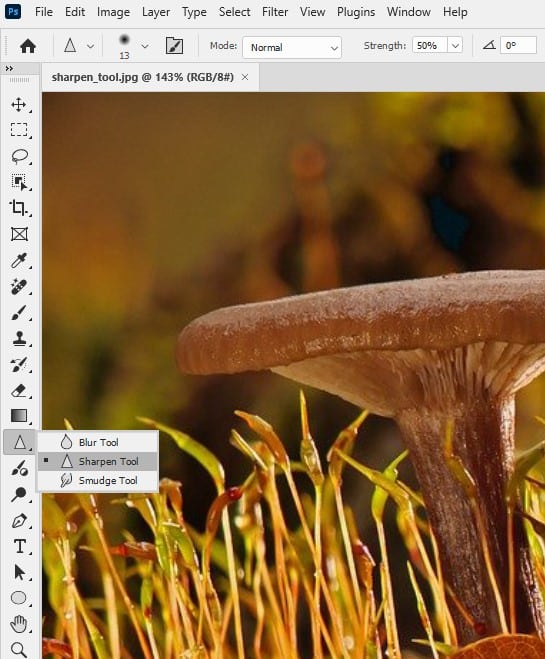
Then, simply paint over the areas you want to sharpen. The more you paint, the sharper the area becomes. This tool is ideal when you need to enhance small details or specific parts of an image. For instance, you might use it to bring out the texture in a subject’s eyes or hair. However, be cautious not to overuse this tool. Excessive sharpening can lead to a grainy look in your photos.

Unsharp Mask: Traditional and Reliable

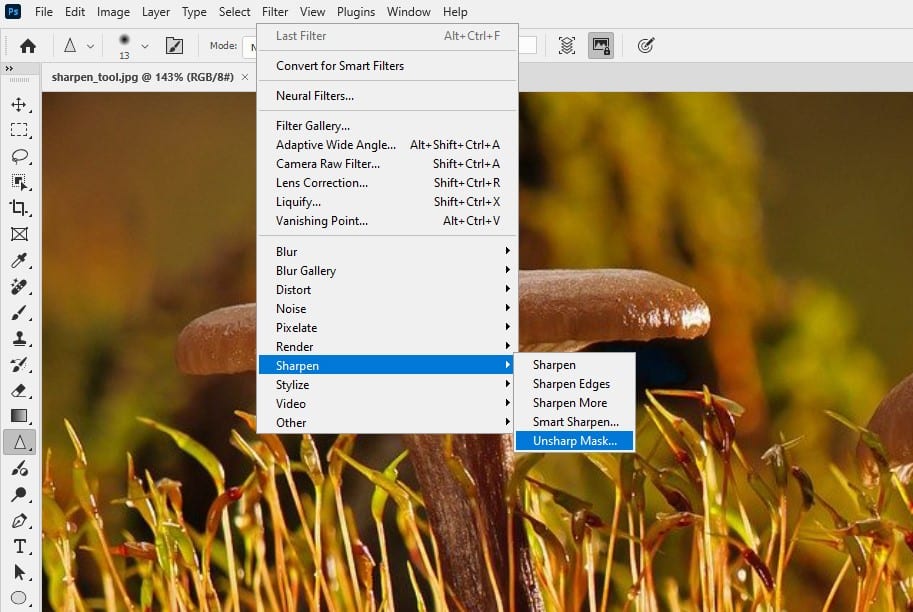
The Unsharp Mask filter is a classic sharpening tool. Despite its name, it actually sharpens images rather than making them unsharp.

To use Unsharp Mask, go to Filter > Sharpen > Unsharp Mask:

Unsharp Mask menu location

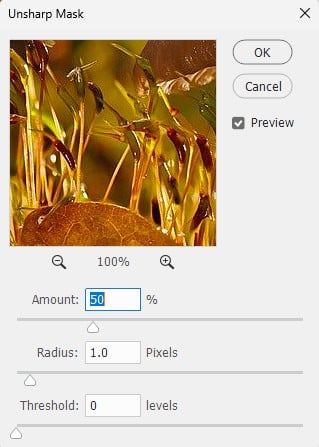
You’ll see three main controls:

  1. Amount: This sets the sharpening intensity.
  2. Radius: This determines how many surrounding pixels are affected.
  3. Threshold: This controls which pixels are sharpened based on tonal difference.
unsharp mask controls

Unsharp Mask is great for overall image sharpening. It’s particularly useful for output sharpening before printing or web display.

Smart Sharpen: Advanced Control

Smart Sharpen offers more control than Unsharp Mask. It allows you to set the sharpening algorithm and control sharpening in shadow and highlight areas.

smart sharpen menu location

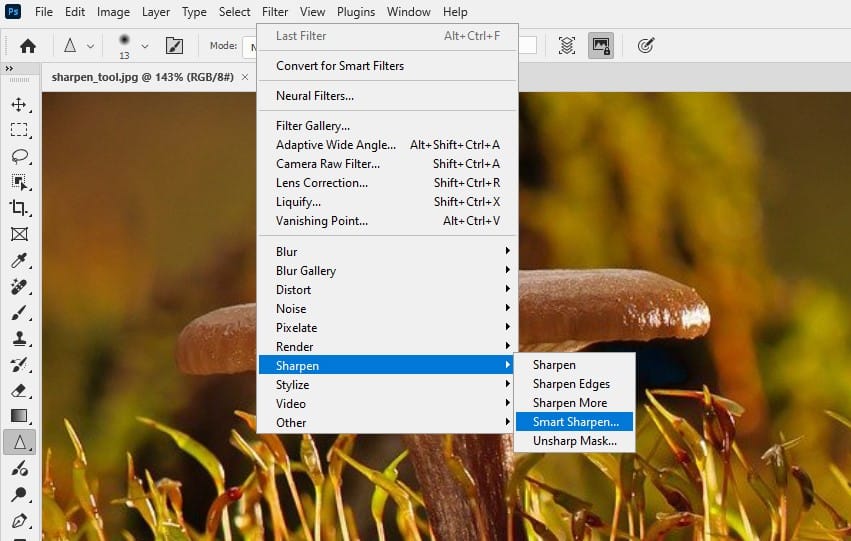
To access Smart Sharpen, go to Filter > Sharpen > Smart Sharpen. You’ll find controls for:

  1. Amount: Sets the sharpening intensity.
  2. Radius: Determines the number of pixels affected.
  3. Reduce Noise: Helps maintain image quality while sharpening.
  4. Remove: Lets you choose the sharpening algorithm (Gaussian Blur, Lens Blur, or Motion Blur).
smart sharpen controls

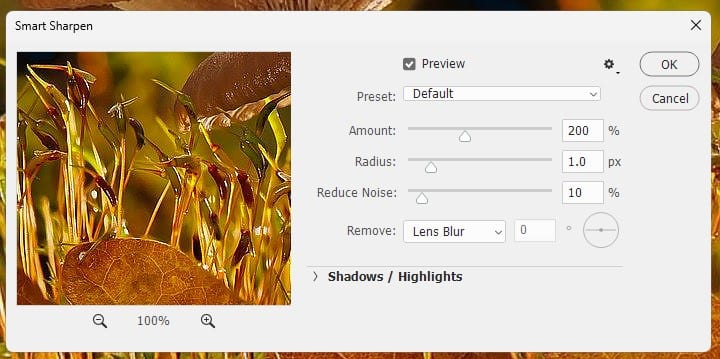
Smart Sharpen is ideal for detailed sharpening tasks. It’s particularly useful when you need to sharpen an image while minimizing noise.

High Pass Filter: Edge Enhancement

The High Pass filter is a versatile sharpening technique. It works by enhancing edge contrast in your image.

high pass filter menu location

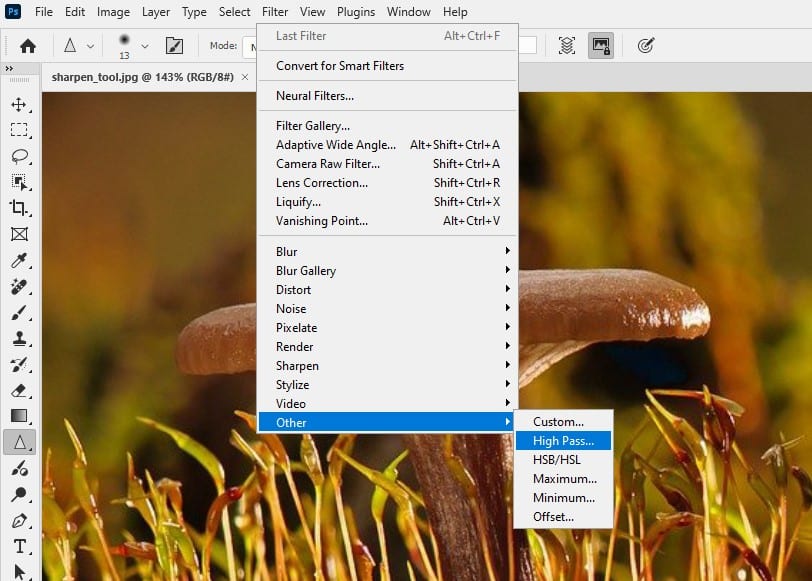
To use the High Pass filter:

  1. Duplicate your image layer.
  2. Apply Filter > Other > High Pass to the duplicate layer.
  3. Set the layer blend mode to Overlay or Soft Light.

This method is great for selective sharpening of textures or edges without affecting the entire image.

Camera Raw Filter: Initial Sharpening

The Camera Raw filter offers a comprehensive set of sharpening tools. It’s ideal for initial sharpening of raw files before further editing.

To use Camera Raw for sharpening:

  1. Open your image in Photoshop.
  2. Go to Filter > Camera Raw Filter.
  3. Navigate to the Detail panel.
  4. Adjust the Sharpening sliders as needed.
camera raw filter menu location

This method is perfect for setting a base level of sharpness for your raw images.

Choosing the Right Tool

Selecting the appropriate sharpening tool depends on your specific needs:

  • For quick, targeted sharpening, use the Sharpen Tool.
  • For overall image sharpening, try Unsharp Mask.
  • For detailed control and noise reduction, opt for Smart Sharpen.
  • For edge enhancement, experiment with the High Pass filter.
  • For initial raw file sharpening, use the Camera Raw filter.

Remember, the key to effective sharpening is subtlety. Over-sharpening can lead to unnatural-looking images with halos and excessive noise.

Best Practices for Sharpening

  1. Always sharpen at 100% zoom to see the true effects.
  2. Use a light touch. It’s easier to add more sharpening than to undo excessive sharpening.
  3. Consider sharpening on a separate layer for non-destructive editing.
  4. Be mindful of noise. Sharpening can enhance noise, so balance is key.
  5. Different image types may require different sharpening approaches. Portraits often need less sharpening than landscapes, for example.

Conclusion

Mastering Photoshop’s sharpening tools can significantly enhance your images. By understanding the strengths of each tool and when to use them, you can bring out the best in your photos.

Remember, sharpening is both an art and a science. It requires practice and experimentation to achieve the best results. Don’t be afraid to try different techniques and find what works best for your unique style and needs.

With these tools at your disposal, you’re well-equipped to create stunning, sharp images that captivate viewers. Happy sharpening!

Further Readings

  • Image Sharpening in Photoshop – A Comprehensive Guide
  • Elevate Your Photo with AI Noise Reduction and Sharpening in Photoshop
  • How to Sharpen an Image in Photoshop
photoshop sharpen tool
Share. Facebook Twitter Pinterest LinkedIn Tumblr Email
James Qu
  • Website

James is a seasoned Photoshop expert with over 25 years of experience based in Australia. As the driving force behind PSD Vault, he authors the majority of its in-depth tutorials and insightful articles.

Related Posts

How to Create Relistic Burning Car Effect in Photoshop

October 17, 2025

How to Pixelate an Image in Photoshop

October 16, 2025

How to Stay Ahead of Every Photoshop Update & Unlock Their Full Power

October 11, 2025

Comments are closed.

Don't Miss

Create Realistic Neon Text Effect in Photoshop

November 8, 2025

How to Enlarge Images Without Losing Quality in Photoshop (using Super Resolution)

November 6, 2025

Draw Animated GIF Soundwave Using Gradient Map in Photoshop

November 6, 2025

For Beginners

Basics

How to Create Relistic Burning Car Effect in Photoshop

By James QuOctober 17, 20251 Min Read

How to Pixelate an Image in Photoshop

October 16, 2025

How to Stay Ahead of Every Photoshop Update & Unlock Their Full Power

October 11, 2025

Curves or Levels: Choosing the Right Tool for Stunning Edits

September 28, 2025

You May Also Like

Basics

How to Create Relistic Burning Car Effect in Photoshop

By James QuOctober 17, 20251 Min Read
Basics

How to Pixelate an Image in Photoshop

By Lana WilsonOctober 16, 20254 Mins Read
Basics

How to Stay Ahead of Every Photoshop Update & Unlock Their Full Power

By James QuOctober 11, 20253 Mins Read
Facebook X (Twitter) Instagram Pinterest
  • About Us
  • Get in Touch
  • Advertise
  • VIP Area
  • Privacy Policy
  • Terms & Conditions
© 2025 PSD Vault. All Right Reserved.

Type above and press Enter to search. Press Esc to cancel.

Manage Consent
To provide the best experiences, we use technologies like cookies to store and/or access device information. Consenting to these technologies will allow us to process data such as browsing behavior or unique IDs on this site. Not consenting or withdrawing consent, may adversely affect certain features and functions.
Functional Always active
The technical storage or access is strictly necessary for the legitimate purpose of enabling the use of a specific service explicitly requested by the subscriber or user, or for the sole purpose of carrying out the transmission of a communication over an electronic communications network.
Preferences
The technical storage or access is necessary for the legitimate purpose of storing preferences that are not requested by the subscriber or user.
Statistics
The technical storage or access that is used exclusively for statistical purposes. The technical storage or access that is used exclusively for anonymous statistical purposes. Without a subpoena, voluntary compliance on the part of your Internet Service Provider, or additional records from a third party, information stored or retrieved for this purpose alone cannot usually be used to identify you.
Marketing
The technical storage or access is required to create user profiles to send advertising, or to track the user on a website or across several websites for similar marketing purposes.
  • Manage options
  • Manage services
  • Manage {vendor_count} vendors
  • Read more about these purposes
View preferences
  • {title}
  • {title}
  • {title}