Close Menu
PSD VaultPSD Vault
  • VIP Area
  • Photoshop Basics
  • Photo Effect
  • Text Effect
  • Premium Tuts
  • Resources
  • Drawing
  • Inspiration
  • Web Graphics
  • Abstract
  • Freebies
  • Advertise
  • Get in Touch
  • About PSD Vault
Facebook Instagram Pinterest YouTube TikTok
Facebook Instagram Pinterest YouTube TikTok RSS
PSD VaultPSD Vault
  • VIP Area
    • Sign Up
    • Log In
  • Photoshop Basics
  • AI
  • Photoshop Error Fixes
  • Video Tutorial
  • Photo Effect
  • Text Effect
  • Premium Tuts
  • Drawing
  • Opinion
PSD VaultPSD Vault
Home»Text Effect»Create Unique Snow & Frost Text Effect in Photoshop
Text Effect

Create Unique Snow & Frost Text Effect in Photoshop

By James QuJuly 1, 20233 Mins Read
Share
Facebook Twitter LinkedIn Pinterest Email

In this tutorial, you will learn the process of making this unique snow & frost text effect in Photoshop. We will use a forest stock image as the background, and construct the text effect with a combination of stone & frost texture, then finish it off with a touch of snow particles. Have a try!

This is an intermediate difficulty tutorial.

The PSD file of this tutorial is available via the PSD Vault VIP members area.

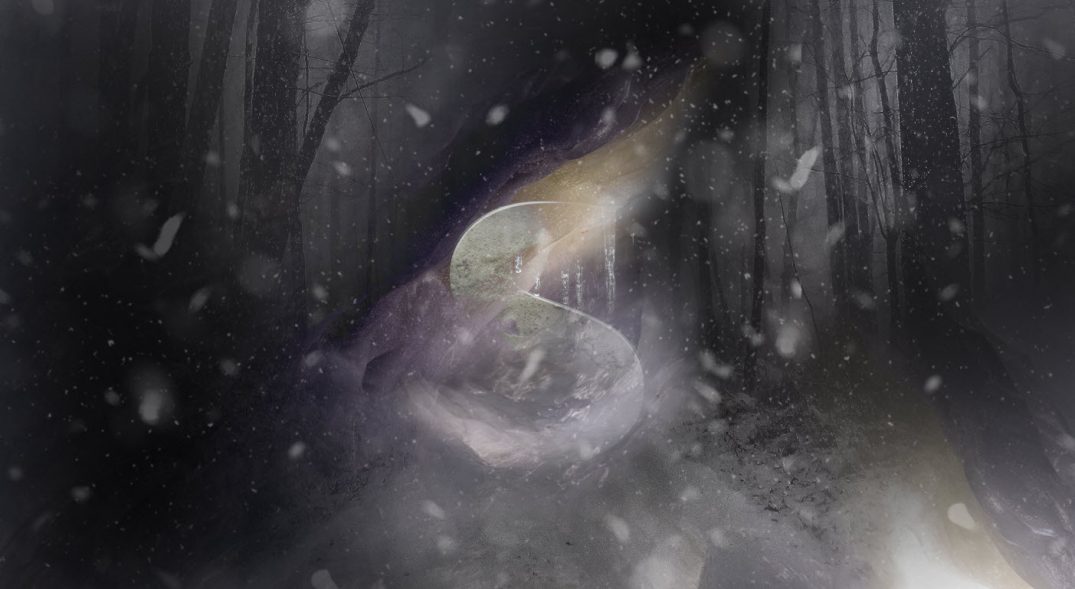
Here is a preview of the final effect I have for this tutorial: (click to enlarge)

PSD Vault VIP Membership

You can download the PSD File for this tutorial via the VIP Members Area for only $6.95/Month (or less)! You will not only get this PSD File, but also 300+ other PSD Files & 50+ VIP Exclusive Photoshop tutorials there. Signup now and get exclusive!

OK Let’s get started!

To complete this tutorial, you will need the following stocks:

  • Forest
  • Concrete Texture
  • Ice Texture
  • Font
  • Frozen Water
  • Snow Photoshop Brushes

Step 1 – Prepare a Forest Background

Create a new document with a size of 1440px * 800px. Set the background layer colour to Black. Load the forest stock image into Photoshop, copy and paste the entire image onto our document.

Use the Free Transform tool to resize the forest layer as shown below:

Use a soft eraser to remove the following area from the forest layer:

Apply the following Levels adjustments to this forest layer:

and you will have the following effect:

Step 2 – Adding Frost Effect to Forest

Load the ice texture into Photoshop. Copy and paste the entire image onto our document. Use the Free Transform tool to rotate it, as shown below:

Use a soft eraser to fade the following area as shown below:

Step 3 – Working on Our Letter

Use the font we downloaded (or any font you like), type a letter onto our document:

Apply the following Bevel & Emboss blending option on this text layer:

Fade the top and bottom part of the text with soft eraser:

Load the concrete stock image into Photoshop, select a portion of it as shown below:

Copy and paste the concrete selection to our document, cover the text as shown below:

Set this concrete layer as clipping mask to this text layer below:

and this is the effect so far:

Step 4 – Let’s Make Our Text Icy!

Go to the ice stock image and select this part of the stock:

Add it to our document as shown below (adjust its size with free transform tool):

Make sure you set this new ice layer’s blend mode to “Pin Light”:

Again we go to the ice texture, select this piece from it:

Add it to the bottom of the text, make sure you lower the layer opacity of this new ice layer to around 80%, so the text below aren’t covered entirely by it:

This step 4 is the most difficult part of the tutorial. You might need to experiment a few times to get it right.

Step 5 – Adding Extra Frost Effect

We’re almost done! For final touches, I added some frozen water drops from the stock image we downloaded:

Paint some snowfall effect by using the snow brushes we downloaded:

We can also use the Accented Edges filter to brighten the edge of the text, adding some artistic effect to it:

I further apply some cold blue colour to it, and this is my final result:

That’s it for this tutorial! Leave me a comment below if you have any questions and I will try my best to answer it.

snow text
Share. Facebook Twitter Pinterest LinkedIn Tumblr Email
James Qu
  • Website

James is a seasoned Photoshop expert with over 25 years of experience based in Australia. As the driving force behind PSD Vault, he authors the majority of its in-depth tutorials and insightful articles.

Related Posts

Create a Dissolved Ancient Ink Text Effect in Photoshop

February 5, 2026

Create Fire Burning on Metal Text Effect in Photoshop

January 22, 2026

How to Create Realistic Frozen Text with Cracks in Photoshop

December 11, 2025

Comments are closed.

Don't Miss

Unlock the Power of Photoshop’s Generative Expand Tool

February 13, 2026

How to Use “Find Distractions” Feature in Photoshop for Easy Photo Clean-up

February 13, 2026

How to Refine Adobe Firefly Generations Directly in Photoshop with Firefly History

February 12, 2026

For Beginners

Basics

How to Use “Find Distractions” Feature in Photoshop for Easy Photo Clean-up

By James QuFebruary 13, 20265 Mins Read

How to Stay Ahead of Every Photoshop Update & Unlock Their Full Power

February 8, 2026

Dodge & Burn Tool in Photoshop – The Beginner’s Guide

January 24, 2026

How to Pixelate an Image in Photoshop

January 21, 2026

You May Also Like

Text Effect

Create a Dissolved Ancient Ink Text Effect in Photoshop

By James QuFebruary 5, 20263 Mins Read
Text Effect

Create Fire Burning on Metal Text Effect in Photoshop

By James QuJanuary 22, 20263 Mins Read
Text Effect

How to Create Realistic Frozen Text with Cracks in Photoshop

By James QuDecember 11, 20254 Mins Read
Facebook X (Twitter) Instagram Pinterest
  • About Us
  • Get in Touch
  • Advertise
  • VIP Area
  • Privacy Policy
  • Terms & Conditions
© 2026 PSD Vault. All Right Reserved.

Type above and press Enter to search. Press Esc to cancel.

Manage Consent
To provide the best experiences, we use technologies like cookies to store and/or access device information. Consenting to these technologies will allow us to process data such as browsing behavior or unique IDs on this site. Not consenting or withdrawing consent, may adversely affect certain features and functions.
Functional Always active
The technical storage or access is strictly necessary for the legitimate purpose of enabling the use of a specific service explicitly requested by the subscriber or user, or for the sole purpose of carrying out the transmission of a communication over an electronic communications network.
Preferences
The technical storage or access is necessary for the legitimate purpose of storing preferences that are not requested by the subscriber or user.
Statistics
The technical storage or access that is used exclusively for statistical purposes. The technical storage or access that is used exclusively for anonymous statistical purposes. Without a subpoena, voluntary compliance on the part of your Internet Service Provider, or additional records from a third party, information stored or retrieved for this purpose alone cannot usually be used to identify you.
Marketing
The technical storage or access is required to create user profiles to send advertising, or to track the user on a website or across several websites for similar marketing purposes.
  • Manage options
  • Manage services
  • Manage {vendor_count} vendors
  • Read more about these purposes
View preferences
  • {title}
  • {title}
  • {title}