
In this tutorial, I will show you how to make this Photo Manipulation of a Warrior in Battle in Photoshop. This is a intermediate level difficulty tutorial and can be a bit tricky to complete, but why not have a try!
This photo manipulation is inspired by the “Destiny” Game Box Art.
The PSD file of this tutorial is available to buy on PSD Vault Shop, or via the PSD Vault VIP members area.
Note: The Photoshop tutorial is done in Photoshop CC – therefore some screenshot may have slighting different layout as in the earlier version. Some brushes are exclusive to Photoshop CS6 or above.
Here is a preview of the final effect I have for this tutorial: (click to enlarge)

PSD Vault VIP Membership
You can download the PSD File for this tutorial via the VIP Members Area for only $6.95/Month (or less)! You will not only get this PSD File, but also 200+ other PSD Files + Extra Goodies + Exclusive Photoshop tutorials there. Signup now and get exclusive!

OK Let’s get started!
To complete this tutorial, you will need the following stocks:
Step 1
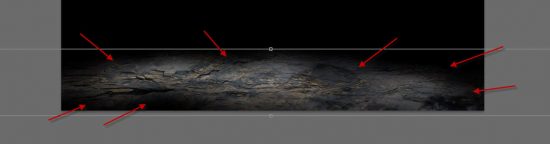
Create a new document sized 1440px * 867px with black background. Load the “Rock Stock 1” image into Photoshop and select the following portion – we will use this to form the ground of our manipulation:

Copy and paste the selection to our document, re-size it and use a soft eraser to fade the edges of the rock, as shown below:
Apply the following adjustment layers as clipping mask to this ground layer:
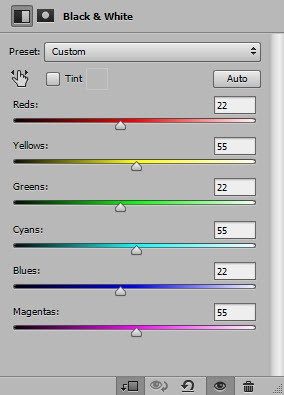
Black and White

Levels

and here is the effect so far:

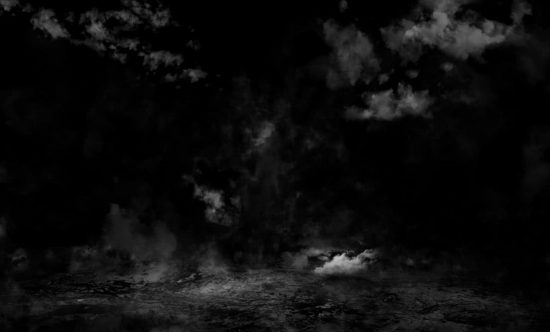
Use a cloud brush or the cloud filter, add some cloud effect around canvas, particularly in the area where the warrior and the building will be placed:
Step 2
Load the warrior image into Photoshop and cut out the warrior, place it into the centre position of our canvas:

Apply the following adjustment layers as clipping masks to this warrior layer:
Black and White

On the above black and white’s layer mask, reveal the following area of the model (this is in preparation of adding fire to the model in later step):

Levels

Layer mask on the above levels adjustment layer:

Use a soft round brush and the Warp tool, create a curved highlight over the axe:

and here is the effect so far:

Step 3
Load the building stock image into Photoshop, select the following portion from the stock:

Copy and paste the selection to our document, place it on the left side of warrior as shown below:

I use a number of Crack Brushes to create this broken/cracked wall effect on the building:

Apply the following adjustment layers as clipping masks on top of the building layer:
Black and White

Levels

Curves

and here is the effect so far:

Group all these layers linked to the building into a layer folder. Duplicate this layer group, and select the dupcliated layer group and press Ctrl + T, choose “Flip Horizontal”:

Move this duplicated layer group to the right side of the canvas as shown below:

Use a soft eraser, remove part of the building on the right to make it look different to the one on the left:

Step 4
Load the “Rock Stock 2” image into Photoshop and select the tip of the rock:

Place your selection into Photoshop and use the free transform tool to rotate it, and use a soft eraser to fade its edge and blend it with the ground and the building:

Apply the following adjustment layers as clipping masks to this rock layer:
Black and White
Levels

Layer mask on the levels adjustment layer:

Group all layers related to the rocks together, duplicate this group and flip it horizontally. Move it to the right side:

Step 5
We will give the warrior a wolf companion. Load the wolf stock image into Photoshop, copy it out and place it onto the left rock:

Apply the following adjustment layer as clipping mask to the Wolf layer:
Black and White

Levels

and here is the effect so far:

Step 6
Load the fire stock into Photoshop and select the following area:

Attach the selection to the model’s body and axe – use the free transform tool to adjust the shape of the fire:

Attach another piece of the fire to the building on the right and make it look like it’s erupting from the window:

Step 7
I decided to add some flying particles around the canvas. Use a particle brush to paint some particles as shown below:

Use the Motion Blur filter with the following setting on this particle you just painted:

And here is the effect you will have:

Repeat this above process and add more particle around the canvas:

Step 8
In this last step, I decided to give the photo manipulation a “Rusty” effect. I flattened the layers, and duplicated the background layer, applied the following “Accented Edges” filter to the duplicated layer:

I added the following layer mask to the duplicated layer to hide the accented edge filter effect in some area:

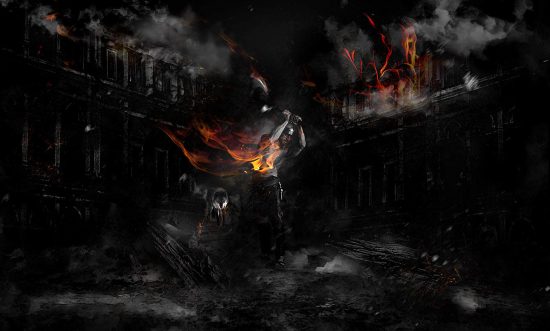
and this is the effect so far:
I further applied a few adjustment layers to add colours for our design, here this is my end result: (click to enlarge)
That’s it for this tutorial! Hope you enjoy it and find it useful! If you have any questions about the steps, please contact me or leave a comment below. I will try my best to answer them.
Till next time, have a great day!