
This tutorial will show you how to draw bubbles, lots of them. Obviously, you don’t want to draw each bubble, one by one. We will use Photoshop’s amazing brush to do the magic for us. This tutorial is intended for beginner so the instruction is going to be very detailed with addition of tips to help our reader work faster.
Preview
Here’s the final image we are going to make.

Free PSD File Download
The PSD File of this tutorial is freely available on PSD Vault. You can download it here.
Resources
We are going to use the following resource in this tutorial
Step 0
Before starting the tutorial, I want you to click Window > Workspace > Essentials (Default), Window > Workspace > Reset Essentials, and then Window > Workspace > Lock Workspace. The first two commands will make sure that we both have the same Photoshop interface and the last will prevent you for changing the interface which can end up with confusion.

Step 1
Start by making new file. There are more than one way to make new file. You can use button in the home page or click menu File > New. You can also hit the keyboard, Ctrl + N. Keyboard is a lot faster than a mouse so it will be handy if you remember shortcuts for frequently used commands such as this one.


Step 2
A dialog box for new document will open up. In this dialog box, you are asked to put the size of the new image. I suggest you to make new image with width and height no less than 1000 pixels. You can just ignore the resolution for this project. Any resolution will do just fine. Once you’ve filled the Width and Height box, click Create button to make the new image.

Step 3
All new image starts with a Background layer. Head to the Layers Panel and then click the plus icon to add new layer. Another way to create new layer is using shortcut Ctrl + Shift + Alt + N.

Step 4
Activate Elliptical Marquee Tool from the toolbox. The slot is occupied by several selection tools. If you can’t find the Elliptical Marquee Tool on the tolbox, you will need to click and hold for a while to select the tool.

Step 5
To make a perfect circle, hold Shift and then click and drag.

Step 6
We need to save this selection because we are going to need at later time. To save it, open up the Channels Panel, it is in the same place as the Layers Panel. If you can’t find it, click Window > Channels. Click the second icon in lower part of the Channels Panel. The selection will be saved as a new channel, named Alpha 1.

Step 7
Click Edit > Stroke. Stroke command will add line onto the selection’s edge.

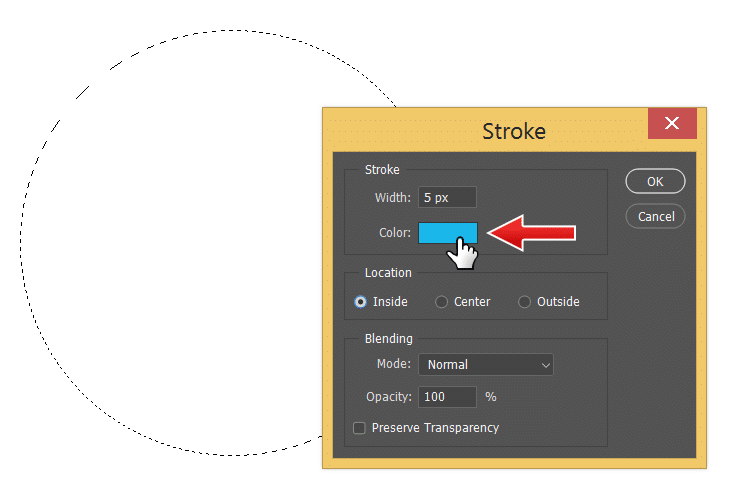
Step 8
A dialog box will appear. Set the Stroke Width to 5 px and its location to Inside. Change the stroke color by clicking on its color box.
Step 9
In the Color Picker dialog box, select black color which is located at the corner of the color preview. You can also input number of the color, which is R: 0, G: 0, and B: 0. Once the color is selected, click the OK button.

Step 10
You will be brought back to the Stroke dialog box. Click OK to start adding the line.

Step 11
This is the result we have. A 5 px black line along the selection edge.

Step 12
We need to create a soft ball as basis of the bubble, not a circle. To do this, we need to soften the line using a blur filter. Click Filter > Blur > Gaussian Blur.

Step 13
In the next dialog box, set the radius size until the edge is soften. If you want to take a closer look at part of the image, click on it to display that area on the preview box.

Step 14
For now, we don’t need the selection. To remove it, the selection not the content of the selection, hit Ctrl + D or click Select > Deselect. We are going to paint some highlights inside the bubble. Activate Brush Tool from the Toolbox and reduce its Opacity to 40%. Lower Opacity means the paint coming from the Brush tool will be transparent.

Step 15
Right click inside the canvas and change the brush Size to about 100 px. Make sure to also set its Hardness to 0% to keep the painting soft.

Step 16
We are going to paint black. To use this color, you need to change the foregound color to black. To do this, simply hit D to set foreground to its default color, which is black.

Step 17
We will put the new painting in a separate layer for easier management. Create new layer by clicking on the Add New Layer icon in the Layers Panel.

Step 18
Using the Brush Tool, paint a curve on top left of the bubble.
Step 19
Paint another curve on top of the existing one, this time shorter.

Step 20
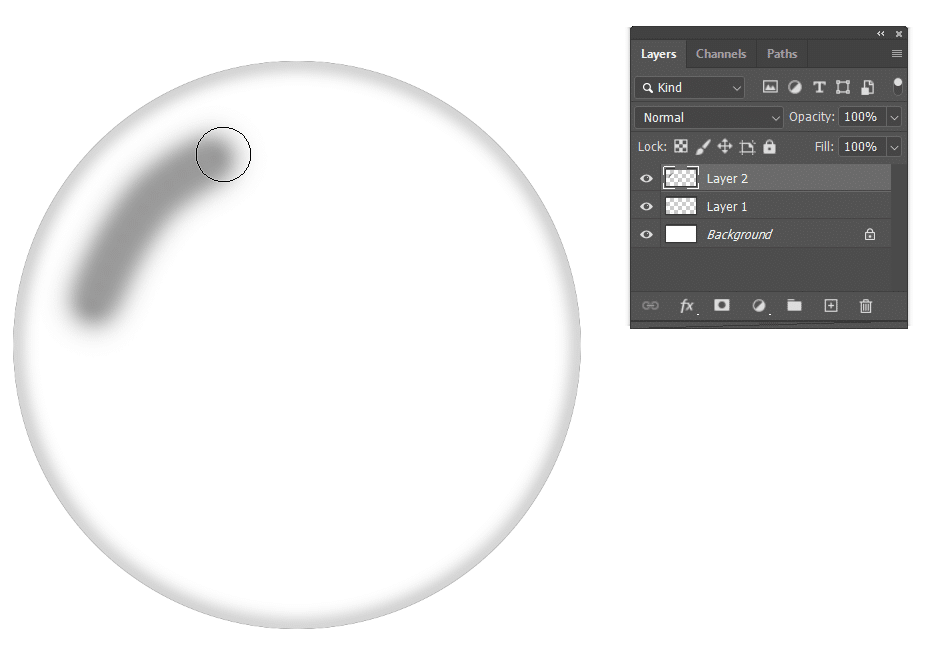
And paint again on top of the curve. Take a look at the image below for reference. We should have darker area on the center of the curve and lighter area on its edge.

Step 21
Repeat the same step, this time smaller and its opposite side. To change the brush size, we can right click and change the Size setting. But, there is a faster way. Use shortcut [ or ] to decrease or increase the brush size.


Step 22
The highlight we just paint is very crude. That’s okay, we can fix it easily. Just click Filter > Blur > Gaussian Blur. Use large enough Radius until the highlights soften.

Step 23
The Gaussian Blur we have just applied earlier will spread the pixels and some might end up outside the bubble. We don’t that. We have to delete all pixels outside the bubble. That’s why we saved the selection that shaped the bubble to a channel. Now, we need to load it back. Open up the Channels Panel and then select the channel. Click Load channel as selection icon to convert it into selection.

Step 24
We need to go back to the original image. In the Layers Panel, activate the layer where we paint the highlight. Current selection is selecting inside the bubble. Because our intention is to delete pixels outside the bubble, we will invert the selection. Click Select > Inverse or hit Shift + Ctrl + I. Using this command, areas outside the bubble is now selected. Now, hit Delete key to delete any pixels outside the bubble. We dont the selection anymore, hit Ctrl + D to remove it.


Step 25
We are done making the bubble. Next step is saving it as a brush which will allows us to draw a bunch of bubbles in one stroke. But first, we need get rid of the background. Click eye icon of the Background layer to hide it. You will checkered pattern which represents transparency.

Step 26
To save the bubble image as brush, click Edit > Define Brush Preset.

Step 27
In the Brush Name dialog box, give the brush a decent name. Click OK to confirm it.

Step 28
Clearly, we need to change the brush setting. But, let’s test the brush. Prepare suitable image to paint on. Activate the Brush Tool from the Toolbox. Set the foreground color to white. Remember that the default color for foreground and background color is black and white. To set them to its default color, hit D. Switch both color by pressing X. And now, we have white as the foreground color.

Step 29
Right click and then select the brush we have add earlier. It will be located at the bottom of the list.

Step 30
Click and drag to draw a line made of bubbles. We know it’s not perfect, but at least the brush is working. Obviously, we need to set up the brush setting. Hit Ctrl + Z to undo the brush stroke.

Step 31
First, make sure to set the brush Opacity to 100%. You can use shortcut for this. Hit 1 for 10%, 2 for 20%, 3 and then 5 for 35%, and 0 for 100%.

Step 32
Hit F5 to open up the Brush Settings Panel. First, we want to set the Size parameter. The bubble size should be revelant to the image.

Step 33
Let’s test the brush. Stroke once to see the result. I think this is a lot better. Hit Ctrl + Z to undo the brush stroke.
Step 34
We’ll get back to the Brush Settings Panel. Activate the Shape Dynamics section. Increase Size Jitter to 85%. Size Jitter will allow the brush size to change randomly.

Step 35
Test out the brush. The bubbles size are now varied. Redo the brush stroke by hitting Ctrl + Z.

Step 36
Increase Angle Jitter and Roundness Jitter a bit. Angle Jitter will add random rotation to the brush and Roundness Jitter will add random distortion to the bubble shape.

Step 37
Next, activate Scattering. Scattering will spread the bubble and make the result totally random. Increase the Scatter size. The bubbles now no longer in a line but spread out.

Step 38
Increase Count size to 3 to double the number of brush in each brush stroke.

Step 39
Make new layer by clicking on the Add New Layer icon in Layers Panel. It’s always to a good idea to draw in different layer, never directly on the image. This way, if you don’t like the result you can just simply remove the layer and start all over again. The original will be safe from any alteration.

Step 40
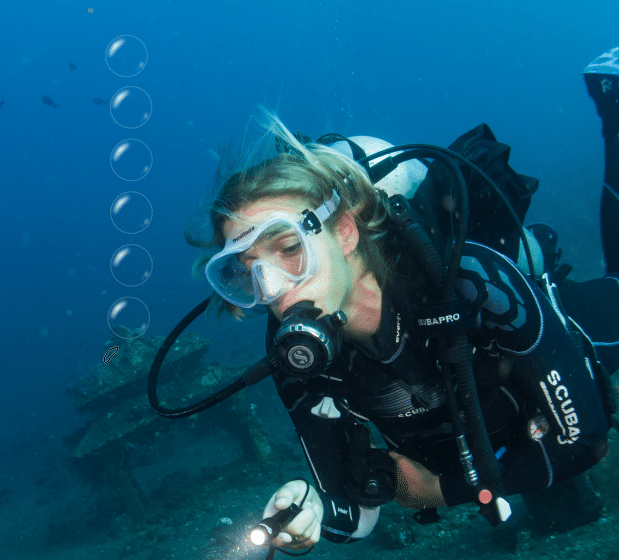
Click and drag to add bubbles coming from the diver.

Step 41
Decrease the brush size by hitting [ key a few times. Draw another bubbles.

Conclusion
Feel free to add more to the image. I hope you like the result and more importantly, grasp the power of custom brush. Remember that you can always use other image, not just bubble. You can make, for examples, custom brush that draw random grass, leaves, or stars.