Welcome to this intermediate-level Photoshop tutorial where we will explore the process of crafting a unique photo manipulation by blending ice and fire textures.
Throughout this guide, we will delve into various techniques, including texture manipulation using image adjustment and free transform tools.
Follow along to enhance your Photoshop skills and achieve a captivating final effect.
The PSD file of this tutorial is available via the PSD Vault VIP members area.
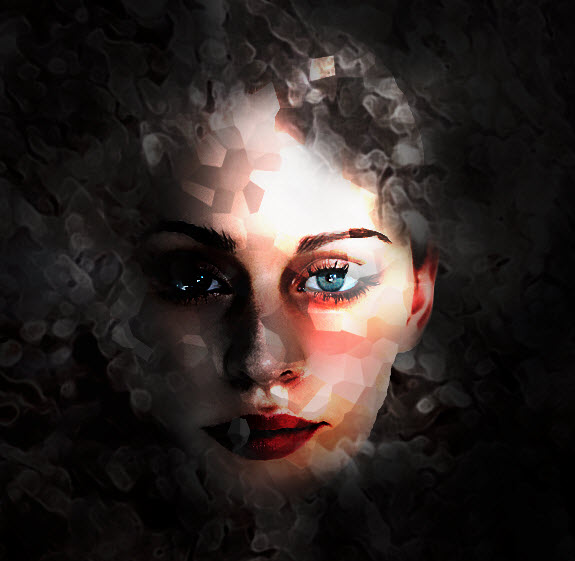
Here is a preview of the final effect I have for this tutorial: (click to enlarge)

What Will You Learn
In this tutorial, we’ll explore:
- Selecting and preparing high-quality ice and fire textures
- Essential Photoshop tools and techniques for surreal effects
- Advanced blending methods to create a cohesive composition
- Color adjustment tricks to enhance the overall mood
- Tips for adding finishing touches and refining your artwork
By the end of this guide, you’ll have the skills to create stunning surreal photo manipulations that combine contrasting elements into a harmonious and visually striking piece.
PSD Vault VIP Membership
You can download the PSD File for this tutorial via the VIP Members Area for only $6.95/Month (or less)! You will not only get this PSD File, but also 250+ other PSD Files + Extra Goodies + Exclusive Photoshop tutorials there. Signup now and get exclusive!
Don’t miss out on this exclusive opportunity to refine your digital artistry skills. Sign up for PSD Vault VIP membership today and open the doors to a world of creativity, inspiration, and artistic mastery.
🔓 Unlock VIP Access Now
OK Let’s get started!
To complete this tutorial, you will need the following stocks:
Step 1: Enhancing the Metal Texture
Create a new document sized 860px * 1140px with black background, load the metal image into Photoshop and select a piece as shown below:

Copy and paste the selection over to our document, resize it to cover the canvas. Then apply the following Accented Edges filter to give it a special effect:

and here is the effect so far:

Use a soft eraser, remove the edges of this layer as shown below:

Add the following 3 adjustments layers on top:
Black and White

Levels

Curves

and here is the effect so far:

Step 2: Incorporating the Model
Load the model image into Photoshop and cut out the head area, paste it onto our document as shown below:

Apply the following Surface Blur settings to smooth out the skin a bit:

Use a soft eraser, erase the edges of the face.
Add the following adjustment layers as clipping mask to this model layer:
Black and white

Layer mask on the black and white adjustment layer:

Levels

Layer mask on the levels adjustment layer:

Curves

and here is the effect so far:

Step 3: Introducing Ice Texture
We will add some ice texture onto image. Load the ice 1 image into Photoshop and use the Lasso Tool to select a piece as shown below:

Copy and paste into the document, and set it as a clipping mask to the face layer:

Apply the following Crystallize filter to add some crystal effect into the ice texture:

Apply the following black and white adjustment to this ice layer:

Change the blending mode of this ice texture layer to “vivid light”:

and here is the effect so far:
Step 4: Infusing Fire Texture
Now let’s go to the fire image and select the fire with the quick selection tool.
We can then copy the fire texture over and place it under the face layer, use the free transform tool to resize it to fit the shape of the face:

Add some fire texture over the head as well:

Step 5: Adding “Dark Energy”
Now we want to give this photo some further surreal effect by adding some “Dark Energy” around the face. To do this, simply duplicate the fire texture layer once and apply the following black and white adjustment:

and you will the fire texture changed into some black/grey lines, as shown below:

We can then duplicate this layer a few times, and attach them around the face:

Step 6: Enhancing with Additional Ice Texture
We can further add some ice texture over the face. Load the “ice” 2 image (pick one from the pack) into Photoshop, and select a portion with the Lasso Tool as shown below:

Copy and paste a few of those selections onto our document, change the layer blending mode to “screen” for those new ice layers and use the free tranform tool to adjust their shape as you see fit. Here is the effect so far:

Step 7: Final Touches
We’re almost done! To fine-tune the effect, I added the following image adjustment layers on top of all previous layers:
Selective color


Curves

And here is my final effect: (click to enlarge)
Conclusion
Congratulations! You’ve successfully created a surreal photo manipulation by blending ice and fire textures in Photoshop. Experiment with additional adjustments and techniques to customize your outcomes further.
Additional Tips
- Experiment with blending modes for different texture combinations.
- Utilize layer masks to refine specific areas of your composition.
- Explore other adjustment layers such as Hue/Saturation for colour adjustments.
- Incorporate brushes or overlays to add intricate details to your manipulation.
- Save your work regularly and consider creating a layer backup for experimentation.
Feel free to share your results and ask any questions in the comments below. Happy editing!OK Let’s get started!
To complete this tutorial, you will need the following stocks:
Step 1: Enhancing the Metal Texture
Create a new document sized 860px * 1140px with black background, load the metal image into Photoshop and select a piece as shown below:
Copy and paste the selection over to our document, resize it to cover the canvas. Then apply the following Accented Edges filter to give it a special effect:
and here is the effect so far:
Use a soft eraser, remove the edges of this layer as shown below:
Add the following 3 adjustments layers on top:
Black and White
Levels
Curves
and here is the effect so far:
Step 2: Incorporating the Model
Load the model image into Photoshop and cut out the head area, paste it onto our document as shown below:
Apply the following Surface Blur settings to smooth out the skin a bit:
Use a soft eraser, erase the edges of the face.
Add the following adjustment layers as clipping mask to this model layer:
Black and white
Layer mask on the black and white adjustment layer:
Levels
Layer mask on the levels adjustment layer:
Curves
and here is the effect so far:
Step 3: Introducing Ice Texture
We will add some ice texture onto image. Load the ice 1 image into Photoshop and use the Lasso Tool to select a piece as shown below:
Copy and paste into the document, and set it as a clipping mask to the face layer:
Apply the following Crystallize filter to add some crystal effect into the ice texture:
Apply the following black and white adjustment to this ice layer:
Change the blending mode of this ice texture layer to “vivid light”:
and here is the effect so far:
Step 4: Infusing Fire Texture
Now let’s go to the fire image and select the fire with the quick selection tool.
We can then copy the fire texture over and place it under the face layer, use the free transform tool to resize it to fit the shape of the face:
Add some fire texture over the head as well:
Step 5: Adding “Dark Energy”
Now we want to give this photo some further surreal effect by adding some “Dark Energy” around the face. To do this, simply duplicate the fire texture layer once and apply the following black and white adjustment:
and you will the fire texture changed into some black/grey lines, as shown below:
We can then duplicate this layer a few times, and attach them around the face:
Step 6: Enhancing with Additional Ice Texture
We can further add some ice texture over the face. Load the “ice” 2 image (pick one from the pack) into Photoshop, and select a portion with the Lasso Tool as shown below:
Copy and paste a few of those selections onto our document, change the layer blending mode to “screen” for those new ice layers and use the free tranform tool to adjust their shape as you see fit. Here is the effect so far:
Step 7: Final Touches
We’re almost done! To fine-tune the effect, I added the following image adjustment layers on top of all previous layers:
Selective color
Curves
And here is my final effect: (click to enlarge)
Conclusion
Congratulations! You’ve successfully created a surreal photo manipulation by blending ice and fire textures in Photoshop. Experiment with additional adjustments and techniques to customize your outcomes further.
Additional Tips
- Experiment with blending modes for different texture combinations.
- Utilize layer masks to refine specific areas of your composition.
- Explore other adjustment layers such as Hue/Saturation for colour adjustments.
- Incorporate brushes or overlays to add intricate details to your manipulation.
- Save your work regularly and consider creating a layer backup for experimentation.
Feel free to share your results and ask any questions in the comments below. Happy editing!
Frequently Asked Questions
What software do I need for this ice and fire photo manipulation?
You’ll need Adobe Photoshop for this tutorial. The techniques described work best with recent versions of Photoshop CC.
How long does it take to complete this surreal photo manipulation?
The time required varies depending on your skill level. Beginners might take 2-3 hours, while experienced users could complete it in about an hour.
Where can I find high-quality ice and fire textures?
You can find textures on stock photo websites, create your own, or use texture packs designed for digital artists. Ensure you have the right to use these textures in your work.
Can I apply these techniques to other types of surreal photo manipulations?
Absolutely! The blending and texture application techniques in this tutorial can be adapted for various surreal photo manipulations, not just ice and fire themes.
Do I need advanced Photoshop skills for this tutorial?
While some familiarity with Photoshop is helpful, this tutorial is designed to guide users of all skill levels. We break down complex techniques into manageable steps.
How can I make my fire effects look more realistic?
To enhance realism, pay attention to color blending, use layer masks for smooth transitions, and adjust the opacity of your fire layers. Adding subtle smoke effects can also improve authenticity.
What’s the best way to blend the ice and fire elements seamlessly?
Use layer masks, adjustment layers, and blending modes like Overlay or Soft Light. Gradual transitions between elements and matching color tones are key to a seamless blend.
Can I use this technique for client work or commercial projects?
Yes, the skills you learn in this tutorial can be applied to personal and commercial projects. Just ensure you have the necessary rights for any stock images or textures used.
How do I troubleshoot if my layers aren’t blending correctly?
Check your layer order, blending modes, and mask settings. Sometimes, adjusting the opacity or using a different blending mode can solve issues with layer integration.
Are there any shortcuts to speed up the workflow in Photoshop?
Yes, learning keyboard shortcuts for tools and layer adjustments can significantly speed up your workflow. We cover some essential shortcuts in the tutorial.
15 Comments
Thank you so much for these tutorials!! They are really helping me expand my knowledge of my Photoshop, (I use CS4) and they are really helping me tap into my creative side when I feel I’ve hit a wall.
No problem, I’m glad that the tutorial helps!
how can i make the fire blue too :| ? can make it pink but not blue.
this is a really great effect. thank you.
awesome tutorial! thanks
Thank you
gud one <3
how did you get the red color after adding layer mask to the black and white adjustment layer? help!!
thank you so much this was fun! im working with cs so the blk&wht adjustment layer threw me off a lil but i made it work i love the turn out.
söylediğiniz herşeyi yaptım ama olmadı amk neden olmadı ki acaba
hi wanaa friendship with me Stacy
How do you get the red/pink color on the black and white layer?
How do you get the red/pink color on the black and white layer?
that’s beautiful ,wonderful .i’like it .
im stuck with the b&w layer for the ice clipping mask (?), can u send me -if possible- a screenshot of your layer panel? if i make the ice layer a clipping mask for the face layer, i cant make the b&w adlayer work for the ice mask layer only… help! :(