")
Making a GIF in Photoshop is straightforward once you know which method suits your source material. From still images to video footage, this guide covers every approach – including the correct export path that changed in Photoshop 2024.
Quick Answer: How to make a GIF in Photoshop
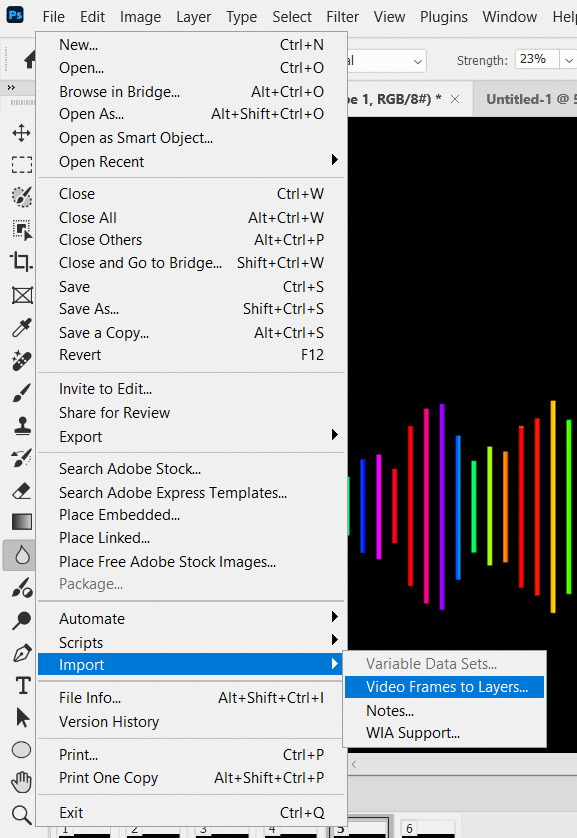
To make a GIF in Photoshop from images: go to File > Scripts > Load Files into Stack to import your frames as layers, open the Timeline panel (Window > Timeline), click Create Frame Animation, then export via File > Export > Save for Web (Legacy) and choose GIF format. For video-to-GIF, use File > Import > Video Frames to Layers instead.
Note: Always use Save for Web (Legacy) — not Export As — when exporting animated GIFs. Export As does not preserve the animation.
The PSD file of this tutorial is available via the PSD Vault VIP members area.
| Difficulty | Beginner (Methods 1 & 2) · Intermediate (Method 3) |
| Time Required | Method 1 (from images): 10–20 min · Method 2 (from video): 5 min · Method 3 (from scratch): 20 – 40 min |
| Software | Photoshop CC 2019 or later for all methods. Timeline panel required. |
| Output | Animated GIF – works in browsers, social media, email, messaging apps |
| Key Panel | Window > Timeline – must be open for all animation work |
| Export Path | File > Export > Save for Web (Legacy) – the ONLY path that preserves animation in Photoshop |
Preview
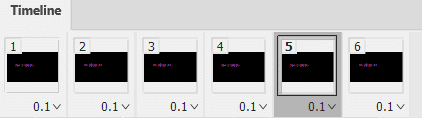
In this tutorial, you will practice making a soundwave gif, below is the final result:

PSD Vault VIP Membership
You can download the PSD File for this tutorial via the VIP Members Area for only $6.95/Month (or less)! You will not only get this PSD File, but also 250+ other PSD Files + Extra Goodies + Exclusive Photoshop tutorials there. Signup now and get exclusive!
What this guide covers – and the one thing most tutorials get wrong
Making a GIF in Photoshop is one of the most-searched basic Photoshop skills – and one where outdated tutorials cause the most confusion. The reason: Adobe changed the export workflow in Photoshop 2024, moving the recommended save path, and a huge number of tutorials still direct readers to interface elements that have been reorganised, renamed, or behave differently in current versions.
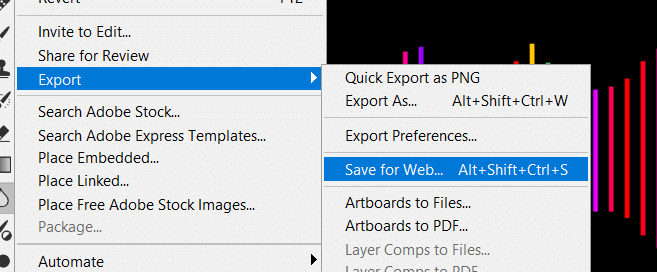
The most important thing to know before you start: when exporting an animated GIF from Photoshop, you must use File > Export > Save for Web (Legacy). The newer Export As option (File > Export > Export As) can save a static GIF image but strips all animation frames – a fact that trips up hundreds of readers every month. This guide uses the correct path throughout.
This tutorial covers three complete methods depending on your source material: creating a GIF from a series of still images, converting existing video footage to a GIF, and building a simple animated GIF from scratch using the Timeline panel. All three use the same export process at the end.
Before You Start: Understanding the Timeline Panel
Every GIF-making method in Photoshop uses the Timeline panel. If you’ve never used it, here’s what you need to know before diving into the methods.
Open it via Window > Timeline. The panel has two modes accessed via a dropdown in the centre of an empty panel:
- Frame Animation mode: Each frame of the GIF is shown as a thumbnail in a filmstrip across the bottom of the panel. This is the mode used for Methods 1 and 3. Each layer (or combination of layers) in your document becomes a frame. You set the duration of each frame individually.
- Video Timeline mode: Shows a conventional video timeline with tracks, duration bars, and a playhead. This is the mode used for Method 2 (video to GIF). Layers appear as horizontal tracks you can trim and position in time.
You can switch between modes using the dropdown menu (the three horizontal lines) in the top-right corner of the Timeline panel. Photoshop usually selects the correct mode automatically based on how you import your content.
| 🔍 Why this works: Photoshop generates GIFs from layers, not from video frames directly. Even when you import video footage (Method 2), Photoshop converts each video frame into a separate layer before creating the animation. Understanding this layer-to-frame relationship makes every step in the Timeline much more intuitive. |
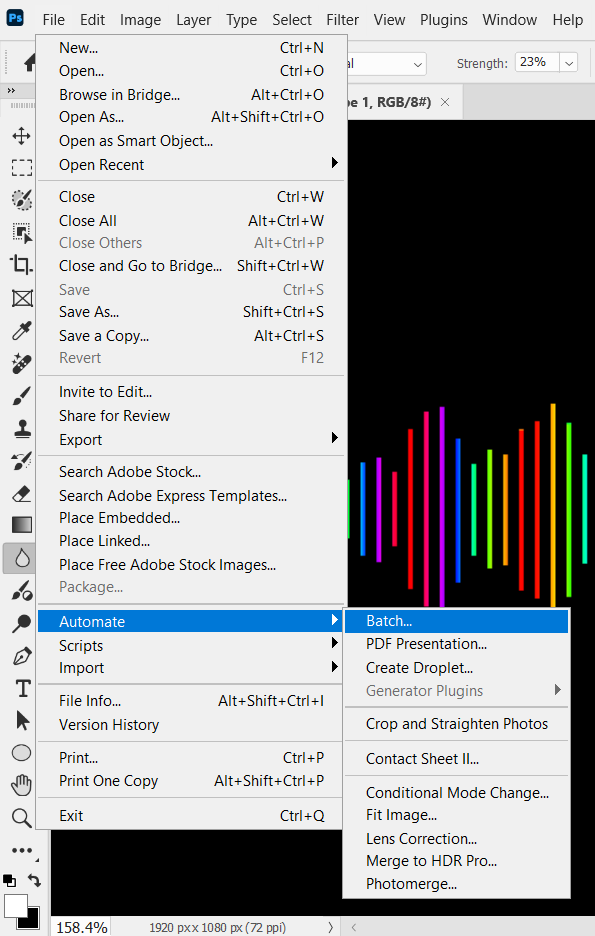
METHOD 1: GIF FROM STILL IMAGES OR LAYERS
Best for: photo slideshows, product carousels, multi-frame illustrations, step-by-step demonstrations
This is the most common approach – you have a series of photographs or illustrated frames and want to combine them into an animated GIF. Each image becomes one frame of the animation.
Step 1: Prepare Your Images
Before importing into Photoshop, ensure all your images are the same dimensions. GIF frames must all be the same pixel size – if they aren’t, Photoshop will use the canvas size and any smaller images will be padded with the background colour, which usually looks wrong.
A quick way to batch-resize in Photoshop: File > Automate > Batch. Choose the Image Size action (or create one) and apply it to your folder. Alternatively, use File > Scripts > Image Processor for JPEG/PNG resizing.
- Recommended dimensions for web GIFs: 480×480px or 600×400px for social media. Keep dimensions as small as the intended display size — GIF file sizes grow rapidly with resolution.
- Recommended dimensions for email: 480–600px wide maximum. Most email clients cap display width around 600px.
- Frame count: 10–30 frames is the sweet spot for web GIFs. Above 30 frames the file size becomes impractical for most web use cases unless you optimise aggressively.
| 💡 Pro Tip: Convert all source images to sRGB colour profile (Edit > Convert to Profile > sRGB) before importing. GIF uses an indexed colour palette and colours can shift unexpectedly if your source images are in Adobe RGB or ProPhoto RGB. |
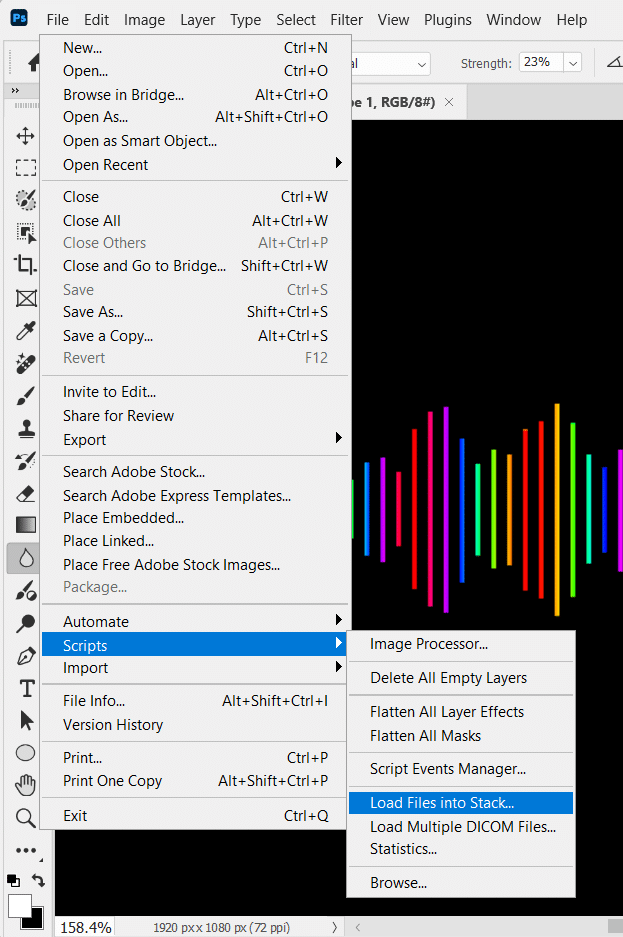
Step 2: Load Images as Layers
Go to File > Scripts > Load Files into Stack:
In the dialogue that opens:
- Click Browse and navigate to your image folder. Select all images you want to include (Cmd/Ctrl+A to select all, or Shift-click for a range).
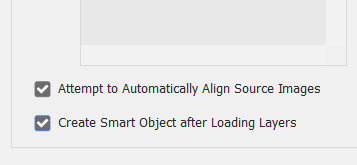
- Check ‘Attempt to Automatically Align Source Images’ only if you want Photoshop to correct for slight camera movement between shots (useful for stop-motion or timelapse). Leave unchecked for unrelated images.
- Check ‘Create Smart Object after Loading Layers’ only if you want to edit frames non-destructively later. Leave unchecked for a standard frame-by-frame GIF.
- Click OK. Photoshop loads all selected images as layers in a new document, named by filename.
Your Layers panel now shows each image as a separate layer. The order in the Layers panel determines the animation order — the bottom layer plays first, working upward. Drag layers to reorder if needed.
| ⚠ Watch Out: By default, Photoshop names layers by filename which can be long and unwieldy. This doesn’t affect the GIF output, but if you need to edit individual frames later, rename layers sequentially (Frame 1, Frame 2, etc.) for easier navigation. |
Step 3: Create Frame Animation in Timeline
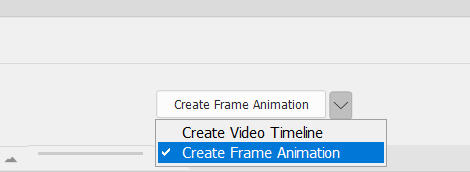
Open the Timeline panel: Window > Timeline. Click the ‘Create Frame Animation’ button in the centre of the panel. You’ll see a single frame appear showing the current state of your document.
Now click the Timeline panel menu (three horizontal lines, top right of the Timeline panel) and choose ‘Make Frames From Layers‘. Photoshop creates one frame per layer, in order from bottom to top. Your filmstrip now shows a thumbnail for each image.
| 💡 Pro Tip: If your frames appear in reverse order (last image first), use the Timeline panel menu > Reverse Frames after creating frames from layers. This saves manually reordering layers. |
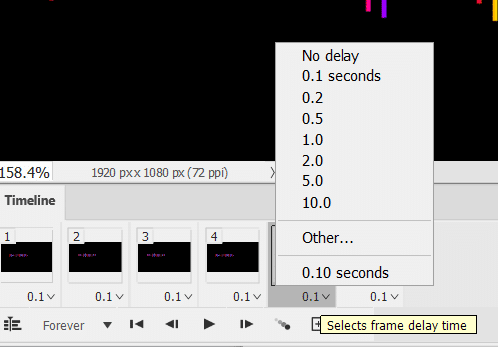
Step 4: Set Frame Timing
Each frame thumbnail has a duration shown below it (e.g. ‘0 sec’, ‘0.1 sec’, etc.). Click the duration under any frame to open a dropdown of preset timings. You can set timing per-frame or select multiple frames to set them all at once:
- Select all frames: Cmd/Ctrl+A in the Timeline, or click the first frame, Shift-click the last.
- Recommended timing for photo slideshows: 1–3 seconds per frame. Long enough to read and appreciate each image.
- Recommended timing for animation: 0.1–0.2 seconds for smooth motion, 0.3–0.5 for a slightly choppy stop-motion feel.
- Custom timing: choose ‘Other’ in the timing dropdown to enter a specific value in seconds (e.g. 1.5, 2.5).
Set the loop count using the dropdown in the bottom-left of the Timeline panel. Options are Once, 3 Times, Forever, or a custom number. ‘Forever’ is correct for most web and social media GIFs.
| 🔍 Why this works: GIF timing is specified in hundredths of a second in the file format itself, and different browsers and social platforms interpret it slightly differently. Very fast timings (below 0.05 seconds, i.e. 50ms) are sometimes overridden by browsers to a minimum of 0.1 seconds. If your GIF plays slower than expected on some platforms, this is why — set frame timing to at least 0.1 seconds minimum. |
Step 5: Preview and Export
Click the Play button (▶) in the Timeline panel to preview the animation at full speed on your canvas. Check that frame order, timing, and loop behaviour all look correct.
To export: File > Export > Save for Web. This opens the optimiser dialogue.
In the Save for Web dialogue, the critical settings are:
- Format: GIF (top right dropdown — must be GIF, not JPEG or PNG).
- Colors: 128 is a good starting point. Lower values (64, 32) reduce file size but may introduce colour banding. Increase to 256 only if colours look noticeably degraded at 128.
- Dither: Diffusion, 75–88%. Dithering simulates colours outside the 256-colour palette by alternating adjacent pixels — it reduces colour banding at the cost of slight texture. Diffusion dithering produces the best results for photographic content.
- Looping Options: Forever (or your chosen count). This must be set here too — it’s separate from the Timeline setting.
- Image Size: reduce dimensions here if needed. Halving the dimensions reduces file size by approximately 75%.
The file size preview in the bottom-left of the Save for Web dialogue updates as you adjust settings. For web use, target under 1–2MB for smooth loading. For social media platforms (Instagram, Twitter/X), check their current GIF size limits — typically 5–8MB for most platforms, 15MB for Twitter.
Click Save. Choose your filename and destination. Your animated GIF is ready.
| ⚠ Watch Out: If you choose File > Export > Export As instead of Save for Web (Legacy), Photoshop will save a GIF file but it will be a still image — the animation frames will all be merged into a single flat frame. Always use Save for Web (Legacy) for animated GIFs. There is no workaround for this in Photoshop 2024/2025/2026. |
METHOD 2: GIF FROM VIDEO FOOTAGE
Best for: screen recordings, short clips, cinemagraphs, reaction GIFs from video
If you have an existing video clip — MP4, MOV, AVI, or another common format — Photoshop can convert it directly to a GIF. This is the fastest route when your source material is already animated. The key is trimming aggressively, because GIFs from video footage are always large files unless you limit the frame count.
Step 1: Import Video Frames as Layers
Go to File > Import > Video Frames to Layers. Navigate to your video file and click Open.
The Video Frames to Layers dialogue appears:
- From Beginning to End: imports the entire video. Avoid this for longer clips — use the range selector instead.
- Selected Range Only: drag the yellow handles in the dialogue’s mini timeline to select only the portion you want. This is the most important setting — trim to the shortest possible range for a manageable file size.
- Limit to Every ___ Frames: use this to reduce frame count. Setting it to 2 imports every other frame (halves frame count and file size). Setting to 3 imports every third frame. For 30fps video converted to a GIF, ‘Limit to Every 2 Frames’ gives you an effective 15fps GIF — visually smooth for most content.
- Make Frame Animation: keep this checked. Photoshop automatically creates the Timeline frame animation from the imported frames.
| 💡 Pro Tip: For a 3-second GIF from 30fps video using ‘Limit to Every 2 Frames’, you get approximately 45 frames. For a 5-second clip, 75 frames. Keep your target range to 3–5 seconds maximum for web use — this balances watchability against file size. |
Step 2: Trim and Adjust Frames
After import, Photoshop opens a document with each selected video frame as a separate layer, and the Timeline panel automatically shows Frame Animation mode with all frames loaded.
To remove unwanted frames from either end: click the frame in the Timeline, then click the trash icon at the bottom of the Timeline panel. To remove multiple frames, Shift-click to select a range first.
Check the frame timing. Photoshop sets timing based on the original video’s frame rate. For a 30fps source with every 2nd frame imported, each frame should be approximately 0.067 seconds (67ms). Adjust as needed using the timing dropdown under each frame.
Step 3: Optimise and Export
Video-to-GIF files are almost always large before optimisation. Before exporting, consider:
- Reducing canvas size: Image > Image Size, reduce to 50–75% of original. Video footage at 1080p or 720p is far more resolution than any GIF needs for web use. 480px wide is sufficient for most contexts.
- Reducing colours in the export: in Save for Web, try 64 or 32 colours for footage with limited colour range (close-ups, product shots). Photographic content usually needs 128+ colours.
- Adjusting dither: for video footage with smooth gradients (skin, sky, product surfaces), increase Diffusion dither to 88–100% to prevent obvious banding.
Export via File > Export > Save for Web, same as Method 1. Select GIF format, confirm Looping Options is set to Forever, and click Save.
| ⚙ Compatibility: Photoshop can import MP4 (H.264), MOV (QuickTime), AVI, MPEG, and FLV formats natively. MKV and WebM files are not directly supported — convert to MP4 first using a free tool like HandBrake or VLC before importing into Photoshop. |
METHOD 3: GIF FROM SCRATCH USING THE TIMELINE
Best for: simple animations, logo loops, text animations, UI demonstrations, banner ads
Creating a GIF from scratch in Photoshop gives you full creative control – you’re building each frame manually using Photoshop’s drawing, text, and effect tools. This method is more involved than importing existing images or video, but it’s the approach used for animated banners, logo reveals, icon animations, and illustrated loops.
The key concept: each unique state of your animation is represented by a different combination of layer visibility. You turn layers on and off to create each frame’s content, then save each configuration as a Timeline frame. Photoshop records which layers are visible in each frame and plays them in sequence.
Step 1: Plan Your Animation
Before touching Photoshop, sketch out your animation on paper or in a simple list. Identify:
- How many frames you need
- What changes between each frame – position, opacity, colour, text, visibility
- Whether any elements remain constant across all frames (background, static text, border)
Step 2: Build Your Layers
Create a new document at your target GIF dimensions (e.g. 500×500px for social, 728×90px for a banner ad).
Build out all your visual elements as separate named layers. For example, for a simple 3-frame text animation:
- Layer: Background — a solid colour or gradient, visible in all frames
- Layer: Logo — your logo, visible in all frames
- Layer: Text Frame 1 — first text line, visible only in Frame 1
- Layer: Text Frame 2 — second text line, visible only in Frame 2
- Layer: Text Frame 3 — third text line or CTA, visible only in Frame 3
Group related layers using layer groups (Cmd/Ctrl+G) to keep the Layers panel manageable. Name every layer clearly — you’ll be toggling visibility repeatedly and ambiguous names slow you down significantly.
| 💡 Pro Tip: Use Smart Objects for any elements that appear at different sizes or opacities across frames — you can apply different Transform or opacity settings per-frame without duplicating the layer content. |
Step 3: Create Frames in the Timeline
Open Window > Timeline. Click ‘Create Frame Animation’. Frame 1 appears showing the current state of your Layers panel.
Now build each subsequent frame:
- Click the ‘Duplicate current frame’ icon (the filmstrip icon) at the bottom of the Timeline panel to create Frame 2.
- With Frame 2 selected in the Timeline, go to your Layers panel and toggle layer visibility to set the state you want for Frame 2 — hide Text Frame 1, show Text Frame 2.
- Repeat: duplicate Frame 2 to create Frame 3, then adjust layer visibility for Frame 3’s content.
- Continue for all frames.
As you click between frames in the Timeline, Photoshop restores the layer visibility state you set for each frame. The Timeline is recording each frame’s visibility configuration — not the pixel content itself.
| ⚠ Watch Out: If you change layer visibility while the wrong Timeline frame is selected, you’ll overwrite the wrong frame’s configuration. Always check which frame is highlighted (it has a blue border in the Timeline) before making visibility changes in the Layers panel. |
Step 4: Add Transitions with Tweening
For smooth transitions between frames — fading, moving, or resizing — Photoshop’s Tween feature generates the intermediate frames automatically.
Select a frame in the Timeline, then click the Tween button (the diamond icon between two frames) or go to the Timeline menu > Tween. In the Tween dialogue:
- Tween With: Previous Frame (generates frames between the selected frame and the one before it).
- Frames to Add: 5–10 for smooth fades, 15–20 for smooth position movement.
- Layers: All Layers (tweens all animatable properties on all layers).
- Parameters: check Opacity for fades, Position for movement, Effects for animated layer styles.
Photoshop generates the intermediate frames and inserts them into the Timeline. Set their timing to a short value (0.05–0.1 seconds) to create smooth playback.
| 💡 Pro Tip: Tween works on layer opacity and position — but only if the layer is in the same position on both the start and end frames. To animate movement: on Frame 1 set the layer at position A. On the last frame, move the layer to position B. Then select Frame 1 and Tween to create the movement frames between them. |
Step 5: Set Timing, Loop, Preview, Export
Set frame timing as described in Method 1 Step 4. For smooth animation at 0.05–0.1 second frames, the visual playback in the Timeline preview will be accurate. Set looping to Forever for most banner and social animations.
Preview by pressing the Play button in the Timeline. Export via File > Export > Save for Web (Legacy) > GIF format, same as the previous methods.
| 💡 Pro Tip: For banner ad GIFs (which often have file size limits of 150–200KB), use the 4-up view in Save for Web (Legacy) to compare four different optimisation settings simultaneously. Click each panel and adjust settings — the file size preview updates per panel, letting you find the lowest acceptable quality at the target file size. |
Export Settings by Use Case
Getting export settings right has a massive impact on file size without necessarily degrading visual quality. Here are verified settings for common GIF use cases:
| Use Case | Max Size Target | Colours | Dither |
| Social media post | 5–8MB | 128 | Diffusion 85% |
| Website/email | 1–2MB | 64–128 | Diffusion 75% |
| Banner ad | 150–200KB | 32–64 | Pattern or None |
| WhatsApp/iMessage | 1MB | 64 | Diffusion 75% |
| Discord | 8MB | 128–256 | Diffusion 88% |
| Tenor/GIPHY upload | 100MB (converts) | 256 | Diffusion 100% |
The single most effective way to reduce GIF file size while preserving quality: reduce the canvas dimensions before exporting. Reducing from 600px wide to 400px wide typically cuts file size by 50–55%. This has far more impact than reducing the colour count.
How to Edit an Existing GIF in Photoshop
Opening and editing a GIF someone else created — or one you made previously — is a common task that the original tutorial didn’t cover. Here’s the complete workflow.
Step 1: Open the GIF
File > Open, navigate to the GIF file and click Open. Photoshop imports the GIF with each frame appearing as a separate layer in the Layers panel (named ‘Frame 1’, ‘Frame 2’, etc.) and the Timeline panel showing the frame animation.
Step 2: Edit Individual Frames
Click a frame in the Timeline to select it. The Layers panel shows which layers are visible in that frame. To edit the content of a frame: click the relevant layer in the Layers panel and use any Photoshop tool — brush, type, crop, adjust — to modify it.
Changes to a layer while a specific frame is selected apply globally to that layer across all frames where it’s visible — because it’s the same layer, not a copy. If you want to make a change that only affects one specific frame, you need to:
- Select the frame you want to modify.
- Duplicate the layer you want to change (Cmd/Ctrl+J).
- Make your changes on the duplicate.
- In the original layer, hide it for the target frame. In the duplicate, show it only for the target frame.
| 💡 Pro Tip: To add text to all frames of an existing GIF: create a new text layer above all existing layers, then go to the Timeline menu > Select All Frames, then make the text layer visible. It will appear in all frames simultaneously. |
Step 3: Re-export
Once edited, export the modified GIF via File > Export > Save for Web (Legacy) exactly as described in Method 1 Step 5. Photoshop will re-encode all frames with your changes applied.
Method Comparison at a Glance
| Method | Time | Skill Level | File Size | Best For |
| 1. From still images | 10–20 min | Beginner | Medium | Photo slideshows, product shots |
| 2. From video | 5–10 min | Beginner | Large → optimise | Screen recordings, clips |
| 3. From scratch | 20–40 min | Intermediate | Small–Medium | Animations, banners, UI demos |
Troubleshooting — Common GIF Problems
| Problem | Cause | Fix |
| GIF exports as a still image, not animated | Using Export As instead of Save for Web (Legacy) | Always use File > Export > Save for Web (Legacy). Export As does not support GIF animation — this is the #1 mistake. |
| All frames show the same image | Frames From Layers wasn’t run after creating Frame Animation | In Timeline panel menu > Make Frames From Layers. Do this immediately after clicking ‘Create Frame Animation’. |
| Animation plays too fast / too slow | Frame timing set incorrectly | Select all frames (Cmd/Ctrl+A in Timeline) and set a unified timing. For social media 1–2 sec per frame is standard. |
| GIF colours look washed out or banded | Too few colours in export, or wrong dither setting | Increase Colors to 128 or 256 in Save for Web. Switch Dither to Diffusion at 85–88%. |
| GIF file size too large | High resolution, too many frames, or too many colours | Reduce canvas dimensions first (most impactful), then reduce Colors to 64, then reduce frame count. |
| Video import creates too many frames | Limit to Every N Frames not set | In File > Import > Video Frames to Layers, set ‘Limit to Every 2 Frames’ or higher before importing. |
| Transparent background not saving correctly | Matte colour set incorrectly in Save for Web | In Save for Web, set Matte to None for true transparency. Note: GIF supports 1-bit transparency — semi-transparent edges will have jagged edges. |
| GIF plays once then stops | Looping Options set to Once in Save for Web | In Save for Web dialogue, change Looping Options from Once to Forever before exporting. |
| Timeline panel is missing | Panel closed or not activated | Window > Timeline. If the window opens empty, click ‘Create Frame Animation’ button in the centre. |
| Frames appear in wrong order | Layer stack order unexpected | Frames from Layers creates frames bottom-to-top (bottom layer = first frame). Reorder layers before creating frames, or use Timeline menu > Reverse Frames after. |
Tutorial – Make a Soundwave GIF in Photoshop
Now you can practice making a soundwave GIF in Photoshop – let’s begin:
Please note this tutorial was written using an older version of Photoshop and some menu locations have since changed.
Step 1
Start by making a new file. Click File > New. You can choose any size. We can easily resize the canvas at the end of the project.

Step 2
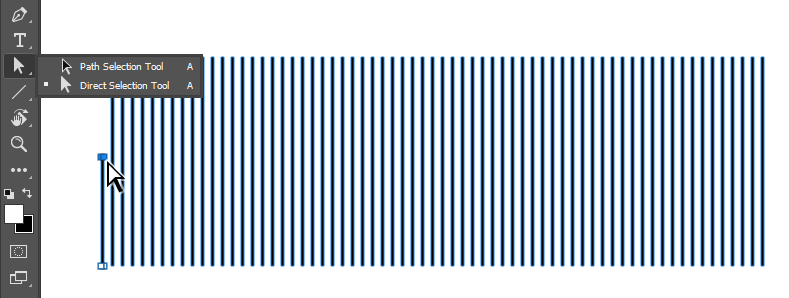
Activate the Line Tool. In the Options Bar, set its Weight to 3 px and select Shape as its mode. Click and drag while holding the Shift key to draw a vertical 3 px width line shape.

Step 3
While the line is still selected, hit Ctrl + Alt + T to transform and duplicate it. Hit the Right Arrow key a few times to move the duplicated line to the right.

Step 4
Make sure the shape is still selected. Now hit Ctrl + Shift + Alt + T to repeat the duplication and transformation process. Keep doing this until we have enough lines.

Step 5
Activate the Direct Selection Tool and then select the top points of the line and drag it down to shorten it.
Step 6
Repeat this to the other lines until we have combination of tall and short lines.

Step 7
You can keep the shape if you want to. Here, I want it to be centered vertically. Select all the shapes using the Path Selection Tool and then click Vertical Centers in the Options Bar.


Step 8
Double click the wave layer shape to open up the Layer Style dialog box. In the dialog box, activate Gradient Overlay. Make sure to set its Angle to 0 degree to get the gradient in a straight line. Click the gradient preview box to edit it.

Step 9
A Gradient Editor dialog box will pop up. You can use it to modify the gradient. Click on the lower part of the gradient bar to add color stop and then select its color from the Color box. Apply combination of white and black colors into the gradient.

Step 10
Hit the OK button to accept the result.

Step 11
Next, we want to add gradient-map adjustment layer to the wave. We don’t want it to affect the background. In order to do that, we need to limit its effect by selecting the wave. Hold Ctrl and then click the wave layer thumbnail.

Step 12
Click the Create an Adjustment Layer icon and then select gradient-map. The gradient-map will only affecting the wave. In the Properties panel, choose rainbow for the gradient.
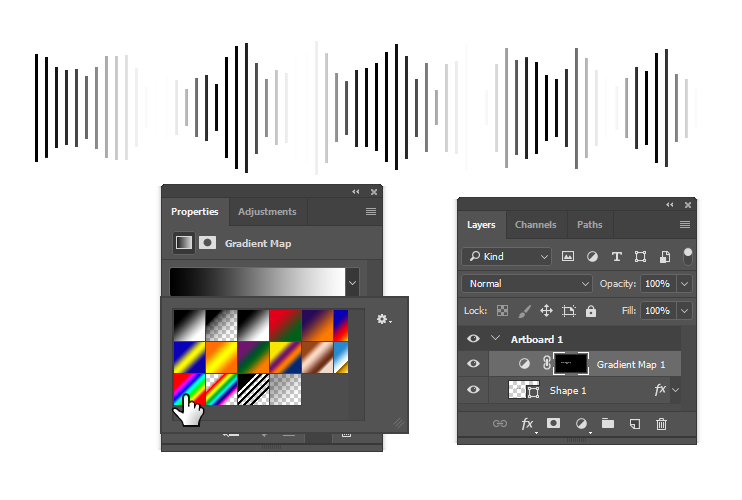

Step 13
I think the background color should be black. Add a new Solid Color adjustment layer. Place it at the bottom of the layer stack.


Step 14
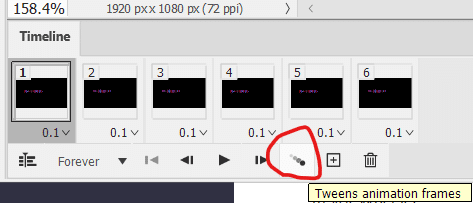
It’s time to add animation. Open up the Timeline panel. By default, the panel is hidden. You can open it using the menu Window > Timeline. Make sure to select Create Frame Animation. Click the button to start making frame based animation.


Step 15
By default, the frame lasts for 0 second. We want to change that to 0.5 seconds.

Step 16
Add new frame by clicking the New Frame icon. The icon is very similar to the Add new layer in the Layers panel.

Step 17
Double click the wave layer shape in the Layers panel. Change the Scale of the Gradient Overlay to 101%.

Step 18
So, in the first frame the scale of the Gradient Overlay is 100%. In the second frame, it grows to 101%. Let’s keep this going. Add the third frame and set it to 102%. Continue until we have the Scale growing and then return to 100%.

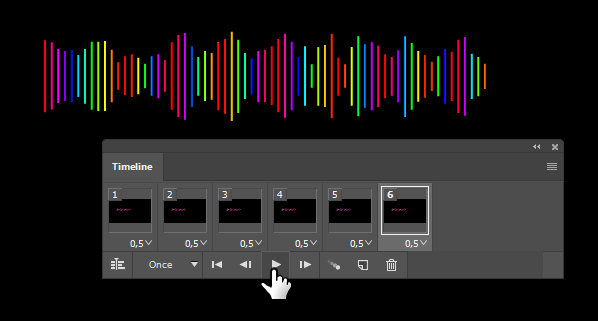
Step 19
Hit the Play icon to animate the wave.
Step 20
To make the animation run faster, change the duration of the frames. To change all the durations at once, select the frames by clicking the first frame and then Shift – clicking the last frame and finally select the new duration.

Step 21
The animation should be much faster now.

Step 22
By default, the animation only runs once. You can change it to Forever to make it looping continuously.

Step 23
In the beginning of this tutorial we don’t really care about the canvas size. To remove excess canvas, select the Artboard in the Layers panel and then drag the canvas bounding box.

Step 24
We have remove the excess canvas in the artboard but not in the animation. You can see it in the frame animation thumbnail. We need to fix this, otherwise we will have empty canvas in our final animation.

Step 25
It is easy to fix this. Just click Image > Trim with Transparent Pixels selected.


Step 26
To export the animation as an animated gif file we have to use the legacy Save for Web feature. You can find it under the File > Export menu. You can not use the newer Export As feature. Both can save a gif image but only the Save for Web have animation. In the file type option, you have to select GIF. JPEG and PNG don’t support animation. You can tweak the setting to reduce the color. Therefore, reducing the file size. This works great if you’re going to upload the image on the internet. However, since most people have fast internet these days I tend to skip it and just click the Save button.

Final Result
This is the final result. If you want to change the color of the wave, you only need to double click the gradient-map adjustment layer and edit the gradient. Hope you enjoy the tutorial as much as I do. I also add another wave with different color combination.