
I love custom Photoshop brushes and there are tons of these over the internet. As time goes by you will have download thousands of these brushes and it’s hard to manager. In this post, I will show you a handy way to use Adobe Preset Manager to organise Photoshop brushes.
As we download more and more Photoshop brushes off the net and load them into Photoshop, they become quite disorganised and you will find it’s getting harder & harder to locate certain brush (like this screenshot below, I have hundreds of brushes all cramped into one panel):

If you want to save time and find your desired brush quickly, it’s important to save them into groups using the Preset Manager.
Now let’s begin – firstly go into Window > Brush Presets and turn on the brush preset panel:

Once the brush preset panel is on, click on the “Preset Manager” button down the bottom of the panel:

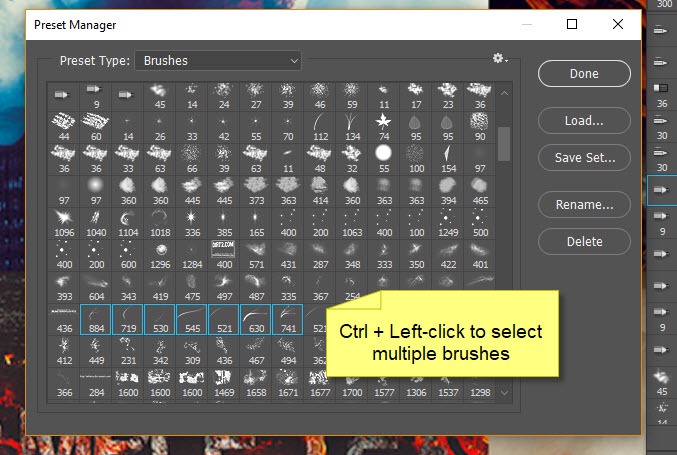
Open the preset manager, then simply hold down the Ctrl key and left-click on the brushes you would like to group:
Once you finish the selection, click on “Save Set…”:

Choose a folder and name your brushes to save with, and press “Save”:

That’s it! Next time you want to use these brushes, you can simply use the “Replace Brushes” feature on the brush panel:

And you will see only the brushes within that preset! Much cleaner, isn’t it:

This method will come in particularly handy if you have several brushsets with the same theme, as such cloud, smoke or fire brushes. You can just group brushes with the same theme into a single preset. Much easier to locate.
That’s it folks! Hope this method help you organise Photoshop brushes and save your time finding them. If you have any other handy tips, leave me a comment below!
2 Comments
I have a TON of brushes. I categorized them into groups (such as; accents, floral, masks, borders, etc) and saved them, deleted them and loaded them one by one until it looked semi-organized. and when i load new brushes, i put them in order of where they’re supposed to be, and save the whole set again. my brush file is over 250MB now XD
Same here, way too many brushes and the amount just keep growing!