In this Photoshop tutorial, I will show you the process of creating fresh fruit 3D text effect in Photoshop. You will learn a few trick to render a nice and unique 3D text effect and apply various fruits around it. We will use a number filter to add some extra effect for our text.
The PSD file of this tutorial is available to buy on PSD Vault Shop, or via the PSD Vault VIP members area.
Here is a preview of the final effect I have for this tutorial: (click to enlarge)
PSD Vault VIP Membership
You can download the PSD File for this tutorial via the VIP Members Area for only $6.95/Month (or less)! You will not only get this PSD File, but also 100+ other PSD Files + Extra Goodies + Exclusive Photoshop tutorials there. Signup now and get exclusive!
OK Let’s get started!
To complete this tutorial, you will need the following stocks:
Step 1
Create a new document sized 1400px * 800px with the standard white a light blue background:
Create a new layer and use a soft white brush to paint a dot in the centre of the canvas:
Set this new layer’s blending mode to “Soft Light”:
And you will have the following effect:
Step 2
We will add the 3D text onto our canvas in this step. Firstly, use the type tool to type some texts on our canvas with a light pink colour:
Then, if you have Photoshop CS6, you can go to 3D > New 3D Extrusion from selected layer (make sure the text layer is selected) and apply the following effect:
Note: You can download this 3D text render here if you don’t have CS6, or simply want to skip this step. I have the render in a different text colour but you can simply change it via the Hue tool.
Mesh
Deform
Cap
Coordinates
Materials
Infinite Light
Render the 3D text and convert it into a smart object, you will have the following effect:
Rotate the text to the following angle with the free transform tool:
Add the following 2 adjustment layers as clipping mask to this text layer:
Levels
Curves
and you will have the following effect:
Step 3
We will add some fruits into the image. Load the fruit stock photos into Photoshop and select it as shown below:
Copy and paste the selection onto our document, resize it as shown below:
Repeat the process above and add more variety into the mix:
Merge all these layers and duplicate it several times, attach each duplicated layer around the text.
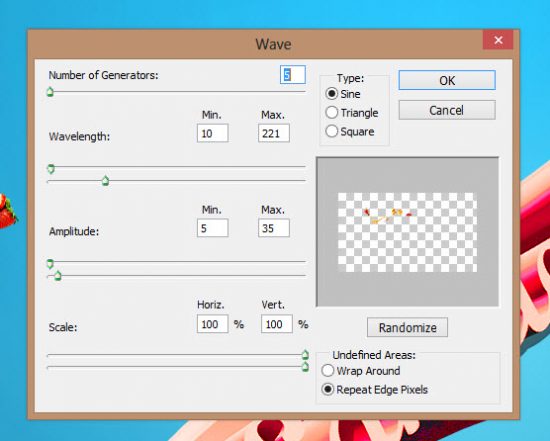
On the top-most layer, apply the Wave filter from Filter > Distort > Wave, using the following settings:
And you will have the following effect:
Duplicate this wave layer a few times as welll and attache them around the text as shown below:
Step 4
We’re almost done! We can add some liquify filter effect on the fruits layer to add some flowing effect:
We can also add some cloud and water splash effect with cloud brush and water brush (you can find plenty of these on the net):
and here is my final effect: (click to enlarge)
That’s it for this tutorial! Hope you enjoy going through it and find it useful. Drop me a comment below if you have any question.
Till next time, have a great day!


7 Comments
it helped. thanks)
amazing work. unfortunately i don’t have a good graphic card to follow along with this tutorial in the 3D section :(. by the way your design is great. :)
@abzdesigner you don’t have because you need to have Photoshop Extended version. (it has extra’s 3D feauter) Have a nice day
u are so amizing 10q
Hello I have photoshop version creative Claudia. I do everything as it is written, but going in 3D> New 3D Extrusion from the selected layer opens a window “Properties Oh, there is no such icon in the ideal letter t, what to do please help how to do this version of CC,?
I LIKE TNX
Thank you for the amazing tutorial