Close Menu
PSD VaultPSD Vault
  • VIP Area
  • Photoshop Basics
  • Photo Effect
  • Text Effect
  • Premium Tuts
  • Resources
  • Drawing
  • Inspiration
  • Web Graphics
  • Abstract
  • Freebies
  • Advertise
  • Get in Touch
  • About PSD Vault
Facebook Instagram Pinterest YouTube TikTok
Facebook Instagram Pinterest YouTube TikTok RSS
PSD VaultPSD Vault
  • VIP Area
    • Sign Up
    • Log In
  • Photoshop Basics
  • AI
  • Photoshop Error Fixes
  • Video Tutorial
  • Photo Effect
  • Text Effect
  • Premium Tuts
  • Drawing
  • Opinion
PSD VaultPSD Vault
Home»Photo Effect»How to Give Your Portrait Cyberpunk Effect in Photoshop
Photo Effect

How to Give Your Portrait Cyberpunk Effect in Photoshop

By James QuNovember 15, 20253 Mins Read
Share
Facebook Twitter LinkedIn Pinterest Email

Cyberpunk aesthetics are defined by high-contrast neon lighting, wet reflective surfaces, and futuristic HUD elements. This tutorial transforms a standard portrait into a dystopian cyberpunk character using non-destructive techniques in Photoshop.

What You’ll Need

  • Adobe Photoshop (CC 2021 or later)
  • High-resolution portrait (minimum 2000px height)

PSD Vault VIP Membership

You can download the PSD File for this tutorial via the VIP Members Area for only $6.95/Month (or less)! You will not only get this PSD File, but also 250+ other PSD Files + Extra Goodies + Exclusive Photoshop tutorials there. Signup now and get exclusive!

OK Let’s get started!

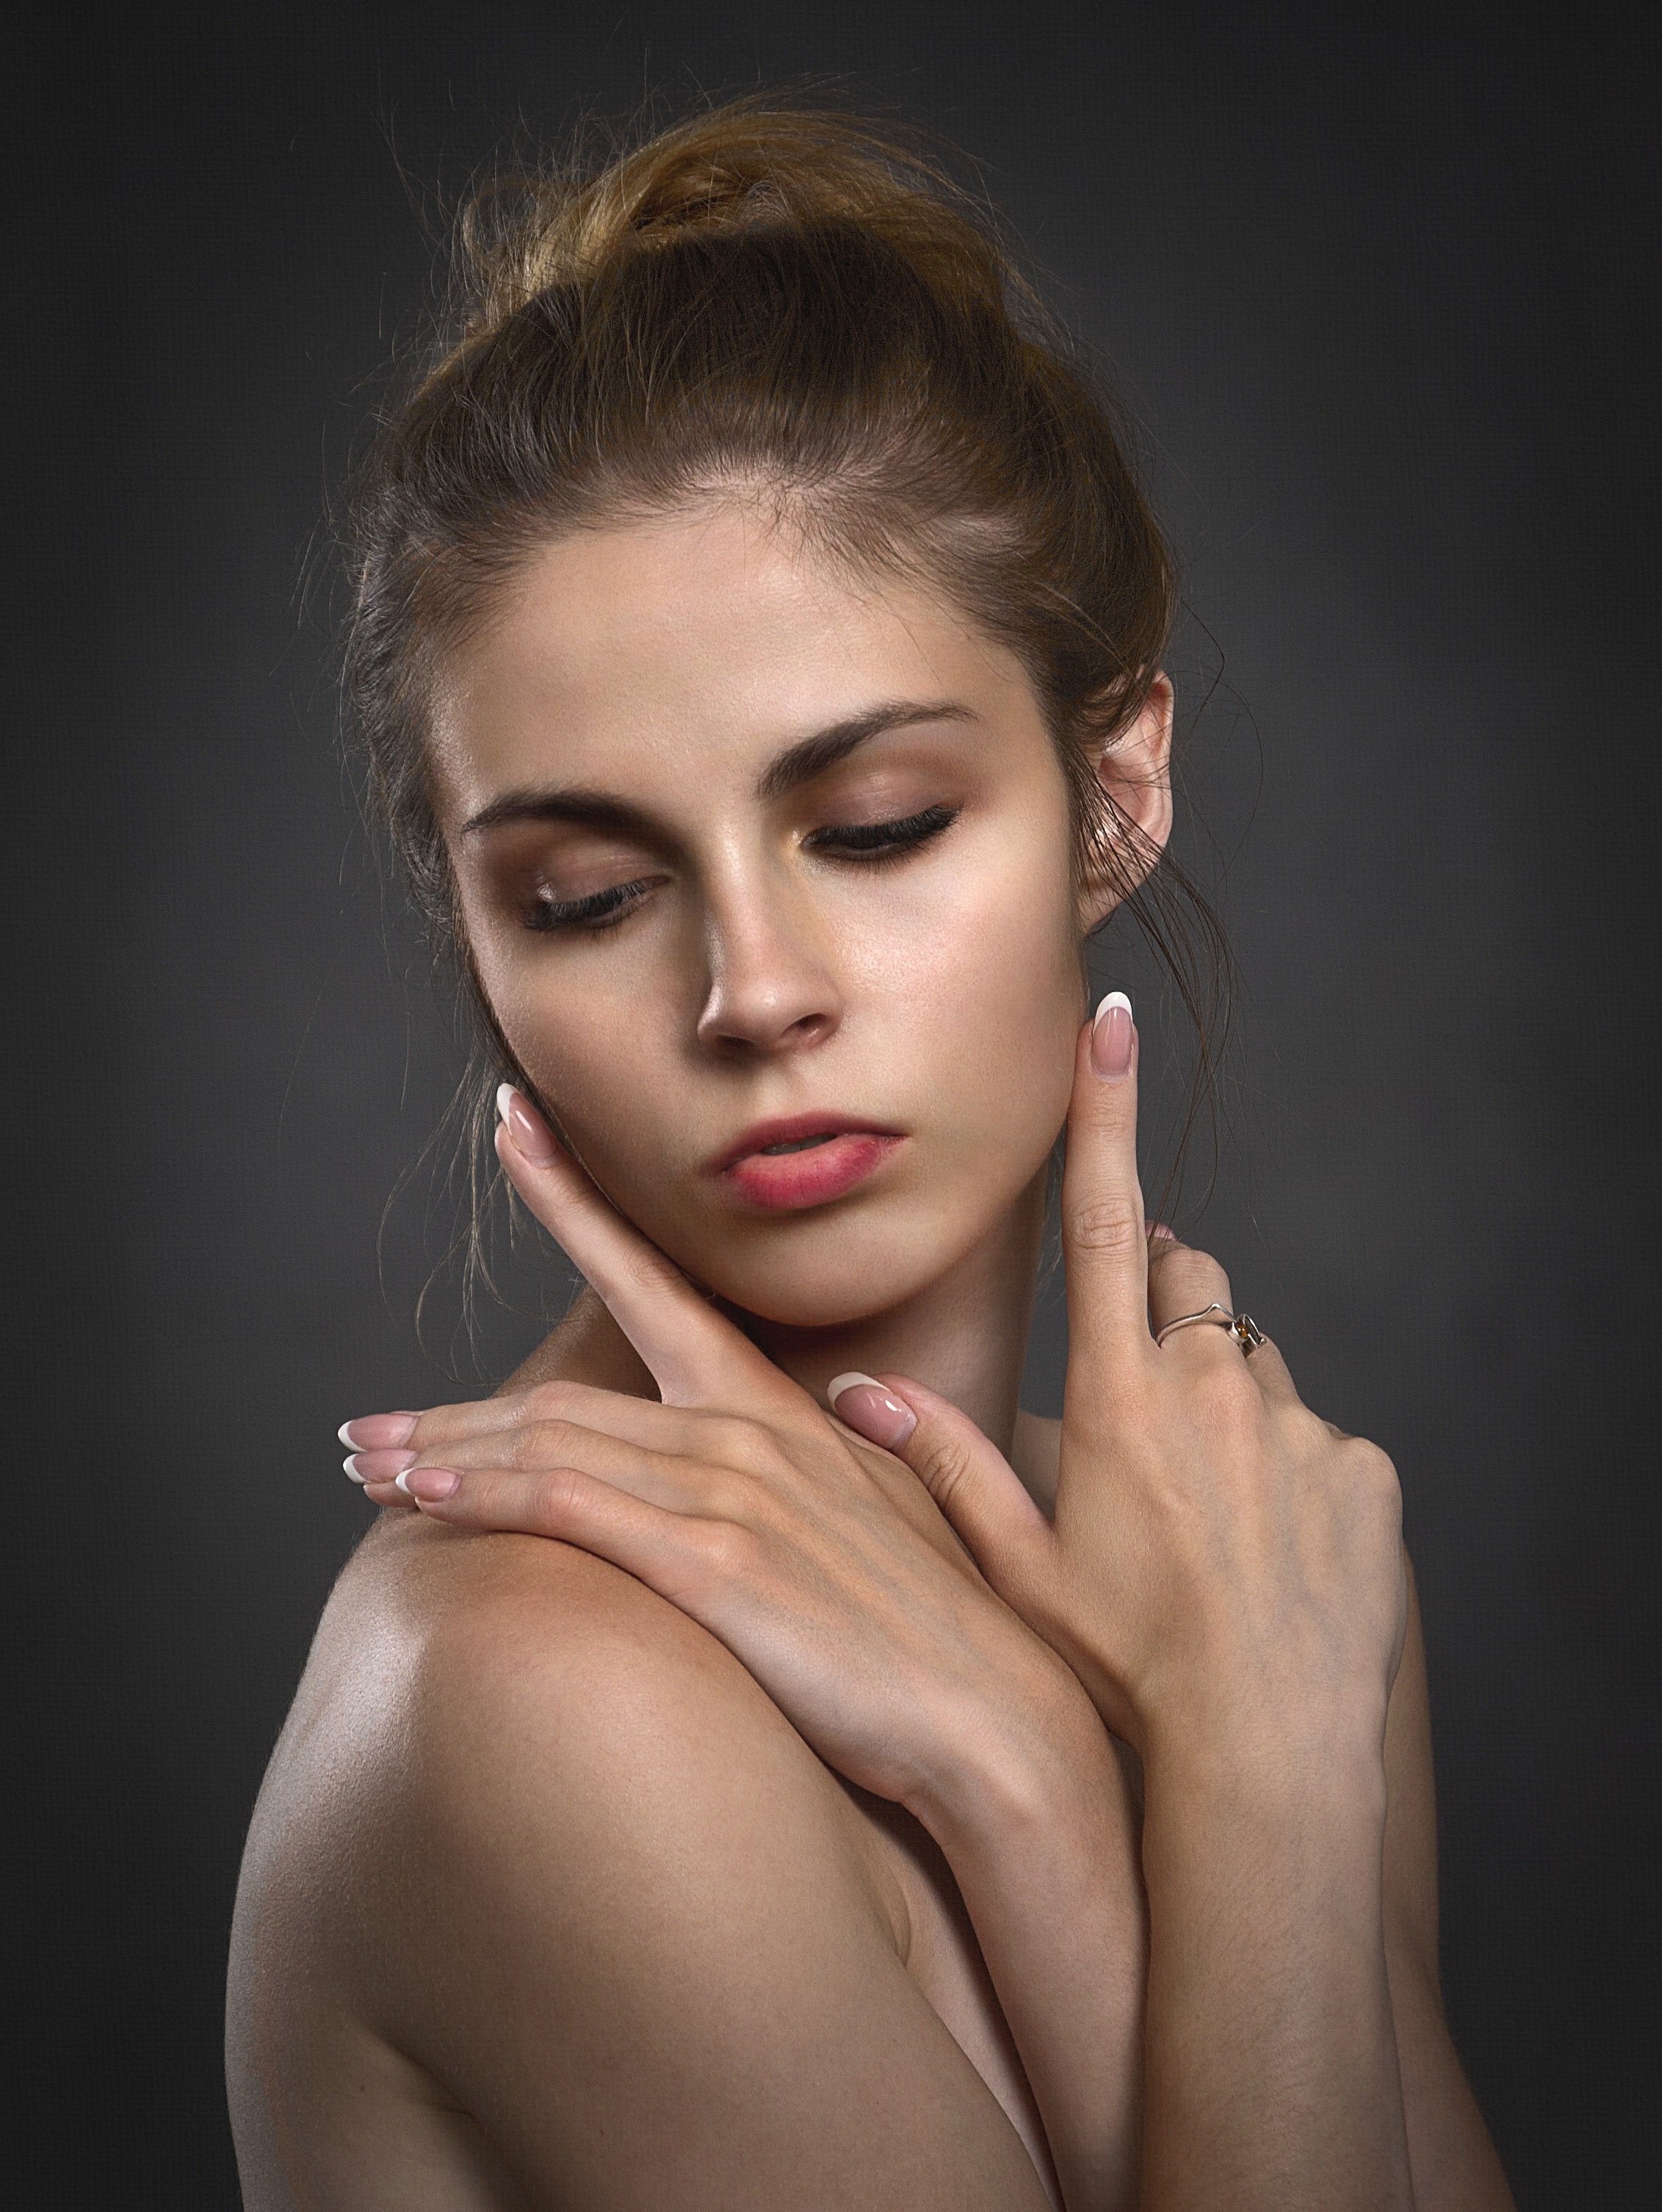
Step 1: Prepare Your Portrait

  1. Open your portrait in Photoshop (File > Open).
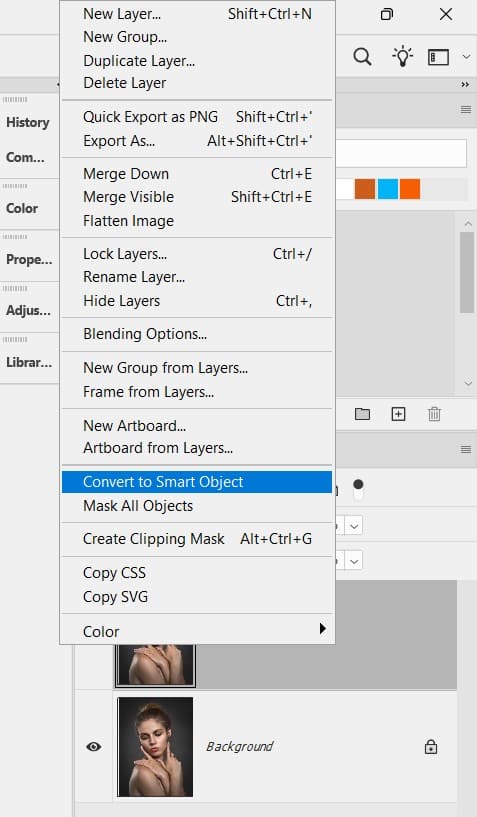
  2. Duplicate the background layer: Right-click > Duplicate Layer → Name: Base Portrait.
  3. Convert to Smart Object: Right-click layer > Convert to Smart Object.
    • Keeps edits non-destructive.
Right-click layer > Convert to Smart Object

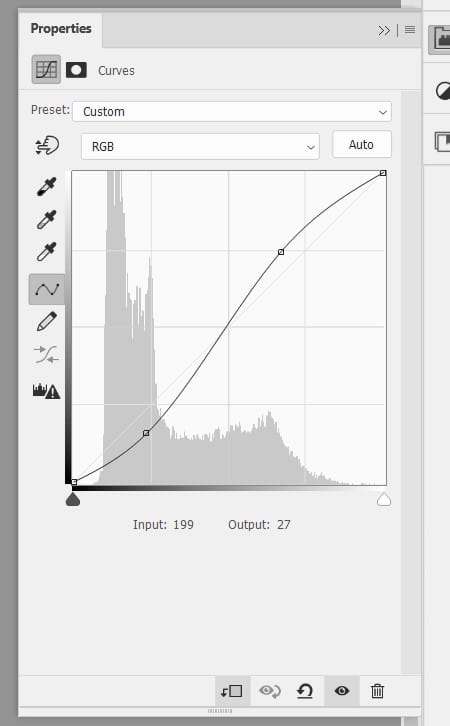
Step 2: Desaturate & Boost Contrast

  1. Add Black & White adjustment layer (Layer > New Adjustment Layer > Black & White).
  2. Increase contrast: Image > Adjustments > Curves:
Desaturate & Boost Contrast

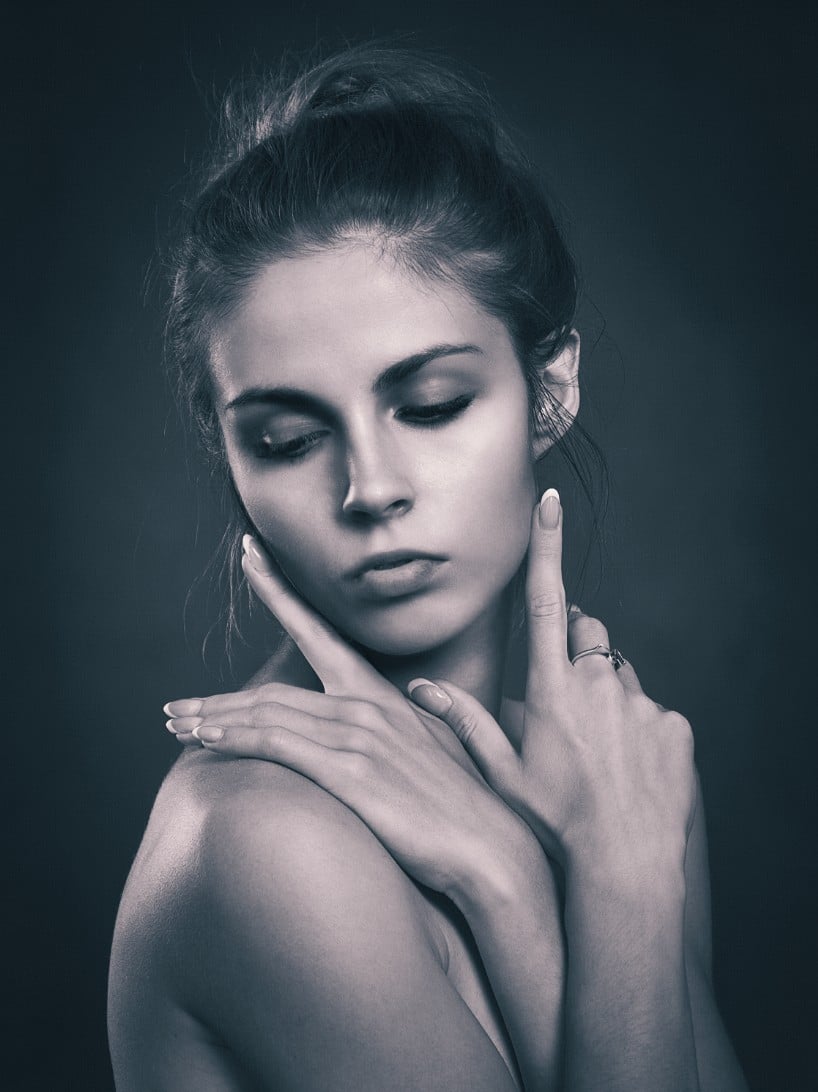
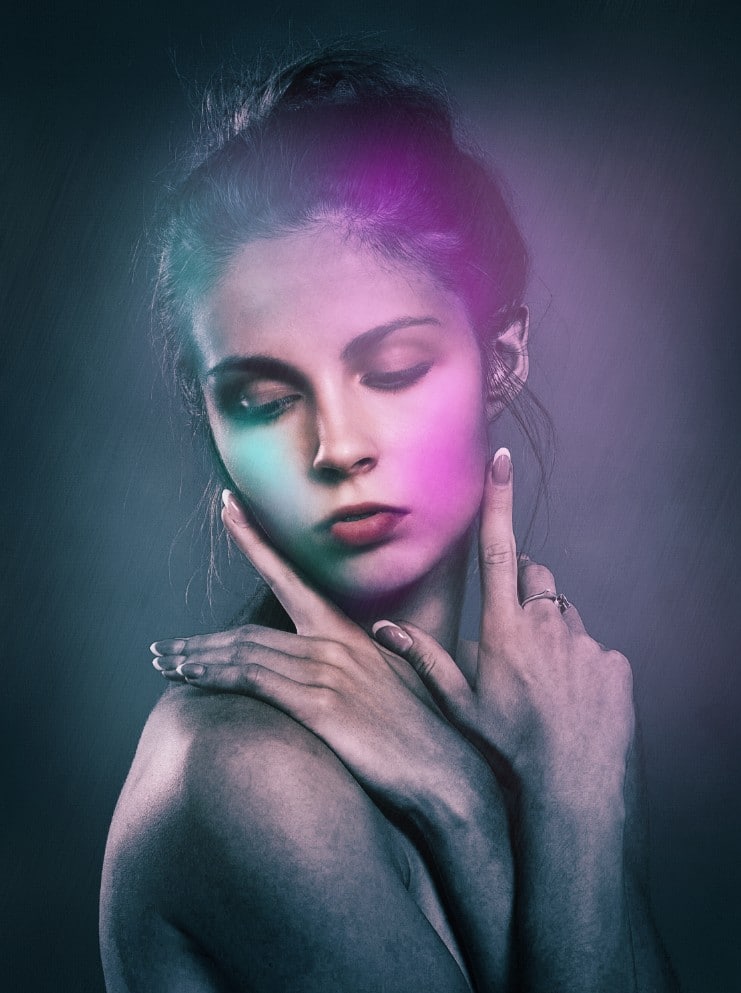
Step 3: Apply Cyberpunk Colour Grading

  1. Add Gradient Map adjustment layer.
    • Click gradient → Double-click left stop → #00D4FF (cyan).
    • Double-click right stop → #FF00C8 (magenta).
  2. Set blend mode to Soft Light, opacity 55%.
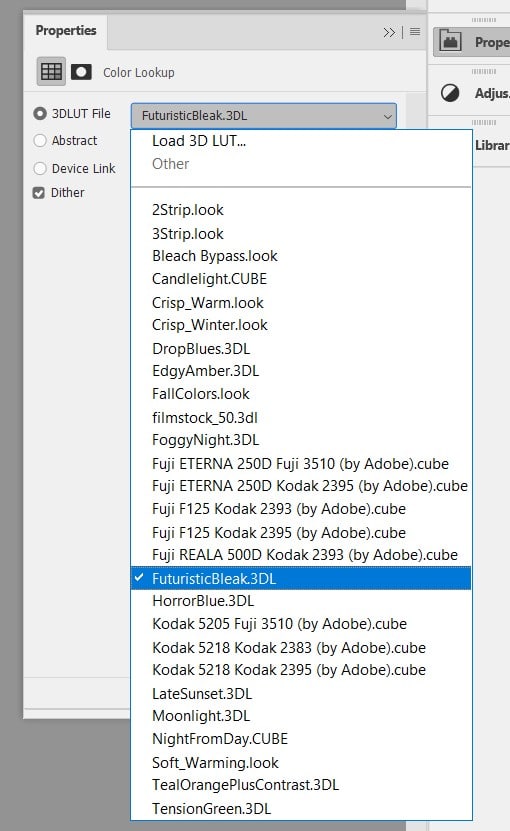
  3. Add Color Lookup layer → Load “FuturisticBleak.3DL” (or “TealOrangePlusContrast.3DL”).
    • Opacity: 40%.
FuturisticBleak.3DL

and this is the result so far:

Step 4: Paint Neon Rim Lighting

  1. Create new layer → Name: Neon Rim.
  2. Select Brush Tool (B) → Soft round brush, 0% hardness, flow 20%.
  3. Paint cyan (#00F9FF) along left cheek, jaw, and hair edges.
  4. Paint magenta (#FF00FF) on right side (simulates dual neon sources).
  5. Apply Gaussian Blur (Filter > Blur > Gaussian Blur) → 8–12 px.
  6. Duplicate layer → Blend mode: Linear Dodge (Add) → Opacity 30%.

Screenshot: Before/after neon rim + brush settings.

Step 6: Create Rain & Wet Skin Effect

  1. New layer → Fill with 50% grey (Edit > Fill > 50% Grey).
  2. Filter > Noise > Add Noise → 35%, Gaussian, Monochromatic.
  3. Filter > Blur > Motion Blur → Angle 70°, Distance 180 px.
  4. Blend mode: Screen, opacity 45%.
  5. Add white specular highlights on lips, cheekbones, collarbone using small soft brush.
Create Rain & Wet Skin Effect

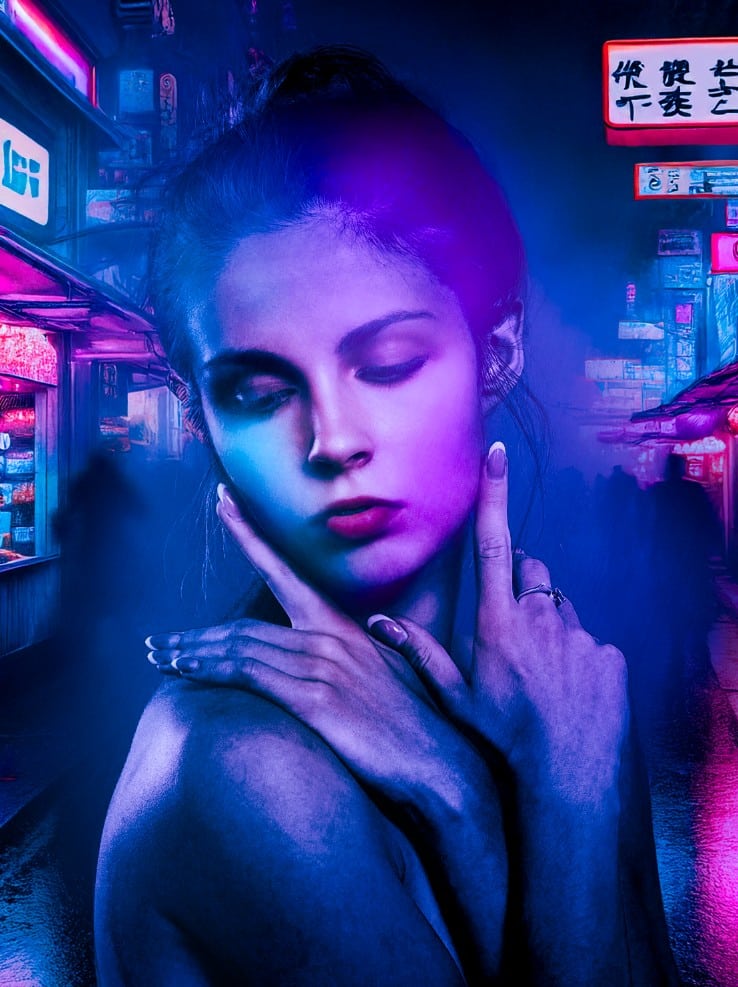
Step 7 – Use Generative Fill to Create Cyberpunk Environment

  1. Use the Object Selection Tool, select the subject, then inverse the selection.
  2. Use Generative Fill to create a cyberpunk street scape, using the following prompt: Bustling cyberpunk night market street, crowded with blurred figures in futuristic clothing, street food stalls with glowing menus, overhead holographic fish and dragons swimming in the air, vibrant neon in kanji and English, wet asphalt reflecting lights, steam and mist, rich colour saturation, dynamic composition, photorealistic.
Use Generative Fill to Create Cyberpunk Environment

Step 8: Final Polish

For final effect, you can apply the following adjustments to the image:

EffectSettings
VignetteFilter > Lens Correction > Custom > Vignette: -60
SharpenFilter > Sharpen > Unsharp Mask (Amount 80%, Radius 1.5 px)
GrainFilter > Noise > Add Noise (3%, Uniform)
Glowing EdgeFlatten the image, duplicate the background layer, and use Glowing Edge filter on the duplicated layer and set its blend mode to Linear Dodge (Add).

Before & After

Before

After

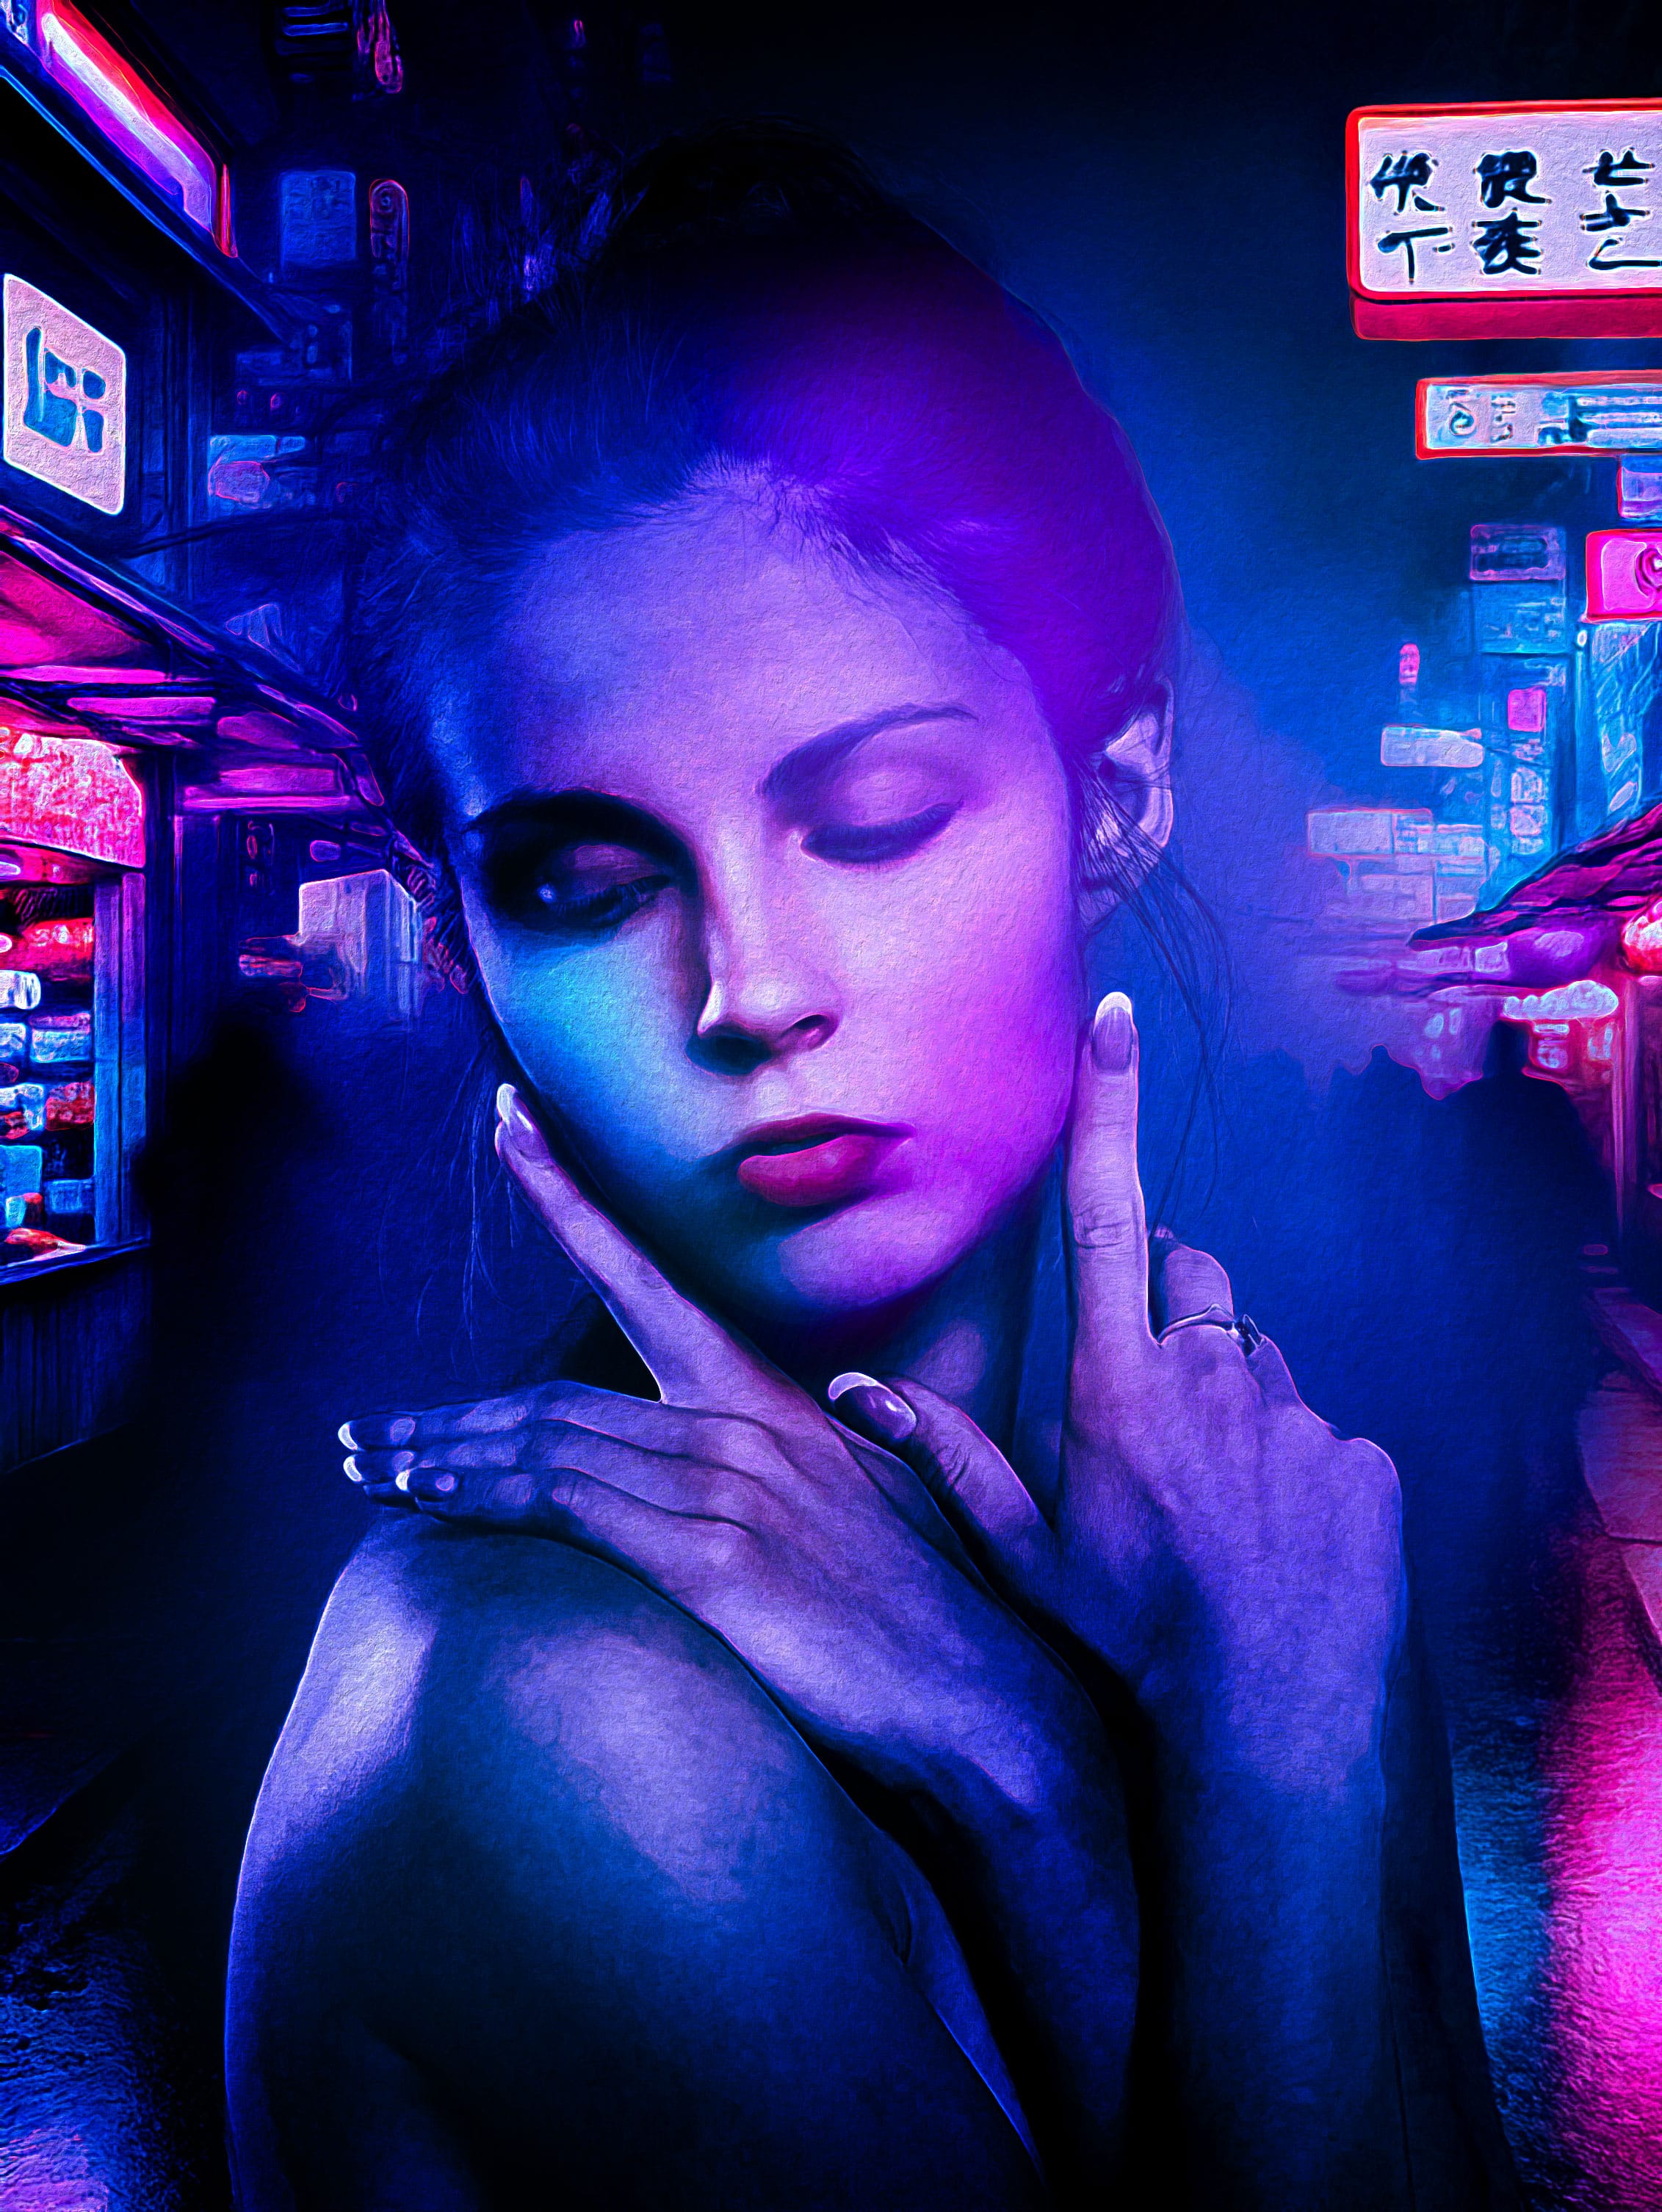
Congratulations! Your portrait now pulses with cyberpunk energy. Save as PSD (preserve layers) and export JPG/PNG for social media.

That’s it for this tutorial! Drop me a comment if you have any questions. Till next time, have a great day!

cyberpunk
Share. Facebook Twitter Pinterest LinkedIn Tumblr Email
James Qu
  • Website

James is a seasoned Photoshop expert with over 25 years of experience based in Australia. As the driving force behind PSD Vault, he authors the majority of its in-depth tutorials and insightful articles.

Related Posts

How to Edit Non-Destructively with Smart Objects & Neural Filters in Photoshop

October 25, 2025

Create Surreal Motorbike Racing Scene in Photoshop

October 18, 2025

VIP Exclusive Tutorial – The Creation of “Return” Digital Art in Photoshop

October 10, 2025

Comments are closed.

Don't Miss

How to Give Your Portrait Cyberpunk Effect in Photoshop

November 15, 2025

Create Realistic Neon Text Effect in Photoshop

November 8, 2025

How to Enlarge Images Without Losing Quality in Photoshop (using Super Resolution)

November 6, 2025

For Beginners

Basics

How to Create Relistic Burning Car Effect in Photoshop

By James QuOctober 17, 20251 Min Read

How to Pixelate an Image in Photoshop

October 16, 2025

How to Stay Ahead of Every Photoshop Update & Unlock Their Full Power

October 11, 2025

Curves or Levels: Choosing the Right Tool for Stunning Edits

September 28, 2025

You May Also Like

Photo Effect

How to Edit Non-Destructively with Smart Objects & Neural Filters in Photoshop

By James QuOctober 25, 20253 Mins Read
Photo Effect

Create Surreal Motorbike Racing Scene in Photoshop

By James QuOctober 18, 202512 Mins Read
Photo Effect

VIP Exclusive Tutorial – The Creation of “Return” Digital Art in Photoshop

By Kris ShieldsOctober 10, 20252 Mins Read
Facebook X (Twitter) Instagram Pinterest
  • About Us
  • Get in Touch
  • Advertise
  • VIP Area
  • Privacy Policy
  • Terms & Conditions
© 2025 PSD Vault. All Right Reserved.

Type above and press Enter to search. Press Esc to cancel.

Manage Consent
To provide the best experiences, we use technologies like cookies to store and/or access device information. Consenting to these technologies will allow us to process data such as browsing behavior or unique IDs on this site. Not consenting or withdrawing consent, may adversely affect certain features and functions.
Functional Always active
The technical storage or access is strictly necessary for the legitimate purpose of enabling the use of a specific service explicitly requested by the subscriber or user, or for the sole purpose of carrying out the transmission of a communication over an electronic communications network.
Preferences
The technical storage or access is necessary for the legitimate purpose of storing preferences that are not requested by the subscriber or user.
Statistics
The technical storage or access that is used exclusively for statistical purposes. The technical storage or access that is used exclusively for anonymous statistical purposes. Without a subpoena, voluntary compliance on the part of your Internet Service Provider, or additional records from a third party, information stored or retrieved for this purpose alone cannot usually be used to identify you.
Marketing
The technical storage or access is required to create user profiles to send advertising, or to track the user on a website or across several websites for similar marketing purposes.
  • Manage options
  • Manage services
  • Manage {vendor_count} vendors
  • Read more about these purposes
View preferences
  • {title}
  • {title}
  • {title}