In this tutorial, I will show you the processes of creating this unique “Trapped in the trees” photo manipulation in Photoshop. The idea of this photo manipulation is to surround a face with tree trunks and branches and create a trapped effect. We will achieve this by utilising a few simple Photoshop techniques.
The PSD file of this tutorial is available via the PSD Vault VIP members area.
Here is a preview of the final effect I have for this tutorial: (click to enlarge)

PSD File Download
You can download the PSD File for this tutorial via the VIP Members Area for only $6.95/Month (or less)! You will not only get this PSD File, but also 100+ other PSD Files + Extra Goodies + Exclusive Photoshop tutorials there. Signup now and get exclusive :) Find out more about the VIP Members Areas

OK Let’s get started!
To complete this tutorial, you will need the following stocks:
Model by anettfrozen
Step 1
Create a new document sized 1400px * 800px with white background. Load the Model stock image into Photoshop and select the facial area of the model:

Copy and paste the selection over to our document. Re-size this new face layer with the free transform tool, and rotate the face clockwise slightly as show below:

Add a layer mask to this face layer and use some of the splatter brushes you downloaded, remove some portions around the face edges as shown below:

Step 2
We will work on the face layer further in this step. Let’s add the following 3 adjustment layers as clipping masks to the face layer:
Black and White


Reveal the eyes area on this black and white’s layer mask:

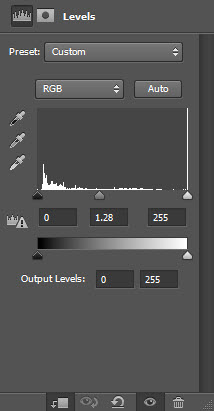
Levels

Curves


Load the fallen tree stock into Photoshop and select a piece of the tree:

Copy and paste the selection over to our document and set it as clipping mask (make sure it’s above the previous adjustment layer), and you will have the following effect:
Hint: you can use the free transform tool to re-size and rotate this tree layer, to achieve the best result.

Add one more black and white adjustment layer as clipping mask on top of this tree layer. Set the layer opacity of this black and white adjustment layer to around 40%.
and here is the effect so far:

Step 3
We will start adding the tree branches in this step. Grab another piece of the tree from the fallen tree stock and paste it over to our document. Use the free transform tool to re-size and rotate it to the angel shown below:

Add the following 2 adjustment layers as clipping masks for this tree branch layer:
Black and White

Levels

and here is the effect so far:

Step 4
We will keep adding the branches in until the face in surrounded by them. We can use the same process as mentioned in step 3, and make sure your select different pieces from the fallen tree stock image, so we can ensure the variety for our image:


Make sure you adjust the size of each branch pieces with the free transform tool as well:


Step 5
We will add the fire texture to the image in step 5. Load the fire stock image into Photoshop and select the fire:

Copy and paste the selection over to our document and set the blending mode to “overlay”, and move them to the following portions:

Add some fire texture around the eye area as well:

Step 6
We will work on a series of extra effects in this step. Load the crow stock image into Photoshop and add it to the position shown below:

We will render some smoke/cloud with the cloud filter or brush as shown below:

Use the splatter brush to add some abstract patterns below:

Step 7
We’re almost done! We will apply a few filter effects to touch up this image. Flatten the layers and duplicate the background layer, apply the following Ink Outlines filter to the duplicated layer:

Attach the following layer mask to this ink outline filtered layer:

and here is the effect so far:

Optionally, we can duplicate the background layer once more and move this duplicated layer to the top, and apply the following Stained Glass filter:

Set this layer blending mode to “Screen”:

Add the following selective color adjustment layer to fine tune the colours a bit:


and this is the final effect I have: (click to enlarge)
That’s it for this tutorial! Hope you enjoy going through it and find it useful. Drop me a comment below if you have any question.
Till next time, have a great day!