Close Menu
PSD VaultPSD Vault
  • VIP Area
  • Photoshop Basics
  • Photo Effect
  • Text Effect
  • Premium Tuts
  • Resources
  • Drawing
  • Inspiration
  • Web Graphics
  • Abstract
  • Freebies
  • Advertise
  • Get in Touch
  • About PSD Vault
Facebook Instagram Pinterest YouTube TikTok
Facebook Instagram Pinterest YouTube TikTok RSS
PSD VaultPSD Vault
  • VIP Area
    • Sign Up
    • Log In
  • Photoshop Basics
  • AI
  • Photoshop Error Fixes
  • Video Tutorial
  • Photo Effect
  • Text Effect
  • Premium Tuts
  • Drawing
  • Opinion
PSD VaultPSD Vault
Home»Photo Effect»Create Surreal Landscape with Mountain and Waterfalls in Photoshop
Photo Effect

Create Surreal Landscape with Mountain and Waterfalls in Photoshop

By James QuOctober 5, 20244 Mins Read
Share
Facebook Twitter LinkedIn Pinterest Email

In this Photoshop tutorial, I will show you the steps I took to create Surreal Landscape with Mountain and Waterfalls in Photoshop. We will also be adding some spacecrafts flying in the sky, as well as elements such as cloud, birds and light.

The PSD file of this tutorial is available via the PSD Vault VIP members area.

This is an intermediate level difficulty tutorial and some steps can be tricky.

Here is a preview of the final effect I have for this tutorial: (click to enlarge)

fantasy-landscape-with-floating-mountain-waterfall-max

PSD Vault VIP Membership

You can download the PSD File for this tutorial via the VIP Members Area for only $6.95/Month (or less)! You will not only get this PSD File, but also 200+ other PSD Files + Extra Goodies + Exclusive Photoshop tutorials there. Signup now and get exclusive!

OK Let’s get started!

To complete this tutorial, you will need the following stocks:

Mountain 1

Mountain 2

Waterfall

Spacecraft (when you’re at the page, right-click on the image and “save as”, no need to download the source file)

Cloud Brushes

Birds Brushes

Step 1

Create a new document sized 1000px * 1500px with white background. Load the cloud brush downloaded and paint some cloud over the background layer as shown below:

1 cloud

Load the “Mountain 1” image into Photoshop, select the following mountain peak from this image:

1 sel

Copy and paste your selection into Photoshop, re-size and place it down the bottom:

1 paste

Use a soft eraser, fade the top edge of this new layer, so it blends into our cloud background:

1 erase

Step 2

Load the “Mountain 2” image into Photoshop, select the following peak area:

2 sel

Copy and paste the selection to our document, rotate it so it becomes up side down as shown below:

2 rotate

Use a soft eraser (set its brush flow and opacity to both around 50%), fade the edge of the mountain as shown below:

2 erase

Repeat the above step, add 2 more floating mountain into the far distant position. You can adjust the size of the mountain by using the Free Transform tool:

2 more

Step 3

Load the waterfall stock image into Photoshop, select the main falls portion of the image:

3 sel

Copy and paste the selection to our document, flip the new layer horizontally, and place on the left side of the floating mountain:

3 paste

Use a soft eraser to fade the edges of the waterfall, so it blends into the mountain:

3 erase

Apply the following adjustment layers as clipping masks to this waterfall layer:

Black and White

3 bw

Levels

3 lvs

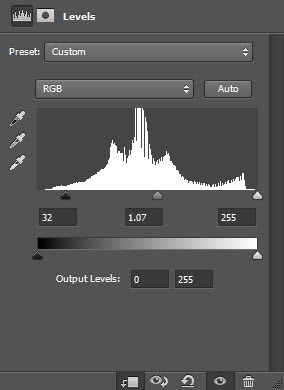
and here is the effect so far:

3 effect

Repeat the above process, add another small waterfall on the right side of the mountain:

3 add

Step 4

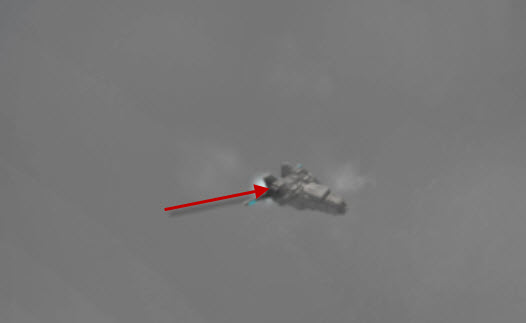
Load the spacecraft image into Photoshop. Select the spacecraft:

4 sel

Copy and paste the selection onto our document, re-size it to a very small scale, and place it to the following position below the floating mountain:

4 paste resize

Use a small soft brush to paint a white light behind and below the spacecraft:

4 light

We will add some trail light behind the spacecraft. Create a new layer and draw a rectangular selection, and fill the selection as shown below:

4 fill

Apply the following Gaussian Blur setting to this rectangular shape:

4 gau blur

Rotate it slightly clockwise:

4 rotate

And scale it down a bit:

4 scale

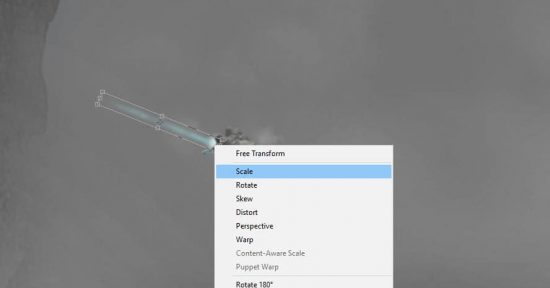
and this is the effect you will be aiming to achieve:

4 effect

Repeat this process, add another trail light for the spacecraft:

4 more

Use the cloud brush, paint some cloud effect around the spacecraft:

4 cloud

Optionally, you can add a few more spacecrafts around the mountain at the bottom. Make sure you adjust the size of the spacecraft so they don’t have the same size to each other:

4 more craft

Step 5

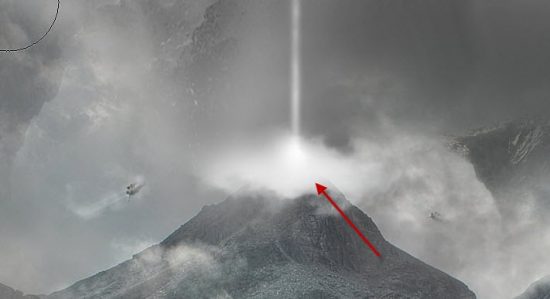
I added a light shooting from the top of the mountain using the same method as the trail light in Step 4:

5 add light

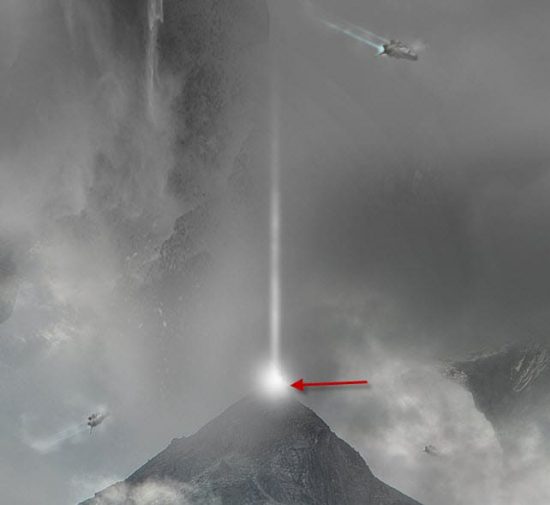
Paint some cloud around the mountain peak using the cloud brushes:

5 cloud

Step 6

We will be adding some final touches to our image in this final step. I use the cloud brush to paint some extra cloud around the mountain, in the following areas:

6 cloud

Use the bird brush downloaded at the beginning of the tutorial, paint some flying birds – make sure you lower the opacity so they’re barely visible, and do not use large size birds:

7 bird

Add some particles effect around the bottom mountain with a particle brush:

7 particle

I further added some colours to the image with several adjustment layers added on top of all previous layers, such as selective colours, vibrance and brightness and contrast. Please feel free to experiment with different colour schemes, you don’t have to limit yourself to using my colours.

fantasy-landscape-with-floating-mountain-waterfall-max

That’s it for this tutorial! Hope you enjoy it and find it useful! If you have any questions about the steps, please contact me or leave a comment below. I will try my best to answer them.

Till next time, have a great day!

landscape mountain surreal waterfall
Share. Facebook Twitter Pinterest LinkedIn Tumblr Email
James Qu
  • Website

James is a seasoned Photoshop expert with over 25 years of experience based in Australia. As the driving force behind PSD Vault, he authors the majority of its in-depth tutorials and insightful articles.

Related Posts

How to Give Your Portrait Cyberpunk Effect in Photoshop

November 15, 2025

How to Edit Non-Destructively with Smart Objects & Neural Filters in Photoshop

October 25, 2025

Create Surreal Motorbike Racing Scene in Photoshop

October 18, 2025

Comments are closed.

Don't Miss

How to Give Your Portrait Cyberpunk Effect in Photoshop

November 15, 2025

Create Realistic Neon Text Effect in Photoshop

November 8, 2025

How to Enlarge Images Without Losing Quality in Photoshop (using Super Resolution)

November 6, 2025

For Beginners

Basics

How to Create Relistic Burning Car Effect in Photoshop

By James QuOctober 17, 20251 Min Read

How to Pixelate an Image in Photoshop

October 16, 2025

How to Stay Ahead of Every Photoshop Update & Unlock Their Full Power

October 11, 2025

Curves or Levels: Choosing the Right Tool for Stunning Edits

September 28, 2025

You May Also Like

Photo Effect

How to Give Your Portrait Cyberpunk Effect in Photoshop

By James QuNovember 15, 20253 Mins Read
Photo Effect

How to Edit Non-Destructively with Smart Objects & Neural Filters in Photoshop

By James QuOctober 25, 20253 Mins Read
Photo Effect

Create Surreal Motorbike Racing Scene in Photoshop

By James QuOctober 18, 202512 Mins Read
Facebook X (Twitter) Instagram Pinterest
  • About Us
  • Get in Touch
  • Advertise
  • VIP Area
  • Privacy Policy
  • Terms & Conditions
© 2025 PSD Vault. All Right Reserved.

Type above and press Enter to search. Press Esc to cancel.

Manage Consent
To provide the best experiences, we use technologies like cookies to store and/or access device information. Consenting to these technologies will allow us to process data such as browsing behavior or unique IDs on this site. Not consenting or withdrawing consent, may adversely affect certain features and functions.
Functional Always active
The technical storage or access is strictly necessary for the legitimate purpose of enabling the use of a specific service explicitly requested by the subscriber or user, or for the sole purpose of carrying out the transmission of a communication over an electronic communications network.
Preferences
The technical storage or access is necessary for the legitimate purpose of storing preferences that are not requested by the subscriber or user.
Statistics
The technical storage or access that is used exclusively for statistical purposes. The technical storage or access that is used exclusively for anonymous statistical purposes. Without a subpoena, voluntary compliance on the part of your Internet Service Provider, or additional records from a third party, information stored or retrieved for this purpose alone cannot usually be used to identify you.
Marketing
The technical storage or access is required to create user profiles to send advertising, or to track the user on a website or across several websites for similar marketing purposes.
  • Manage options
  • Manage services
  • Manage {vendor_count} vendors
  • Read more about these purposes
View preferences
  • {title}
  • {title}
  • {title}