Close Menu
PSD VaultPSD Vault
  • VIP Area
  • Photoshop Basics
  • Photo Effect
  • Text Effect
  • Premium Tuts
  • Resources
  • Drawing
  • Inspiration
  • Web Graphics
  • Abstract
  • Freebies
  • Advertise
  • Get in Touch
  • About PSD Vault
Facebook Instagram Pinterest YouTube TikTok
Facebook Instagram Pinterest YouTube TikTok RSS
PSD VaultPSD Vault
  • VIP Area
    • Sign Up
    • Log In
  • Photoshop Basics
  • AI
  • Photoshop Error Fixes
  • Video Tutorial
  • Photo Effect
  • Text Effect
  • Premium Tuts
  • Drawing
  • Opinion
PSD VaultPSD Vault
Home»Photo Effect»How to Create Beautiful Alien Landscape in Photoshop
Photo Effect

How to Create Beautiful Alien Landscape in Photoshop

By James QuApril 29, 20234 Mins Read
Share
Facebook Twitter LinkedIn Pinterest Email

In this tutorial, you will learn the process of making a beautiful alien landscape in Photoshop (inspired by the movie “Avatar”). We will apply several interesting object blending techniques to combine the stock images, in order to form the final effect. Have a try!

The PSD file of this tutorial is available via the PSD Vault VIP members area.

Note: The Photoshop tutorial is done in Photoshop CC – therefore some screenshot may have slighting different layout as in the earlier version. Some brushes are exclusive to Photoshop CS6 or above.

Here is a preview of the final effect I have for this tutorial: (click to enlarge)

Become a PSD Vault VIP Member!

You can download the PSD File for this tutorial via the VIP Members Area for only $6.95/Month (or less)! You will not only get this PSD File, but also 250+ other PSD Files + Extra Goodies + Exclusive Photoshop tutorials there. Signup now and get exclusive!

Let’s get started!

To complete this tutorial, you will need the following stocks:

  • Mountain
  • Rock
  • Cliff
  • Tree 1
  • Tree 2
  • Temple
  • Waterfall

Step 1

Create a new document sized 1440px * 900px with the default white background. Fill the background layer with the Gradient Fill tool with the following colour (light blue as foreground colour, white as background colour)

Load the mountain stock into Photoshop, select a portion of it, copy and paste your selection to our document. Place it to the bottom half of the canvas as shown below:

Use a soft eraser to fade the top edge of the mountain layer, so that it blends into the background layer:

Apply the following Lens Blur filter to this new mountain layer:

and here is the effect so far:

Step 2

Load the Rock stock image into Photoshop and select a portion of it:

Copy and paste the selection to our document. Reduce its size and rotate it upside down, move it to the following position:

I used the Burn tool to darken the right side of the rock, and erased parts of the rock:

We can add some extra rocky pattern to this rock layer. Load the Cliff stock image into Photoshop and select a portion of it

Copy and paste the selection to the rock layer, set it as clipping mask. Set its layer blend mode to “Hard Light”:

and here is the effect so far:

Step 3

We will add native plants around the rock in this step.

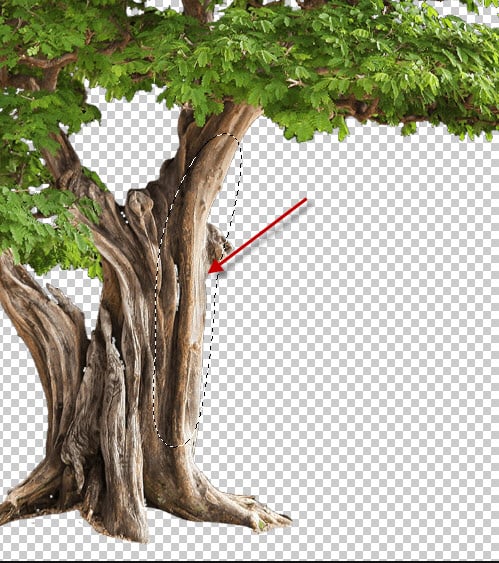
Load the Tree 1 stock image into Photoshop, select a small portion of it with the Lasso Tool:

Copy and paste the selection to our document. Use the free transform tool to adjust the shape and angel of this new layer. Repeat this process, cover the rock with plants as shown below:

You can even break apart your plants with eraser tool (use the chalk brush) to make the plants look more realistic:

Load the Temple stock image into Photoshop and select the template portion:

Copy and paste the template onto the top of the rocks, blends it with the surrounding trees/rocks:

Load the Waterfall stock into Photoshop, select the waterfall:

Attach the waterfall to the right side of the rock, as shown below:

Step 4

We can add more floating rocks in this step, simply by repeating step 4. Ensure each rock looks different from each other with various sizes and tree placement:

Once you’re happy with the rocks, merge their layers into a single layer. Use the Blur tool, blur the following objects around the canvas to create depth of field:

Step 5

I added a natural linkage between the 2 smaller floating rocks in this step. Select the following piece from “Tree 2” stock image:

Copy and paste selection our document, resize and use the Warp tool to bend it as shown below:

Duplicate this layer, add some greens to them with the tree leaves:

Use the Blur tool to blur them slightly:

Here is the effect so far:

Use a cloud brush or cloud filter, add some cloud effect over the canvas:

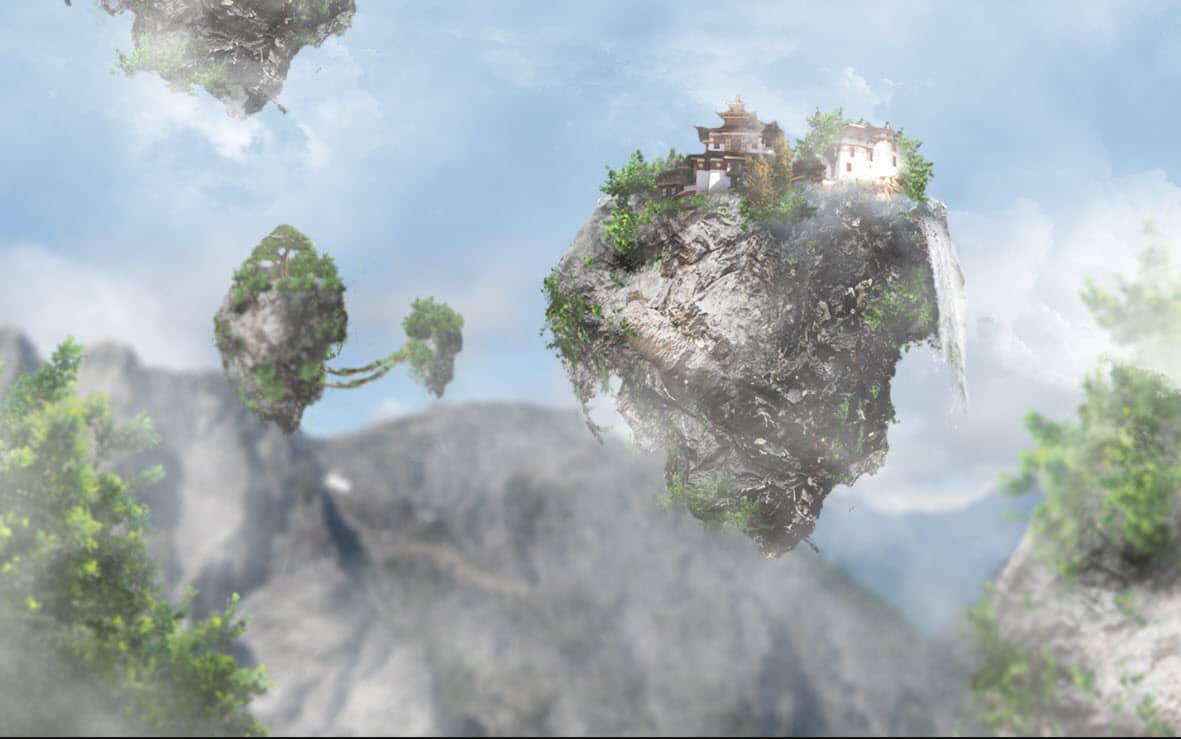
I further added the contrast and colour balance of the image, and this is my final result of the beautiful alien landscape: (click to enlarge)

That’s it for this tutorial! Hope you learn a thing or two from it and if you have any questions, just drop me a comment below.

alien landscape
Share. Facebook Twitter Pinterest LinkedIn Tumblr Email
James Qu
  • Website

James is a seasoned Photoshop expert with over 25 years of experience based in Australia. As the driving force behind PSD Vault, he authors the majority of its in-depth tutorials and insightful articles.

Related Posts

How to Give Your Portrait Cyberpunk Effect in Photoshop

November 15, 2025

How to Edit Non-Destructively with Smart Objects & Neural Filters in Photoshop

October 25, 2025

Create Surreal Motorbike Racing Scene in Photoshop

October 18, 2025

Comments are closed.

Don't Miss

How to Give Your Portrait Cyberpunk Effect in Photoshop

November 15, 2025

Create Realistic Neon Text Effect in Photoshop

November 8, 2025

How to Enlarge Images Without Losing Quality in Photoshop (using Super Resolution)

November 6, 2025

For Beginners

Basics

How to Create Relistic Burning Car Effect in Photoshop

By James QuOctober 17, 20251 Min Read

How to Pixelate an Image in Photoshop

October 16, 2025

How to Stay Ahead of Every Photoshop Update & Unlock Their Full Power

October 11, 2025

Curves or Levels: Choosing the Right Tool for Stunning Edits

September 28, 2025

You May Also Like

Photo Effect

How to Give Your Portrait Cyberpunk Effect in Photoshop

By James QuNovember 15, 20253 Mins Read
Photo Effect

How to Edit Non-Destructively with Smart Objects & Neural Filters in Photoshop

By James QuOctober 25, 20253 Mins Read
Photo Effect

Create Surreal Motorbike Racing Scene in Photoshop

By James QuOctober 18, 202512 Mins Read
Facebook X (Twitter) Instagram Pinterest
  • About Us
  • Get in Touch
  • Advertise
  • VIP Area
  • Privacy Policy
  • Terms & Conditions
© 2025 PSD Vault. All Right Reserved.

Type above and press Enter to search. Press Esc to cancel.

Manage Consent
To provide the best experiences, we use technologies like cookies to store and/or access device information. Consenting to these technologies will allow us to process data such as browsing behavior or unique IDs on this site. Not consenting or withdrawing consent, may adversely affect certain features and functions.
Functional Always active
The technical storage or access is strictly necessary for the legitimate purpose of enabling the use of a specific service explicitly requested by the subscriber or user, or for the sole purpose of carrying out the transmission of a communication over an electronic communications network.
Preferences
The technical storage or access is necessary for the legitimate purpose of storing preferences that are not requested by the subscriber or user.
Statistics
The technical storage or access that is used exclusively for statistical purposes. The technical storage or access that is used exclusively for anonymous statistical purposes. Without a subpoena, voluntary compliance on the part of your Internet Service Provider, or additional records from a third party, information stored or retrieved for this purpose alone cannot usually be used to identify you.
Marketing
The technical storage or access is required to create user profiles to send advertising, or to track the user on a website or across several websites for similar marketing purposes.
  • Manage options
  • Manage services
  • Manage {vendor_count} vendors
  • Read more about these purposes
View preferences
  • {title}
  • {title}
  • {title}