


Style Transfer is a Neural Filter that repaints your photo in the look of a famous artwork or any reference image you choose. It runs inside Photoshop, applies as a non-destructive output, and takes about a minute to try. This guide covers where to find it, what each control actually does, how to use your own style image, and how to fix it when it won’t load.
What is Style Transfer?
Style Transfer is one of the filters in Photoshop’s Neural Filters workspace (Filter > Neural Filters). It uses machine learning to take the colours, brushwork and texture of a reference image and apply them to your photo, while keeping your subject recognisable. Adobe describes it as a way to take the look of one image and put it on another.
It is a creative effect, not a retouching tool. Think of it as a fast way to explore a look: oil painting, watercolour, sketch, or something more abstract.
What You Need
- A current version of Photoshop (Creative Cloud subscription). Neural Filters have been part of Photoshop since version 22, and Photoshop 2026 is version 27.x. [CHECK: confirm the latest stable version number as of publishing]
- An internet connection. Many Neural Filters and individual styles download from Adobe’s cloud the first time you use them.
- A signed-in Adobe account.
- Any photo. Start with a duplicate of your image, not the original.
Getting Started with Style Transfer
Step 1: Open your image and duplicate the layer
Open your photo, then press Ctrl+J (Cmd+J on Mac) to duplicate the background layer. This keeps your original safe if you want to compare or start over.
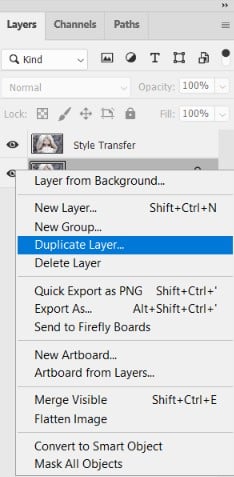
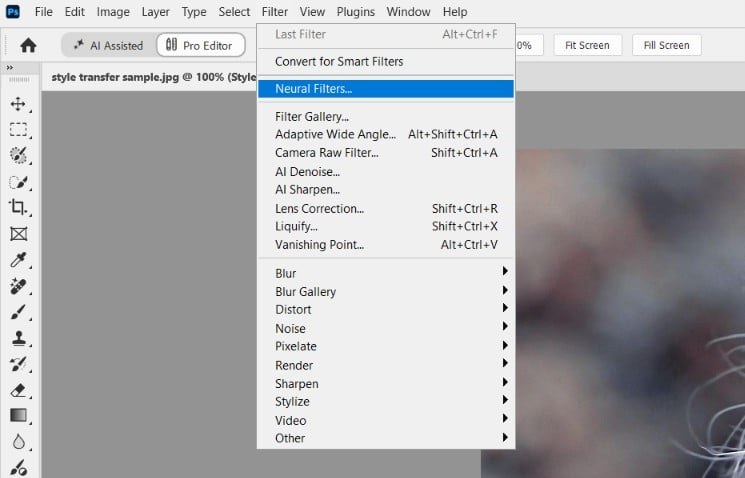
Step 2: Open Neural Filters
Go to Filter > Neural Filters. The workspace opens with a list of available filters on the right.
Step 3: Turn on Style Transfer
Find Style Transfer in the list and switch it on. If you see a cloud icon, click it to download the filter first. This only happens the first time.
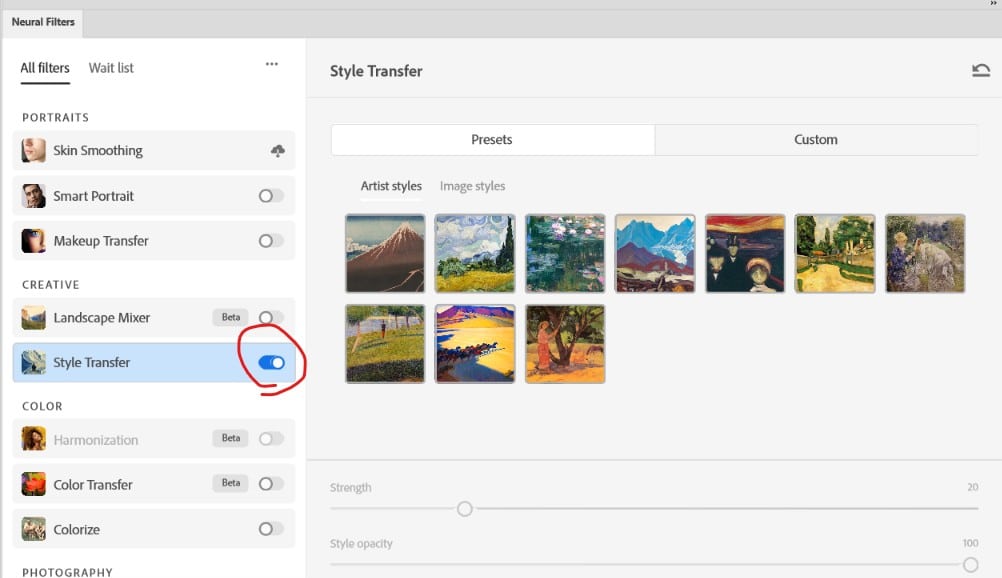
Step 4: Pick a style
The panel has two tabs:
- Presets: Adobe’s built-in styles, grouped into artist styles (painters such as Monet or Van Gogh) and image styles. Click one and Photoshop applies it to your photo. Some styles download on first use, so give each a moment.
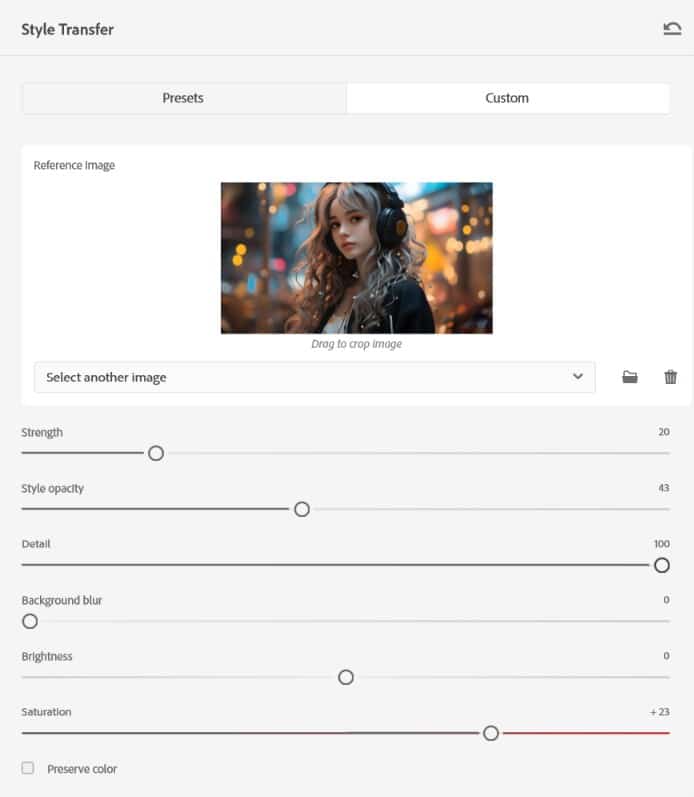
- Custom: Use your own reference image. See the next section.
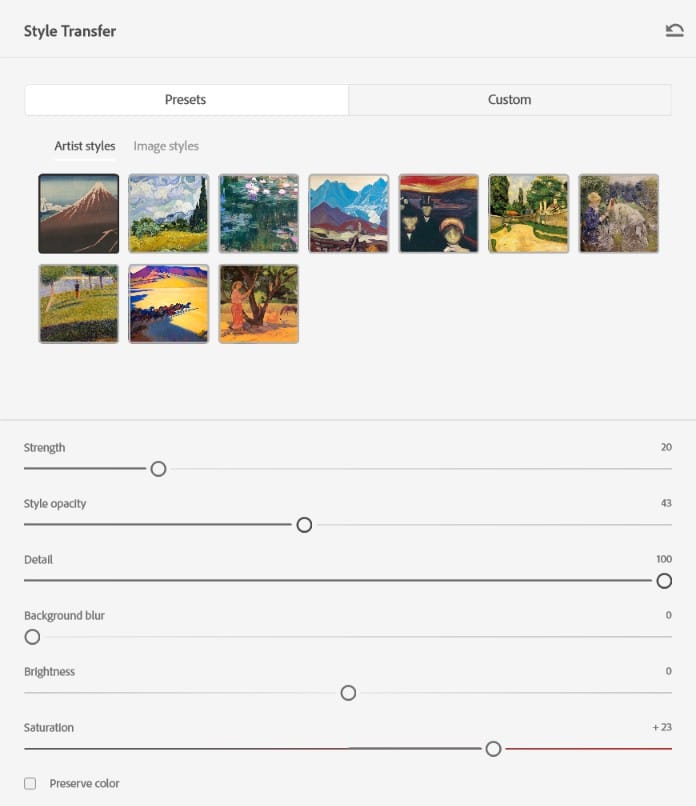
Step 5: Adjust the controls
These are the controls Adobe documents for Style Transfer:
| Control | What it does |
| Style Strength | How strongly the style is applied. Lower values keep more of your original photo. |
| Brush Size | Changes the scale of the brush-like texture in the result. Larger values give broader, more painterly strokes. |
| Blur Background | Softens the background to help the subject stand out. |
| Preserve Color | Keeps your photo’s original colours instead of taking the colours of the style. |
| Focus Subject | Concentrates the effect on the main subject. |
Depending on your Photoshop version, you may also see extra sliders in the panel (some tutorials mention detail, brightness and saturation controls). List exactly what appears in your build and delete anything that doesn’t.
Step 6: Choose an output option
Before clicking OK, set the Output option. Adobe lists Duplicate Layer, Duplicate Layer Masked, New Layer and Smart Filter. Smart Filter is the most flexible because you can reopen the filter and change settings later. If you choose a layer-based output, you can lower the layer’s Opacity afterwards to blend the effect with your original.

Using Your Own Style Image
The Custom tab is where Style Transfer becomes more interesting than the presets.
- In the Style Transfer panel, click the Custom tab.
- Click to select an image from your computer.
- Photoshop analyses it and applies its look to your photo.
Tips for choosing a style image:
- Pick something with strong, obvious texture and colour: a painting, a macro of rust or paint, a fabric pattern.
- Busy images with lots of detail tend to produce messy results. A bold, simple style source is more predictable.
- Only use reference images you have the right to use, particularly for commercial work.
Creative Ways to Use It
- Portraits to paintings: Use a moderate Style Strength so faces stay recognisable. Mask the face back in from the original if the effect distorts features.
- Social posts and thumbnails: A stylised background with a sharper subject draws the eye. Try Blur Background plus a layer mask.
- Backgrounds and textures: Run Style Transfer on a plain photo to generate painterly backdrops for composites.
- Layering styles: Apply one style, output to a new layer, then run a second, lighter style on top.
- Mix with other Neural Filters: Pair it with Depth Blur or Color Transfer for more control over mood.
Tips for Better Results
- Start with a high-resolution, well-exposed image with a clear subject.
- Work on a duplicate layer or use the Smart Filter output.
- Don’t leave Style Strength at maximum by default. Dial it back and use a layer mask to apply the effect where it looks best.
- Zoom to 100% to check faces and fine detail before you commit.
- Save versions as you go so you can compare looks.
Style Transfer vs. Other Approaches
- Filter Gallery and traditional filters (Oil Paint, Palette Knife and so on): Faster to predict and fully local, but the result looks like a filter rather than a specific artwork.
- Manual painting or mixer brush work: Maximum control, but far slower.
- Generative AI tools: Photoshop’s generative features and standalone AI image tools can restyle an image from a text prompt or reference image. They are more flexible, but less predictable about preserving your original composition. [CHECK: confirm which Generative Fill / Generate Image reference-image options are available in your current build before recommending them.]
Style Transfer sits in the middle: quick, built in, and good at keeping your original composition.
Limitations
- Results vary a lot with the source image, and faces can distort.
- Fine detail such as text, hair and small patterns may soften or change.
- Output resolution and quality may not suit large prints. Check at full size.
- It needs an internet connection for downloads, and it is not a replacement for deliberate artistic decisions.
- Neural Filters can be affected by bugs in specific Photoshop releases (for example, some users reported filters being temporarily disabled in 2025 builds until an update fixed it). If something breaks after an update, check Adobe’s community forum.
Troubleshooting
Style Transfer is greyed out or missing
- Update Photoshop through the Creative Cloud app. Neural Filters need version 22 or later.
- Make sure you are signed in and online.
- Select a pixel layer. Filters can be unavailable on some layer types.
Styles keep re-downloading or won’t load
- Check your connection, then restart Photoshop.
- Adobe stores downloaded filter data in a local plugin folder. If it appears corrupted, removing that folder forces a fresh download. See Adobe’s Neural Filters FAQ for the current folder path. [CHECK: confirm path for Photoshop 27.x]
Neural Filters crash or show an error after an update
- Update your graphics driver.
- Reset Photoshop preferences (hold Ctrl+Alt+Shift on Windows or Cmd+Option+Shift on Mac while launching).
- Search Adobe’s community forum for your exact version number, since known bugs are often tied to specific releases.
For more fixes, see our guide: How to Fix Neural Filters Not Working or Greyed Out in Photoshop 2026.
FAQ
Is Style Transfer free? It is included with a Photoshop subscription. There is no separate charge for the filter. [CHECK: confirm no generative credits are consumed by Style Transfer]
Can I use my own images as the style? Yes. Use the Custom tab.
Does it work on any image? It works on most photos, but portraits and busy scenes can give inconsistent results.
Is it destructive? Not if you choose Smart Filter or a new-layer output option.
Can I use the results commercially? Generally yes for your own photos, but check Adobe’s terms and the usage rights of any custom style image you use.
Conclusion
Style Transfer is a fast way to explore painterly and stylised looks without leaving Photoshop. Use presets to experiment, switch to the Custom tab when you want a unique result, and keep the effect non-destructive so you can refine it with masks and opacity.
Next, learn more about the other filters in our Neural Filters beginner’s guide.