In this Photoshop tutorial, you will learn the processes of creating a “Alice in Wonderland” themed photo manipulation, by using smart filters, stock blending. The tutorial will show you how to mix stock, create lights, change weather on image, draw hair, eyes, make up and skin, and how to get depth of field on your manip.
The PSD file of this tutorial is available via the PSD Vault VIP members area.
This tutorial is written exclusively for PSD Vault by Monika Nowakowska, who is a fantastic graphic artist from Poland.
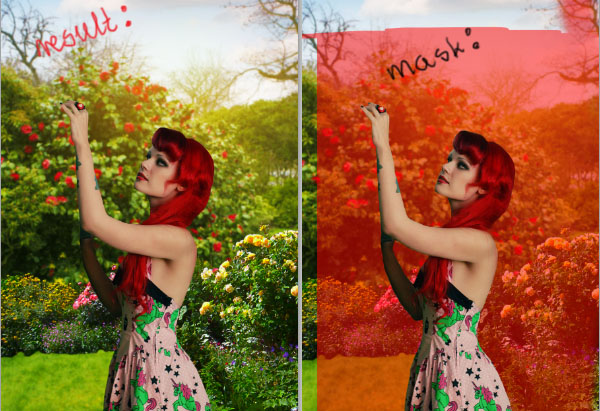
Here is a preview of the final effect for this tutorial: (click to enlarge)

PSD Vault VIP Membership
You can download the PSD File for this tutorial via the VIP Members Area for only $6.95/Month (or less)! You will not only get this PSD File, but also 200+ other PSD Files + Extra Goodies + Exclusive Photoshop tutorials there. Signup now and get exclusive!
OK Let’s get started!
To complete this tutorial, you will need the following stocks:
- 281 by DadiLights
- 188 by alraunie-stock
- Pocket Watch by wintersmagicstock
- Big Lens And Optical flare Collection by dawiiz
- Flowered garden png by hermitcrabstock
- Lemon Tree PNG by evelivesey
- Into the Rose Garden 3 by elandria
- Clouds on a beautiful day 1 from rgbstock
Step 1
Let’s start. Create new file (File > New… or Ctrl+N) 900×1341 px.

Step 2
Place “Into the rose garden” stock into bottom of your file.

Step 3
Choose from top menu Filter > Blur > Gaussian blur… set it to 2,2 px.

Step 4
Place “Clouds on a beautiful day 1” stock into top of your image. Change blending mode to Multiply.

Step 5
Now add mask on this layer, by choosing from top menu Layer > Layer mask > Reveal all or by clicking shortcut.

Step 6
You should erase “Clouds on a beautiful day 1” layer on the bottom. You can do it with soft, big brush.

Step 7
Now add adjustment layer with vibrance (Layer > New Adjustment Layer > Vibrance or use shortcut). Set it as is shown:

Step 8
Becouse of the image is too dark, use Brightness and Contrast adjustment layer. Repeat last step (Layer > New Adjustment Layer > Brightness/Contrast ), set it:

Step 9
Next, add Color/Balance layer. It gives a spring, fresh look.

Step 10
It’s time to place “Flowered garden png” stock. Set it at the bottom of the image. Don’t be afraid of empty space. You will take care of it, soon :).

Step 11
Add Brightness and Contrast adjustment layer (Layer > New Adjustment Layer > Brightness/Contrast ) and make it clipping (RMB > Create clipping mask).

Step 12
Now add vibrance (Layer > New Adjustment Layer > Vibrance) and make it clipping (RMB > Create clipping mask). Set it as is shown:

Step 13
Background is nearly finished! Choose Layer > New Adjustment Layer > Brightness/Contrast and set it:

Step 14
Now you will add light source. Add new layer (Shift + Ctrl + N, or Layer > New > Layer…). Choose Brush Tool (B), set big (I used 765px wide), soft, #f6a313 color brush and draw dot on the top of the image.

Step 15
At the same layer, draw dot, on the center of earlier dot, with smaller (245px wide), soft, #fff200 color brush. If you think, that it’s so small, try duplicate this layer (Layer > Duplicate layer…)

Step 16
Now change blending mode of this layer to Screen and set opacity to 58%.

Step 17
Time to model! Place 188 stock into the bottom of the picture.

Step 18
Add mask to this layer by choosing from top menu Layer > Layer mask > Reveal all or by shortcut. Then erase background.
Step 19
As you can see I left the fragment of strange green box. Now you should fix it. Create new layer and make it clippy by RMB > Create clipping mask. Then choose Clone Stamp Tool (S). Use big, soft rounded brush and set Aligned Sample to Current and below.

Step 20
You can fix her hand by holding alt and copying skin from arm, as is shown. Then click like with brush, where you want to place the skin.

Step 21
Add adjustment layer with color/balance (Layer > New Adjustment Layer > Brightness/Contrast). Make it clippy.

Step 22
I think, that model layer is too dark. Add adjustment layer with brightness/contrast (Layer > New Adjustment Layer > Brightness/Contrast). Make it clippy (RMB > Create clipping mask).

Step 23
Make New clipping layer. (Shitf + Ctrl + N, then RMB > Create clipping mask). Choose soft rounded brush and set color to yellow. Draw light contour on model. Follow arrows. It shows you how goes the light source.

Step 24
Then change blending mode of this layer to soft light.

Step 25
Now you will fix hair. Create new layer – also clippy – choose small soft brush and set #750702 color. Add red strokes on bangs – it shouldn’t be darker than rest of the hair.

Step 26
Add new layer – again clippy. Repeat step 23 – add yellow contour on the model.

Step 27
Change layer opacity to 37%.

Step 28
Add new cliping layer (Shitf + Ctrl + N, then RMB > Create clipping mask). Choose brush tool and set it to big, soft rounded. Pick #262207 color and change opacity of brush to 50%. Follow arrows and make shadows.

Step 29
Again add cliping layer. Choose brush tool like earlier. Pick #dcbc83 color. Draw skin tone on her hand.

Step 30
On new cliping layer draw small brush strokes. Pick yellow color. Draw over skin and hair. Remember about neutral lights, follow arrows.

Step 31
Add new layer (Shift + Ctrl +N) and choose the same brush settings. Draw hair strands.

Step 32
Place to your file 281 bunny from the top. Marquee his nose and create Layer via copy (RMB > Layer via copy)

Step 33
Transform it as is shown. You will replace her nose to nose of bunny. By changing blending mode to screen you can mach noses easier.

Step 34
Add layer mask and erase as is shown:

Step 35
Add new layer (Shift + Ctrl +N), choose Brush tool. Set soft round brush and pick #f26d7d color. Draw dot below the nose.

Change blending mode of this layer to Multiply.

Step 36
On new layer (Shift + Ctrl +N), set small soft round brush and pick #fff200 color. Draw light countour on nose.

Step 37
If you want you cn fix nose with rest of her face. Just create new layer, below nose base, then draw with the same brush (change color to #ecbd7b) a dot as shown.

Step 38
Add one more layer below nose. Choose Clone stamp tool. Fix hair on the right side as shown.

Step 39
On new layer draw eyes. Instruction on the right side will help you.

Step 40
Add make up – draw strokes on her eye lashes and make eye line longer. Add also yellow strokes on the edges of lashes – it will look more natural.

Step 41
On new layer, with small white brush you can draw over tooth.

Step 42
With small black brush strokes draw lace on ring.

Step 43
Place bunny stock and mask it as is shown. I think orginal model ears will guide you.

Step 44
Add Color/Balance adjustment layer and make it clipping by RMB > Create clipping mask

Step 45
On new layer (Shift+Ctrl+N) add strands on the ear. Use small soft round brush with #e1d2b7 color.

Step 46
Again add new layer. Use soft big brush, pick #f26d7d color. Draw dot on her cheek. Then change opacity of this layer to 66%.

Step 47
Create new layer and choose 1px soft brush. At first draw some dots. Then draw some strands.

Step 48
Back to sun layer (last step of making background). Place there ear of bunny. I used photo from the left bottom.

Step 49
Mask ear so badly ^^.

Step 50
Add Color/Balance layer and set it as shown. Make it clippy (RMB > Create clipping mask).

Step 51
Add new layer (Shift+Ctrl+N) and create clipping mask. Choose big, soft brush and pick #fdda07 color.

Change blending mode of this layer to Screen

Then on new layer draw strands on ear. Use small soft brush, pick #fff color.

Step 52
Place pocket watch as is shown. Mask it by using shortcut.

Add adjustment layer with Brightness/contrast. Make it clippy (RMB > Create clipping mask).

Add again the same adjustment layer.

Mask this layer, as shown.

Add adjustment layer with color/balance. Change opacity to 40%.

Then add Vibrance adjustment layer (last of the clipping mask on this layer). Change blending mode to Screen and opacity to 49%.

Step 53
Add new layer and with small brush yellow strokes draw lights on the watch.

Step 54
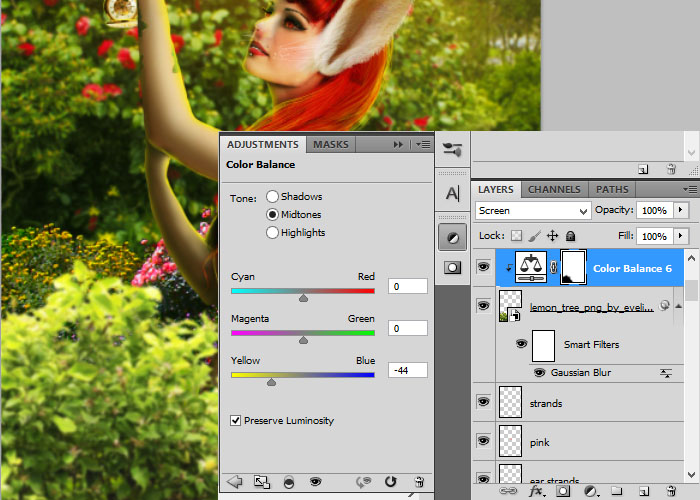
Back to the top of layers. Place lemon tree on the left bottom of the picture.

From top menu choose Filter > Blur > Gaussian blur… and set it:

Step 55
Add Color/Balance layer. Make it clippy (RMB > Create clipping mask). Then change blending option to Screen.
Mask Color/Balance layer as is shown:

Add Brightness/Contrast layer. Create clipping mask.

Step 56
Place Flare (6) into your image. Then change layer blending mode to Screen.

Add mask to flare as is shown.

Step 57 – finish!
Add adjustment layer with Brightness/Contrast.

At the end add Color/Balance layer.

Final image (click to enlarge)
That’s it for this tutorial! Hope you enjoy going through it and find it useful. Drop me a comment below if you have any question.
Till next time, have a great day!
6 Comments
Amazing tutorial, we have featured it here : http://theneodesign.com/best-adobe-photoshop-tutorials-april-2014/
A little hard, but super result. Thanks for the tutorial. :)
Gorgeous and Beautiful tutorial, thanks for sharing.
Creative work..Really this tutorial is more details step by step, so that it is easier to learn for any one who want to create something new in any picture by Photoshop.
This is great! A lot of phone photo apps now also have this capability. Instagram’s selective focus mode can, with a little experimentation, give decent tilt/shift results as well.
Great tutorial, I liked it very much. I did not get the tutorial before that.
so thank for that .