Hair selection used to be probably one of the most difficult aspect when it comes to selection technique in Photoshop – not anymore with the introduction of the Refine Mask feature since Photoshop CS5.
The Refine Mask Tool in Photoshop CS5 and CS6 has made hair selection extermetly easy for even the most frizzy hair styles. In this tutorial, I will show you step-by-step how you can use Refine Mask to make great hair selection with minimum amount of effort.
I think it’s important for beginner to learn to use the Refine Mask so that you don’t waste any time using any other time-consming methods.
This tutorial require Photoshop CS5 + to complete – However it doesn’t hurt to take a look even if you don’t have them yet :)
A preview of the final effect: (click to enlarge)
Alright let’s get started!
To complete this tutorial, you will need the following stocks:
Note: Check out this video tutorial if you have any difficulty following the steps:
Let’s load these two image into Photoshop. Copy and paste the model image on top of the background image. Grab the Quick Selection Tool and select the grey part of this model layer:
Important: Make sure you don’t select any transitional areas around the area. In fact, the rougher the selection for hair, the better the result will be. Photoshop will fine-tune this selection for us later on, via the Refine Mask feature.
Click on the layer mask button on the layer palette to add a layer mask to this model layer:
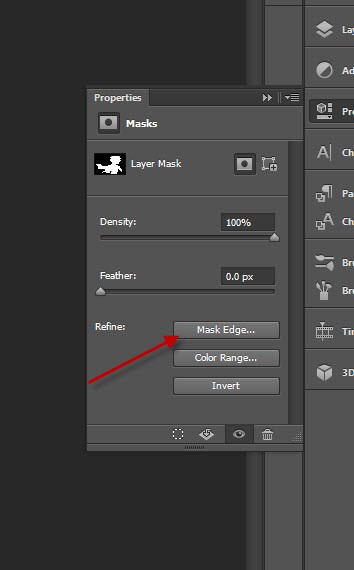
You will see the layer mask is applied to the grey part of this layer, and we want to invert this. To do this, we double-click on the mask to bring up the mask properties:

Click on the “Invert” button to invert the mask:
You can see the mask has been inverted and the model is now showing:
If you pay attention to the hair part, it needs some further work:

This brings us to the next part of the tutorial. Click on the “Mask Edge” button above the invert button:

And you will see the Refine Mask window – our fun begins here!

On the view mode, we will use the “Black and White” mode for now – please feel free to have a look at other modes:

Now we will want to have a look at our mask radius, so tick this “Show Radius” checkbox below:
You will see only a black canvas after ticking this option – but if you increase the “Radius” value a sightly, you will see a white line appearing – that’s the edge of our mask:
As we can see from the image above – the rest of the mask look fine, we will need to refine the hair part of the mask radious. To do this, we can use the “Refine Radious Tool”:
Adjust the brush size from the option bar as you see fit:

Use this brush to paint around the outside of the hair part, you will see the hair starting to appear nicely:
There is no need to adjust the edge – but we do need to apply the following “Decontaminate Colors” option to add some more details into the hair:
Click on “Ok” to apply this Refine Mask setting, you will see Photoshop creates a new layer automatically, and here is the before and after hair effect:
Before:
After
As you can see this Refine Mask feature has done something magical and now the hair looks a lot better :)
That’s it for this tutorial! Hope you enjoy it and find it useful! If you have any question or suggestion to this technique, drop a comment below!
Thanks and have a great day!


13 Comments
Hair extraction is always difficult, but this looks real easy. Thx, gonna try this right now!
This does work good! So, the trick with the brush is to not go over hair, but, the empty space close to it, eh? Would you make your radius larger if you have more ’empty’ spaces within edges of the hair? I used the “Overlay” mode of viewing the edge as It is opaque. You can see through it to see the empty spaces quite well.
Cool! Thank you so much! This is, by far, the most superior method that I have seen!
Su
Ugh, I tried to do this tutorial and got stuck at the mask properties because I have CS3 instead of CS5. :(
“You will see the layer mask is applied to the grey part of this layer, and we want to invert this. To do this, we double-click on the mask to bring up the mask properties.”
No, instead I get, “Layer Mask Display Options: Opacity (50)%”
wow, nice tool, i love it.
Good tutorial, Now in CC we can take Select and Mask, Refine Edge, Calcutlations, Color Range to select hair in complex BG.
Wow ..this is great technique …
CC is very effective tool its works good for me very informative share.
Wonderful Photoshop cs5 effect for hair extraction technique. thanks for sharing
Nice and effective Technique for hair extraction in photoshop cs5. Love this tutorials.
Hair extraction technique . It’s a creative technique here . Like this post and this post is more important for beginners .
Hi there, Thank you so much for this awesome tutorial.
Photoshop hair masking process will spoil the entire outcome. The work of each and every skilled designers, effectual is vetted via a strenuous quality handle process. Really informative article
Amazing Photoshop hair masking tutorial. You include some effective and professional tricks for hair extraction. Thanks a lot for your effort.