In this tutorial, I will show you the steps to design this abstract text effect with pen tool and grunge brush decoration in Photoshop. Along the way, we will practice using Pen Tool to draw some nice hair-like lines, as well as apply grunge brushsets for some cool abstract effect for our texts.
Here is a preview of the final effect I have for this tutorial: (click to enlarge)

PSD File Download
You can download the PSD File for this tutorial via the VIP Members Area for only $6.95/Month (or less)! You will not only get this PSD File, but also 100+ other PSD Files + Extra Goodies + Exclusive Photoshop tutorials there. Signup now and get exclusive :) Find out more about the VIP Members Areas

OK Let’s get started!
To complete this tutorial, you will need the following stocks:
Grunge Brush (Pick one set from the list)
Splatter Brush (Pick one set from the list)
Step 1
Create a new document with 1200px * 600px with a light grey background. Use a soft white brush to paint a spot light in the centre:

Create a new layer and use the grunge brush you download, paint some texture over the light, and scele it download to form a support ground:

Step 2
Use any font you like, type some texts over the document:

Right-click and convert this layer to a “Smart Object”:

Skew the text layer as shown below:

And here is the effect so far:

Step 3
Use the grunge brush you downloaded as an eraser:

Apply the following opacity and flow settings to this eraser:

Add a layer mask to the text layer, apply some grunge eraser effect over it:

Go over the text, and this is the desired effect you should be aiming to achieve:

Step 4
Now we can add the hair lines onto the image. Grab the Pen Tool and draw a path as show below:

Use the following brush to stroke this path, make sure you tick the “Simulate Brush” setting when stroking:

After the stroke, duplicate this layer several times and group each line layer together, use the free transform tool to distort, scale them until they form the following hair-like effect:

Continue to add more lines to the text:

Use the splatter brush you downloaded, add some splash effect to the text:

Step 5
We want to spice up the text a little more – so grab a 3px 60% hardness brush as shown below:

Paint some random lines around the text, as shown below:

We can also add some particle effects around the canvas with a particle brush:


and here is the effect so far:

Step 6
OK we’re almost done! For some final touches, I simply flattened the image and duplicated the background layer, then applied the “Patchwork” filter as shown below to the duplicated layer:

And this is the effect you will have:

We want to mask out the majority of this layer, just leave the lower half of the text visible, as shown below:

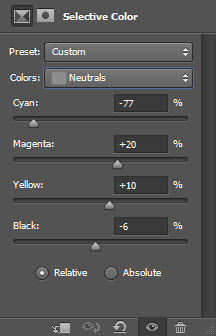
Then add some colours to the image with the following adjustment layers:
Selective Color


Layer mask on the selective colour layer:

Curves


And this is the final effect I have: (click to enlarge)
Hope you enjoy this tutorial and find it useful. Drop me a comment below if you have any question.
Till next time, have a great day!
9 Comments
WoOoW amazing effect
Thank you ..Wonderful
cool! thanks
wooooooow, nice colour combination http://www.unn.edu.ng UNN
Interesting lesson :)
I don’t understand this: “We want to mask out the majority of this layer, just leave the lower half of the text visible, as shown below:”
Please help!
I don’t understand this: “We want to mask out the majority of this layer, just leave the lower half of the text visible, as shown below:”
Please help!
nice tutorial but sorry, quite bad explained…
whats the Grunge brush name ?
can someone give me link !please