
Unlock the full potential of Photoshop by mastering the Auto-Blend Layers feature to seamlessly merge two images and achieve captivating visual effects. In this comprehensive tutorial, we’ll guide you through the process step by step.
This article has been updated in September 2025 to include the latest improvements on the Auto-Blend layers feature made by Photoshop.
Stock Images Required
Step 1
Open the two images you want to blend in Photoshop:

In this case, I’m selecting one of the hot air balloon on the left (you can just draw a rough selection with Lasso Tool):

Copy and paste the selection to the other document:

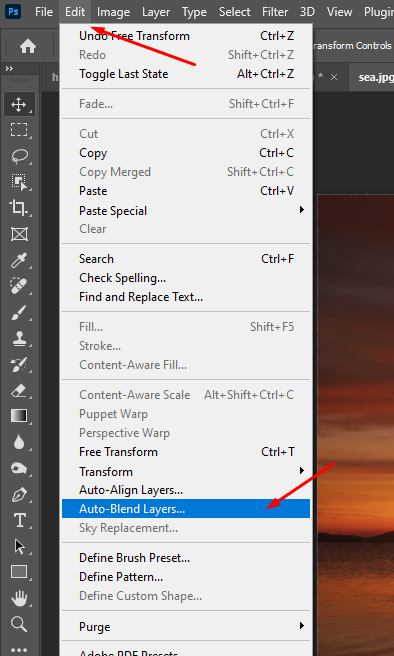
Step 2
Select both images by holding down the Ctrl key (or Cmd key on Mac) and clicking on each image layer.

Hint: If you’re working with a background layer which is locked, unlock it first before using auto-blend.
Step 3
Go to Edit > Auto-Blend Layers.
Step 4
In the Auto-Blend Layers dialog box, select the Seamless Tones and Colors option.

Photoshop will automatically blend the two images together and create layer masks to blend the images together seamlessly. You can then adjust the blend settings as needed.

Here are some additional tips for using auto-blend layers:
- Make sure the images you want to blend are similar in size and resolution.
- You can make further adjustments such as curves, levels to make the blend perfect

Compatibility Limitations
- Image Mode: Auto-Blend Layers only works with RGB or Grayscale images. If you’re working with CMYK or Lab colour modes, you’ll need to convert your image first.
- Layer Types: This feature doesn’t work with Smart Objects, video layers, 3D layers, or background layers. Ensure your layers are standard pixel layers before attempting to use Auto-Blend.
Latest Updates to Auto-Blend Layers in Photoshop (September 2025)
Adobe has introduced several enhancements to the Auto-Blend Layers feature in Photoshop 2025 and the Photoshop (beta) app, improving performance and usability:
- Improved AI-Driven Blending:
- Photoshop 2025 leverages Adobe’s latest AI algorithms (powered by Adobe Sensei) to enhance the precision of Auto-Blend Layers. The feature now better handles complex scenes with varying lighting or intricate details, such as foliage or water.
- The Stack Images mode has been optimised for focus stacking, with improved edge detection for sharper composites, especially in macro photography.
- Support for Adobe Substance 3D Viewer (Beta):
- As of July 2024, Photoshop’s legacy 3D features were removed, but Auto-Blend Layers now integrates with the Adobe Substance 3D Viewer (beta). This allows users to blend 2D images with 3D objects more seamlessly, though Auto-Blend still does not support 3D layers directly.
- Enhanced Performance:
- The Auto-Blend algorithm has been optimised for faster processing, reducing the time required to blend high-resolution images. This is particularly noticeable when blending multiple exposures for HDR images.
- Improved memory management ensures stability when working with large files or multiple layers.
- Updated Compatibility:
- Auto-Blend Layers now supports images up to 64-bit depth in RGB or Grayscale modes, expanding its usability for professional workflows. However, it still does not work with CMYK, Lab color modes, Smart Objects, video layers, 3D layers, or background layers.
Common Issues and Solutions
- Blurry or Inconsistent Results:
- Ensure your source images are well-aligned before blending.
- Try using the “Align Layers” option before Auto-Blend if your images aren’t perfectly aligned.
- Unexpected Color Shifts:
- If you notice color inconsistencies, try unchecking the “Seamless Tones and Colors” option.
- Adjust the individual layers’ color balance before blending.
- Visible Seams or Edges:
- This often occurs with high-contrast edges. Try softening the edges of your source images slightly before blending.
- Manually refine the auto-generated layer masks after blending.
- Performance Issues:
- Auto-Blend can be resource-intensive. Close unnecessary applications and ensure you have enough free RAM.
- For very large files, consider working on smaller sections separately.
Additional Tips for Flawless Blending:
- Ensure images are similar in size and resolution.
- Fine-tune the blend using tools like curves and levels for perfection.
- Experiment with different blend settings to discover unique effects tailored to your creative vision.
Now you’ve mastered the art of blending two images effortlessly! For further guidance and advanced techniques, consult Adobe Photoshop’s help documentation.
Further Readings
How to Blend Two Images Together in Photoshop
Liked this tutorial? Explore more Photoshop magic on our VIP Area and uncover premium tutorials for an enhanced learning experience.