Close Menu
PSD VaultPSD Vault
  • VIP Area
  • Photoshop Basics
  • Photo Effect
  • Text Effect
  • Premium Tuts
  • Resources
  • Drawing
  • Inspiration
  • Web Graphics
  • Abstract
  • Freebies
  • Advertise
  • Get in Touch
  • About PSD Vault
Facebook Instagram Pinterest YouTube TikTok
Facebook Instagram Pinterest YouTube TikTok RSS
PSD VaultPSD Vault
  • VIP Area
    • Sign Up
    • Log In
  • Photoshop Basics
  • AI
  • Photoshop Error Fixes
  • Video Tutorial
  • Photo Effect
  • Text Effect
  • Premium Tuts
  • Drawing
  • Opinion
PSD VaultPSD Vault
Home»Text Effect»Create Typography Using a Mixture of Snow and Fire Elements in Photoshop
Text Effect

Create Typography Using a Mixture of Snow and Fire Elements in Photoshop

By Lana WilsonJanuary 12, 20244 Mins Read
Share
Facebook Twitter LinkedIn Pinterest Email

In this Photoshop tutorial, I will show you the process of creating this interesting Typography using a mixture of snow and fire elements in Photoshop. This is an intermediate level difficulty tutorial and some steps can be tricky. Have a try!

The PSD file of this tutorial is available via the PSD Vault VIP members area.

Here is a preview of the final effect I have for this tutorial: (click to enlarge)

snow-fire-text-psdvault-flatten

PSD Vault VIP Membership

You can download the PSD File for this tutorial via the VIP Members Area for only $6.95/Month (or less)! You will not only get this PSD File, but also 300+ other PSD Files + Extra Goodies + Exclusive Photoshop tutorials there. Signup now and get exclusive!

OK Let’s get started!

To complete this tutorial, you will need the following stocks:

Font

Forest

Concrete Texture

Snow

Flame

Step 1

Create a new document sized 1440px * 700px with black background. We will start by add a snowy forest background to our canvas. Load the forest stock image into Photoshop and select the top center portion of the image:

1 sel

Copy and paste the selection to our document, place it to the position as shown below:

1 paste

Use a big soft eraser, fade the edges of the forest as shown below:

1 erase

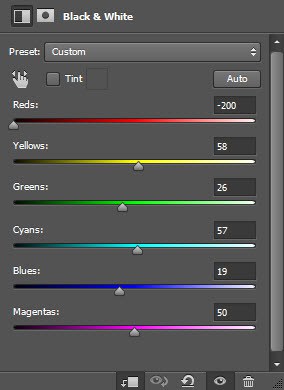
Apply the following black and white image adjustment to this forest layer:

1 bw

and here is the effect so far:

1 effect

Step 2

Use font we downloaded, type some texts to our document as shown below:

2 type

Apply the following blending option for this text layer:

Bevel and Emboss

2 bevel

Gradient Overlay

2 grad

And here is the effect so far:

2 effect

Step 3

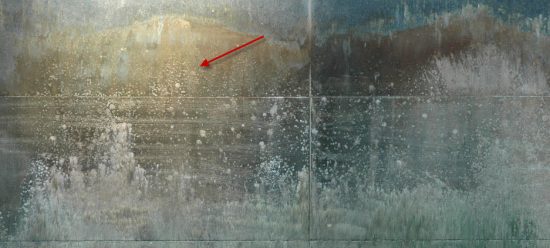
We will apply the concrete texture over our text in this step. Load the texture into Photoshop and select a portion of it:

3 con

Copy and paste the selection over our text and make sure it covers the entirety of all texts, then right-click on the concrete texture layer and set it as clipping mask to the text layer:

3 create clip

and here is the effect so far:

3 effect

Step 4

We will paint some snow effect with this “Per Stroke Brightness Variance” brush (which should come with Photoshop by default):

4 brush

This is the brush options for the above brush:

4 brush set

Gently go over the text and paint some snowy effect as shown below:

4 paint

Step 5

We will add some falling snow to our design. Load the snow stock image into Photoshop, and select a portion of the snow particles:

5 sel

Copy and paste the snow particle selection to our document, change the layer blend mode to “Screen”:

5 screen

Repeat the above process, and add more snow to our design:

5 effect

Step 6

For a more dramatic effect, use the cloud filter or a cloud brush to paint some cloudy/misty effect around the text, make sure you set the layer/brush opacity to a lower scale – a subtle cloud effect will do:

6 cloud

Apply the following Selective Color adjustment layer on top:

6 sel neu

6 black

and we will have the following cold blue colour effect for our text:

6 effect

Step 7

We will add the flame element to our text in this step. Load the flame stock image into Photoshop and select the top portion of the flame:

7 sel

Copy and paste it to the following position, set its layer blend mode to “Screen”, and use the free transform tool to adjust its size to fit the width of the tree trunk:

7 screen

We can also add some fire sparks around texts using the same process:

7 fire text

Step 8

We’re almost done! To add some final touches, I flattened the image, and duplicate the background layer. On the duplicated layer, I applied the following Crystallize Filter:

8 crys

Add a layer mask on the duplicated layer to mask out parts of the crystallized effect:

8 crys mask

and this is my final result: (click to enlarge)

snow-fire-text-psdvault-flatten

That’s it for this tutorial! Hope you enjoy it and find it useful! If you have any questions about the steps, please contact me or leave a comment below. I will try my best to answer them.

Till next time, have a great day!

fire snow typography
Share. Facebook Twitter Pinterest LinkedIn Tumblr Email
Lana Wilson

Lana Wilson is a Photoshop artist with over 10 years of experience. She is known for her creative and innovative use of Photoshop to create stunning images. Her work has been featured in magazines, websites, and advertising campaigns. Lana is passionate about using Photoshop to tell stories and create emotional connections with her audience. She is always looking for new ways to use the software to push the boundaries of what is possible.

Related Posts

Create Deep Space Text Effect in Photoshop

August 22, 2025

How to Create a “Black Widow” Movie-Inspired Text Effect in Photoshop

May 30, 2025

Create Colourful Fiery Portrait in Photoshop

May 7, 2025

Comments are closed.

Don't Miss

Curves or Levels: Choosing the Right Tool for Stunning Edits

September 28, 2025

How to Create Double Exposure Photos in Photoshop (Easy Tutorial 2025)

September 27, 2025

How to Use Reference Image AI Feature in Photoshop

September 26, 2025

For Beginners

Basics

Curves or Levels: Choosing the Right Tool for Stunning Edits

By Lana WilsonSeptember 28, 20255 Mins Read

How to Read Photoshop Histograms for Beginners

September 19, 2025

How to Master Auto-Blend Layers in Photoshop for Stunning Image Blending

September 13, 2025

10 Genius Tips to Master Photoshop’s AI Object Selection Tool

August 30, 2025

You May Also Like

Text Effect

Create Deep Space Text Effect in Photoshop

By James QuAugust 22, 20254 Mins Read
Text Effect

How to Create a “Black Widow” Movie-Inspired Text Effect in Photoshop

By James QuMay 30, 20255 Mins Read
Photo Effect

Create Colourful Fiery Portrait in Photoshop

By James QuMay 7, 20254 Mins Read
Facebook X (Twitter) Instagram Pinterest
  • About Us
  • Get in Touch
  • Advertise
  • VIP Area
  • Privacy Policy
  • Terms & Conditions
© 2025 PSD Vault. All Right Reserved.

Type above and press Enter to search. Press Esc to cancel.

Manage Consent
To provide the best experiences, we use technologies like cookies to store and/or access device information. Consenting to these technologies will allow us to process data such as browsing behavior or unique IDs on this site. Not consenting or withdrawing consent, may adversely affect certain features and functions.
Functional Always active
The technical storage or access is strictly necessary for the legitimate purpose of enabling the use of a specific service explicitly requested by the subscriber or user, or for the sole purpose of carrying out the transmission of a communication over an electronic communications network.
Preferences
The technical storage or access is necessary for the legitimate purpose of storing preferences that are not requested by the subscriber or user.
Statistics
The technical storage or access that is used exclusively for statistical purposes. The technical storage or access that is used exclusively for anonymous statistical purposes. Without a subpoena, voluntary compliance on the part of your Internet Service Provider, or additional records from a third party, information stored or retrieved for this purpose alone cannot usually be used to identify you.
Marketing
The technical storage or access is required to create user profiles to send advertising, or to track the user on a website or across several websites for similar marketing purposes.
Manage options Manage services Manage {vendor_count} vendors Read more about these purposes
View preferences
{title} {title} {title}