In this tutorial, we will delve into the process of creating a chilling ice text effect in Photoshop, exploring various techniques such as texture application, cloud effects, particles, and lighting adjustments. While some steps may pose a challenge, this intermediate-level tutorial promises an engaging learning experience.
This is an immediate level tutorial and some steps can be a little tricky, have a try!
Here is a preview of the final effect I have for this tutorial: (click to enlarge)

PSD File Download
Enhance your learning by downloading the PSD file for this tutorial. Gain access to exclusive content, including 300+ other PSD files, extra goodies, and more. Visit the VIP Members Area and unlock a wealth of design resources for only $6.95/month (or less)!

OK Let’s get started!
To complete this tutorial, you will need the following stocks:
Step 1
Create a new document sized 1200px * 700px with black background. Load the wall texture into Photoshop, select a portion and paste it onto our document:

Use a soft eraser to remove the following parts of the wall texture:

Apply the following 2 image adjustment layers on top of the wall texture layer:
Black and White

Levels

and here is the effect so far – as you can see, only the centre portion is visible after we apply the adjustment layers:

We will use this as a base for our text.
Tip: Ensure the centre portion is visible after adjustment layers.
Step 2
We will work on our texts and start applying the ice texture in this step. Use the font you downloaded, type some letters onto the canvas:

Load the “ice texture 1” image into Photoshop, select the text layer and move the selection over to this texture and copy the selection:

Paste the texture back onto the texts and cover them as shown below:

Apply the following 2 adjustment layers as clipping masks to this ice texture layer:
Black and White

Levels

Repeat the above step and grab another piece of the ice texture:

Paste it onto our document and set it as a clipping mask to the “Levels” adjustment layer you added just now:

Change the blending mode of this second ice texture layer to “Hard Light”, and apply the following image adjustments:
Black and White

Levels

and here is the effect you will have so far:

Tip: Experiment with blending modes for unique effects.
Step 3
We will add some extra ice blocks onto our image in this step. Load the “ice texture 2” image into Photoshop and select one triangle piece:

Copy and paste it behind our text layer, reduce its size as shown below:

Repeat the above step and add a few more ice blocks onto our document:

Tip: Vary the size and placement of ice blocks for a natural look.
Step 4
We will add some extra effect onto our image with the “ice texture 2”. Grab a piece from this stock image and copy it over to our document, resize it as shown below:

Apply the following adjustments to this compressed image:
Black and White

Levels

Change the layer blending mode of this layer to “Screen”:

and you will have the following effect:

Use a soft eraser to fade the edges of this layer:

and you will have the following effect:

Tip: Experiment with layer blending modes and adjustments for creative enhancements.
Step 5
We will add some flying ice blocks to the image. Again we grab a piece from the “ice texture 2” image:
Copy and paste the selection over to our document, resize it to a smaller scale:

Use the blur tool to blur it a bit to add some dynamics to the image:

Repeat the above step and add a few more pieces in, make sure you vary the size and angle of each ice layer:

Tip: Blur tools can simulate motion for dynamic effects.
Step 6
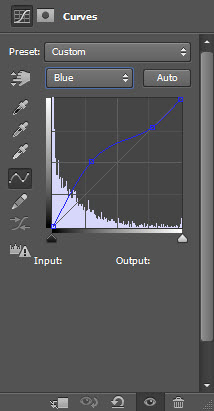
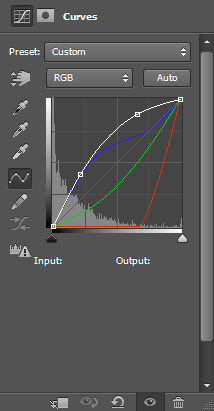
We’re almost done! For some final adjustments, I put a curves adjustment layers on top to add some colours:


I also added some cloud into the image with a cloud brush, and here is my final effect: (click to enlarge)
Tip: Experiment with brushes and adjustment layers for personalized touches.
Extra Tips for Creating Captivating Text Effects in Photoshop
Custom Brush Texturing:
Utilize custom brushes to add intricate textures to your text. Experiment with brushes that mimic natural elements like foliage, clouds, or even abstract patterns. Adjust the brush opacity and size for subtle or bold texturing effects.
Depth with Drop Shadows:
Enhance the depth of your text by strategically applying drop shadows. Experiment with the shadow’s distance, size, and opacity to achieve a realistic three-dimensional appearance. Consider layering multiple drop shadows with varying settings for a nuanced effect.
Layer Opacity Variations:
Create a sense of depth and mystery by adjusting the opacity of different sections of your text. Fade certain areas to allow background elements to subtly show through, adding an ethereal quality to your design. This technique works well for creating dreamy or ghostly text effects.
That concludes our comprehensive tutorial! We hope you enjoyed the process and found it valuable. Feel free to drop any questions or comments below.
Until next time, have a fantastic day!
12 Comments
the button is not given out
Like!!!
What exactly am i deleting/erasing in the wall texture????? More details please. “Use a soft eraser to remove the following parts of the wall texture”
What parts do i delete or erase in the first step? Please use more detail…
Is it the black or the color areas?
the directions in step 1 dont make any sense
this guys jump a lot of things they do… and put here is the final result..
The end image was totally different from tutorial, bad! :(
You guys should SERIOUSLY stop skipping on us in allot of the steps. Also be clear on the directions.
@Null: Have a look at our youtube channel: http://www.youtube.com/user/psdvault, there are several video tutorials there providing extra explanations for the steps. For instance, this video tut: http://www.youtube.com/watch?v=PVkC-3Nme7M shows the coloring details and this technique can be used across the board.
Shame. :( I was really looking forward to following along with this tutorial, but you jump around way too much and weren’t clear in a lot of the directions.
Thanks for the tutorial! But it’s not working.
thanks so much, i can do that.