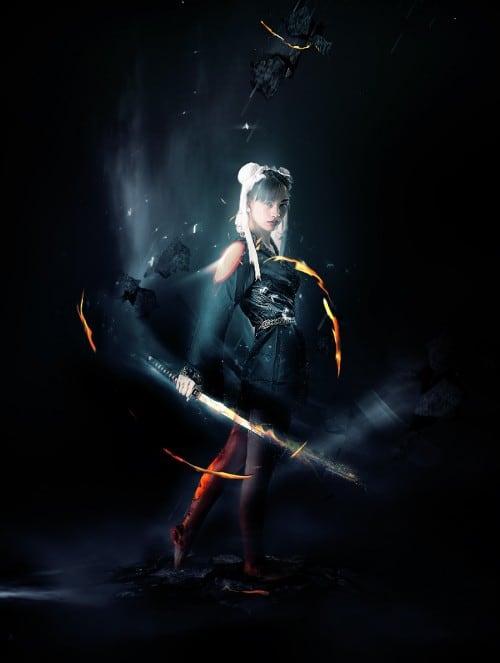
In this Photoshop tutorial, I will show you the steps I took to Design an Abstract Style Sword Warrior with Fiery Effect in Photoshop. This is an intermediate level tutorial so some steps can be tricky, but why not have a try :)
The PSD file of this tutorial is available via the PSD Vault VIP members area.
Along the way, we will be using some photoshop retouching techniques, selection tools, cloud effect, texture application and custom brush painting.
Here is a preview of the final effect I have for this tutorial: (click to enlarge)
PSD Vault VIP Membership
You can download the PSD File for this tutorial via the VIP Members Area for only $6.95/Month (or less)! You will not only get this PSD File, but also 200+ other PSD Files + Extra Goodies + Exclusive Photoshop tutorials there. Signup now and get exclusive!
OK Let’s get started!
To complete this tutorial, you will need the following stocks:
Model by *jagged-eye
Step 1
Create a new document sized 790px * 1050px with black background, create a new layer and use the gradient fill (set to radial gradient) tool to fill the background as shown below:

Load the stone texture into Photoshop, use the quick selection tool to select a portion of the texture as shown below – we will be using this to create some ground texture:
Copy and paste the selection onto our document, use the free transform tool to perspective it a bit to create some depth:
Use a soft eraser tool to remove the edges so it fades into the background:
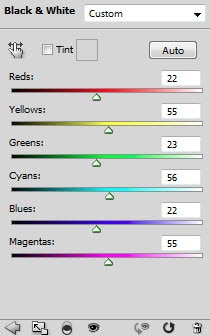
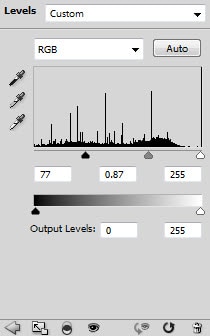
Add the following 3 adjustment layers to this stone texture as clipping mask:
Black and White

Levels
Curves
and here is the effect you will have so far:

Step 2
Load the model image into Photoshop, cut out the model and paste it onto our canvas, resize and position the model in the centre as shown below:

Use the Smudge Tool with 6px pressure to remove the roughness around the legs area:
Add the following 3 adjustment layers on this model layer as clipping mask:
Black and white
Layer mask on this black and white adjustment layer:
Levels

Layer mask on the levels adjustment layer:

Curves

Layer mask on the curves adjustment layer:

After the adjustment, you will find that we now have some burnt effect around the legs, which I think works well with the fiery theme:
Create a new layer and use a soft black brush, paint some shadow under the feet: (use a 20% flow and opacity setting, we don’t want to over paint the shadow)

and here is the effect so far:

Step 3
In this step, we will be adding some cloud and fire effect to the image. With the cloud part, we can simply use the cloud filter in Photoshop, combing it with the warp tool to render some nice effect around the model:
If you’re having trouble with the technique, check out one of my basic tutorial here: 5 Useful Little Photoshop Tricks to Add Extra Elegance For Your Design


Make sure you adjust the layer opacity of the cloud layers, so that you will have more levels and depths for the image:

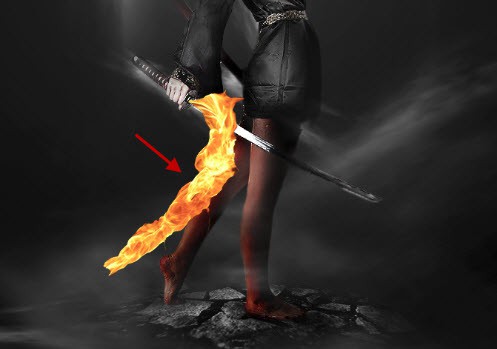
We can now add some fire effect for the model. Load the fire image into Photoshop, and use the quick selection tool to select a portion as shown below:
Copy and paste the selection onto our document, resize and fit it to the leg area as shown below:
Use the liquify filter forward warping tool, adjust the shape of the fire a bit:
Then go back to the original model layer, load the selection of the it and inverse the selection:
On the fire texture layer, go to “Edit > Clear” and clear the selection, and leave only the portion that is on the leg:

Change the blending mode of this fire texture layer to “overlay”, you will have the following effect:

Apply the same technique as shown above (apart from changing the blending mode), add some more fire texture around the model:

Step 4
Now we can add some extra flying rocks for the image. Go back to the stone texture and use the quick selection tool to select some random blocks of the stone ground, as shown below:
Copy and paste the selection onto our document, rotate it and use a soft eraser to remove the edges of the stone to fade it into the cloud:
Add the following 2 adjustment layers onto the stone layer as clipping mask:
Black and White

Levels
and you will have the following effect:
Create a layer folder and put these layers into it, duplicate it a few times and scatter the duplicates stones layer around the canvas:
Hint: adjust the settings on the levels adjustment layer for the contrast of the stone, and the layer opacity of the stone layers for variety. Apply some motion blur to create a flying effect.
Step 5
OK we’re almost done. For extra effect, I decide to add some debris around the model using the debris brush downloaded:

Duplicate this particle layer once, and apply the following Radial Blur settings to the duplicated layer:
And you will see the following blurring effect for the particles:
You can further add some colour and adjust the contrast of the image via a few more adjustment layers, and here is my final result for this Photoshop tutorial: (click to enlarge)

That’s it for this tutorial! Hope you enjoy it and find it useful :) Till next time, have a great day!


3 Comments
With the bases ladoed you struck us out with that answer!
I like the way to implement photoshop effect.
This tutorial will remind my past when i play different games and see these type of cartoons fighting each other now these happy days are gone. This tutorial give me some very memories of my Life. Great Photoshop Tutorial.