In this tutorial, I will show you the steps I took to Design a Dark Surreal Urban Scene with Space Brush in Photoshop. This is an intermediate tutorial so some steps can be tricky, but why not have a try :)
The PSD file of this tutorial is available via the PSD Vault VIP members area.
Along the way, I will show you a few simple photo manipulation skills that might be useful for your future design, including some lighting tricks and image adjustment techniques.
Here is a preview of the final effect: (click to enlarge)
PSD Vault VIP Membership
You can download the PSD File for this tutorial via the VIP Members Area for only $6.95/Month (or less)! You will not only get this PSD File, but also 200+ other PSD Files + Extra Goodies + Exclusive Photoshop tutorials there. Signup now and get exclusive!
Ok Let’s get started!
To complete this tutorial, you will need the following stock: (registration required for those images)
Step 1
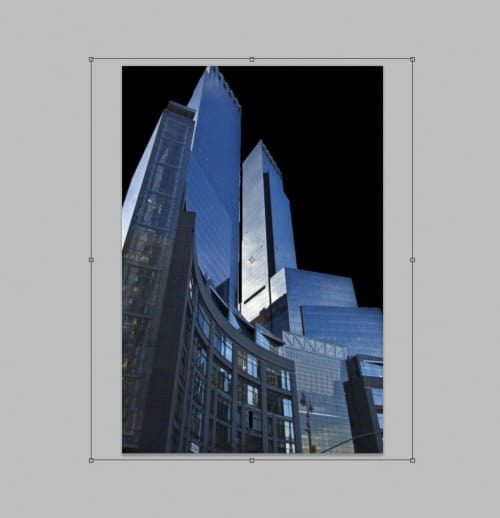
Create a new document sized 800px * 1187px with black background. Load the office building image into Photoshop and cut out the building portion of the image, paste it onto our document, resize and position it as shown below:

Now we want to fade the edges of the building a bit so it blending into the background. So load the selection of this building layer, hit Ctrl + Alt + R to bring up the refine edge tool, apply the following settings:
Apply the refine edge settings, then inverse the selection and clear it, now you will have a slightly fade-in edge for the building:

Now use the blur tool with around 30% strength, blur the following areas: (this will shift the focus to the man and the upper side of the building)

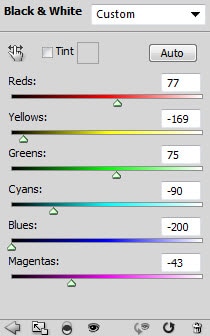
Add the following image adjustment layer to the building layer as clipping mask:
Black and White

Levels

Layer mask on the Levels adjustment layer:

Curves

and here is the effect so far:

Step 2
Optional step: now we can add some little spot light effect around the building – you can use a soft white brush and basically do a few simple clicks to the positions shown below: (make sure you adjust the brush tip size as you go)

Now load the Business Man stock image into Photoshop and cut out the man, paste it onto our document on top of all previous building layer, resize and position it as shown below:
Add the following image adjustment layer on the man layer as clipping masks:
Black and White

Levels
Mask on the Levels adjustment layer: (As you can see, I used the eraser tool to remove the man’s body edge on the level adjustment layer – this will produce a highlight effect on the edge, as if there is a light source in front of the man.)

Curves

and here is the effect so far:

Step 3
Now let’s add a big planet on the night sky. Create a new layer below the building layer and use the elliptical marquee tool to draw a circle on the top right corner of the canvas:

Load the space brush we downloaded in Photoshop, pick a brush from the pack:

Use this brush to paint some pattern inside the selection:

Use a soft eraser to remove the edges around the planet as shown below:

Create a new layer under this planet layer, use the space brushset to further paint some nebula pattern around the sky:

Step 4
Now we have done the majority of the work about combining images. We can focus on adding some details on the image. I decided to add some rainy effect with this technique I described in another tutorial here on psdvault.com:

I also created a new layer under the man’s layer, and used a soft white brush with a 20% flow and opacity to add some lighting effect around the man’s body:

I also added a few splashing effect with the spatter brush (around 30% flow and opacity) around the shoulder areas and arms:

Use the spatter brush to paint some water splash effect on the man’s shoulder – use a soft eraser to remove unnecessary bits as you paint:
Step 5
We’re almost done :) I decided to flatten the image then duplicate the background layer, then applied some smart sharpen effect via Filter > Sharpen > Smart Sharpen effect to the duplicated layer:

Of course we don’t need the entire image to the sharpened, so I added the following layer mask to it for hiding some parts of this sharpened layer:

Alternatively, you can experiment the unsharpen mask filter for some comic effect:

I also added a new colour layer (blending mode set to “color dodge”) and painted some cyan/light blue colour onto the areas shown below:
and here is the final effect of this tutorial: (click to enlarge)
That’s it for this tutorial! Hope you enjoy this tutorial and find it useful! Till next time, have a great day!


