Close Menu
PSD VaultPSD Vault
  • VIP Area
  • Photoshop Basics
  • Photo Effect
  • Text Effect
  • Premium Tuts
  • Resources
  • Drawing
  • Inspiration
  • Web Graphics
  • Abstract
  • Freebies
  • Advertise
  • Get in Touch
  • About PSD Vault
Facebook Instagram Pinterest YouTube TikTok
Facebook Instagram Pinterest YouTube TikTok RSS
PSD VaultPSD Vault
  • VIP Area
    • Sign Up
    • Log In
  • Photoshop Basics
  • AI
  • Photoshop Error Fixes
  • Video Tutorial
  • Photo Effect
  • Text Effect
  • Premium Tuts
  • Drawing
  • Opinion
PSD VaultPSD Vault
Home»Text Effect»Design a Hot Golden Text with Disintegration Effect in Photoshop
Text Effect

Design a Hot Golden Text with Disintegration Effect in Photoshop

By James QuMarch 3, 20134 Mins Read
Facebook Twitter Pinterest LinkedIn Tumblr Email
Share
Facebook Twitter LinkedIn Pinterest Email

In this Photoshop tutorial, I will show you the steps I took to Design this Hot, Golden Text with Disintegration Effect in Photoshop. We will mainly use the selection tool and layer mask to perform some texturing for the letters, and use image adjustment tools to fine-tune the effect.

The PSD file of this tutorial is available to buy on PSD Vault Shop, or via the PSD Vault VIP members area.

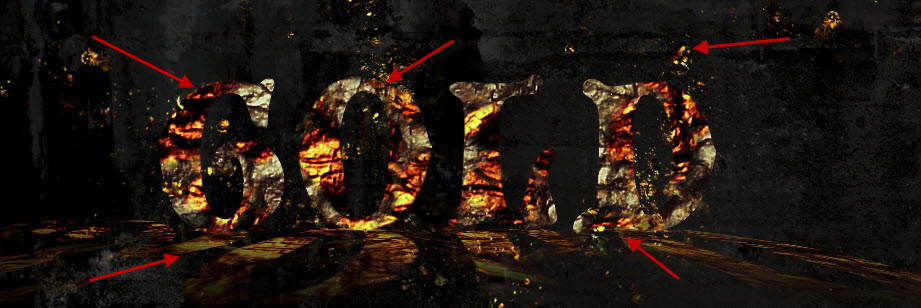
Here is a preview of the final effect I have for this tutorial: (click to enlarge)

PSD File Download

You can download the PSD File for this tutorial via the VIP Members Area for only $6.95/Month (or less)! You will not only get this PSD File, but also 100+ other PSD Files + Extra Goodies + Exclusive Photoshop tutorials there. Signup now and get exclusive :) Find out more about the VIP Members Areas

OK Let’s get started!

To complete this tutorial, you will need the following stocks:

Font

Background Texture

Gold Texture

Water Brushes

Step 1

Create a new document sized 1280px * 468px with black background. We will start by preparing some background texture: Load the background texture image into Photoshop and select a piece from it, copy and paste the selection onto our document, resize to fit the canvas height and width:

Use a soft eraser with 50% flow and opacity, erase some parts of the texture as shown below:

Add the following 2 adjustment layers on top:

Black and White

Levels

and here is the effect so far for the background texture:

Step 2

Use the font we downlaoded, type some letters ove the canvas:

Select the text:

Then move the selection over to the gold texture:

Copy and paste the gold texture over to our document, then turn off the original text layer:

Apply the following Levels adjustment to this gold texture layer to adjust it contrast a bit:

Then we want to duplicate this gold texture layer once, then flip it vertically:

Use the free transform tool to perspective it as shown below:

and use a soft eraser to fade the edge as shown below:

Step 3

We will have some variation for the gold onto text. Go back to the gold texture, repeat the method describe in step 2 to get one more gold texture, place this new layer above the previous gold texture layer:

Apply the following layer mask on this new gold layer to hide some portions of it:

Add the following 3 adjustment layers as clipping masks to this new gold texture layer:

Black and white

Levels

Curves

and here is the effect so far:

Step 4

We will add some disintegration effect into the text. Here is a quick way to do this. We will use the water brushes we downloaded, create a new layer on the golden texture image, and paint some water splashes on it:

Then, we will hold down the Ctrl key, and left click on the thumbnail image of this brush layer on the layer palette:

Go back to the background layer and Ctrl + C to copy, then paste this over to our text document, resize it a bit to fit the size:

Duplicate this splash layer a few times and add them to different parts of the text:

We can add some cloud via the Cloud Filter over the text, as shown below:

Step 5

We’re almost done! For some final effects, I flatten the image, then duplicate the background layer and apply the following “Chrome” filter via Filter > Sketch > Chrome, with the following settings:

Set this Chrome Filtered layer blending mode to “screen”, reduce the layer opacity to 60%.

Apply the following selective color adjustment layer to fine-tune the colour combination a bit:

and here is the final effect I have: (click to enlarge)

That’s it for this tutorial! Hope you enjoy it and find it useful! Drop me a comment below if you have any question.

Till next time, have a great day!

cs6 disintegration effect golden hot photoshop text
Share. Facebook Twitter Pinterest LinkedIn Tumblr Email
James Qu
  • Website

James is a seasoned Photoshop expert with over 25 years of experience, mastering the software since its 5.0 version. As the driving force behind PSD Vault, he authors the majority of its in-depth tutorials and insightful articles.

Related Posts

Why Learning Non-Destructive Editing is a Must for Every Photoshop Beginner

July 5, 2025

Photoshop June 2025 Update: Master New Features in Version 26.8

June 21, 2025

How to Make a GIF in Photoshop: A Step-by-Step Guide

June 20, 2025

9 Comments

  1. mamun on February 9, 2013 5:36 PM

    incredible post…….
    amazing
    :D

  2. mam_raj07 on February 9, 2013 5:40 PM

    fantastic……

  3. Ahmed Azim on April 17, 2013 12:53 AM

    v nice

  4. Eva on July 29, 2013 5:25 PM

    PLEASE REPLY!!! When I click on the water brushes link it isn’t linked straight to them there are many different ones I can choose. Which ones do I use?????
    Thanks!

  5. LeGrip on October 18, 2013 11:25 PM

    Great tutorial! Thanks!

  6. PootisMan on December 17, 2013 3:29 PM

    Nice tutorial, but i get confuse.

  7. azu on January 8, 2014 6:26 PM

    great

  8. รับถ่ายวีดีโองานแต่งงาน on January 27, 2014 3:53 AM

    Your style is unique compared to other people I’ve read stuff from.
    Thank you for posting when you have the opportunity, Guess I will just
    bookmark this site.

  9. zakk on May 6, 2014 6:31 PM

    I can’t go any furthe than duplicating the gold layer and flip vetical step :/ I do it but there is no mirror refection of the image

Don't Miss

Why Learning Non-Destructive Editing is a Must for Every Photoshop Beginner

July 5, 2025

Mastering Sky Replacement in Photoshop: A Comprehensive Guide

July 4, 2025

How to Effectively Change Hair Colour in Photoshop

July 2, 2025

For Beginners

Basics

Mastering Sky Replacement in Photoshop: A Comprehensive Guide

By Lana WilsonJuly 4, 20256 Mins Read

How to Effectively Change Hair Colour in Photoshop

July 2, 2025

How to Use “Find Distractions” Feature in Photoshop for Easy Photo Clean-up

June 28, 2025

Photoshop June 2025 Update: Master New Features in Version 26.8

June 21, 2025

You May Also Like

Opinion

Why Learning Non-Destructive Editing is a Must for Every Photoshop Beginner

By James QuJuly 5, 20259 Mins Read
Basics

Photoshop June 2025 Update: Master New Features in Version 26.8

By James QuJune 21, 20254 Mins Read
Basics

How to Make a GIF in Photoshop: A Step-by-Step Guide

By James QuJune 20, 20253 Mins Read
Facebook X (Twitter) Instagram Pinterest
  • About Us
  • Get in Touch
  • Advertise
  • VIP Area
  • Privacy Policy
  • Terms & Conditions
© 2025 PSD Vault. All Right Reserved.

Type above and press Enter to search. Press Esc to cancel.

Manage Consent
To provide the best experiences, we use technologies like cookies to store and/or access device information. Consenting to these technologies will allow us to process data such as browsing behavior or unique IDs on this site. Not consenting or withdrawing consent, may adversely affect certain features and functions.
Functional Always active
The technical storage or access is strictly necessary for the legitimate purpose of enabling the use of a specific service explicitly requested by the subscriber or user, or for the sole purpose of carrying out the transmission of a communication over an electronic communications network.
Preferences
The technical storage or access is necessary for the legitimate purpose of storing preferences that are not requested by the subscriber or user.
Statistics
The technical storage or access that is used exclusively for statistical purposes. The technical storage or access that is used exclusively for anonymous statistical purposes. Without a subpoena, voluntary compliance on the part of your Internet Service Provider, or additional records from a third party, information stored or retrieved for this purpose alone cannot usually be used to identify you.
Marketing
The technical storage or access is required to create user profiles to send advertising, or to track the user on a website or across several websites for similar marketing purposes.
Manage options Manage services Manage {vendor_count} vendors Read more about these purposes
View preferences
{title} {title} {title}