
In this tutorial, you will learn how to creatively use transform tool & distort filters (such as puppet warp, polar coordinates) to achieve amazing photo effect in Photoshop.
By creating a surreal landscape Photoshop project, you will get familiar with these tools and acquire heaps of useful Photoshop tips and tricks. Have a try!
The PSD file of this tutorial is available via the PSD Vault VIP members area.
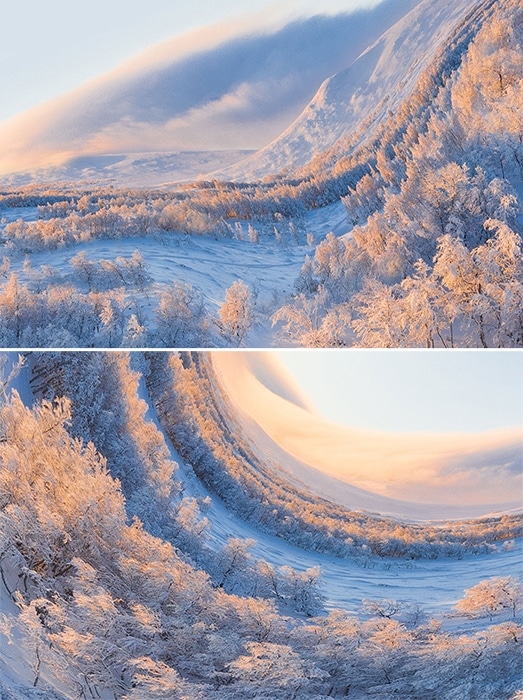
Final Effect Preview

What you will need
- Background (Photo by Jaanus Jagomägi on Unsplash)
- Sky (Photo by StockSnap on Pixabay)
- Snow (Photo by Annie Niemaszyk on Unsplash)
Step 1
Open image “jaanus-jagomagi-1245520-unsplash” in Photoshop. Go to File > Open and specify a path to the image on your hard drive. Duplicate Background layer via Layer > Duplicate Layer or use keyboard shortcut Cmd + J (Mac) / Ctrl + J (Win). So, you can come back if something goes wrong without significant loss of progress.

Two important things before we start. We will try to work in a non-destructive way. With a large image, filters and transform tools, you should not use Smart Objects in this tutorial. To turn this feature off go to Edit > Preferences > General and uncheck “Place or Drag Raster Images as Smart Objects” box. Transform the image right away, as close as possible to the desired result. Do not scale the image too many times.
Step 2
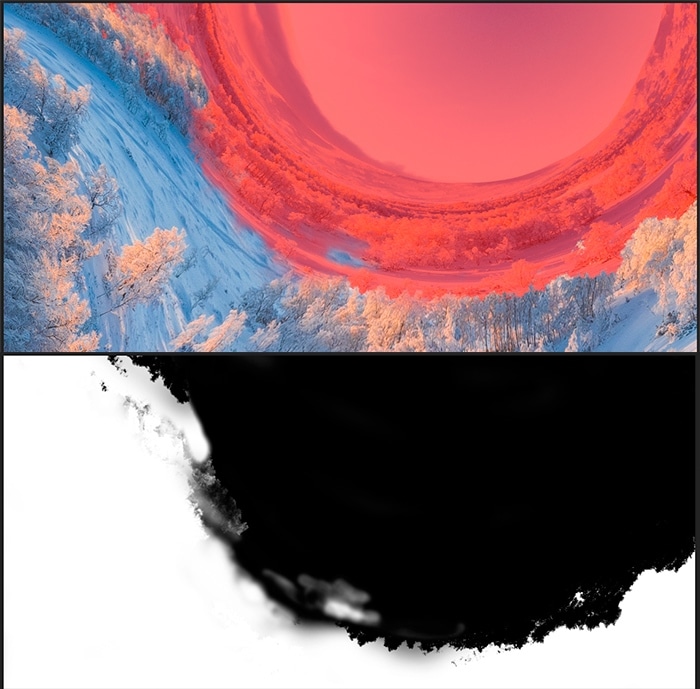
Let’s start from significant distortion and transformation of the photo. For a larger landscape change, we will use a filter. Go to Filter > Distort > Polar Coordinates. In the window that appears check “Rectangular to Polar” option and click “OK” to apply the filter.

This filter used to create circular artworks. In order for the transformation to occur more accurate, the working field must be set to the square shape. It’s okay that our image is a bit oval. We will use this as an artistic solution. We are dealing with a landscape and act creative so this condition omit.
Step 3
Let’s go ahead and experiment with what else obtained from this filter. Hide the distorted layer by clicking on eye icon on the left side of a Layer Panel. Duplicate Background layer again (Layer > Duplicate Layer or Cmd/Ctrl + J). Go to Edit > Transform > Flip Vertical. Apply “Polar Coordinates” filter again (Filter > Distort > Polar Coordinates). Tick “Polar to Rectangular” this time.
Back image to its normal position by flipping image vertical (Edit > Transform > Flip Vertical). Apply last used filter with the same settings (Cmd/Ctrl + F). This gives us another excellent option as the base of the composition of our landscape.
Step 4
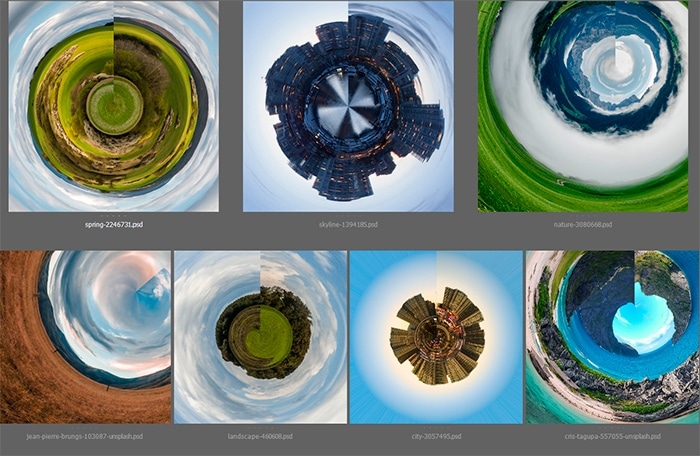
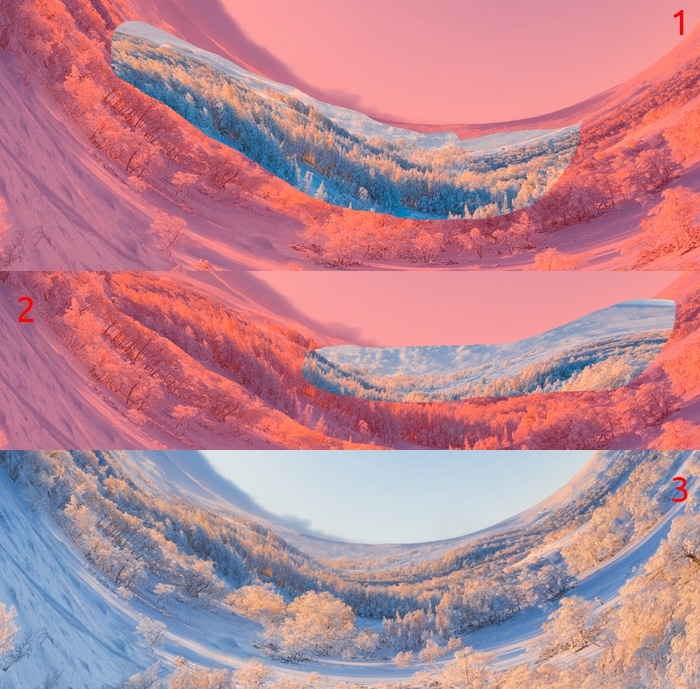
Now both results look for a bit strange and surreal. In some places, the distortion is too obvious. But do not make hasty conclusions. At each stage, there are some interesting areas that are not distorted. The mess will go away as soon as you decide on which composition to continue work with. At this stage, you can choose from several successful paths as shown in the image below. I decided to act inventive and chose as the starting point of the oval image.

Step 5
Show up the oval layer by highlighting it and clicking on the eye icon again. Go to Edit > Free Transform (Cmd/Ctrl + T). First, you need to increase the layer so that all unnecessary parts are outside the working field. Hold down the Shift key and pull on the corners to scale image proportional.
Then, I squeezed the image on the sides to give it a more circular shape. Rotate the image on around 64 degrees to hide the line connecting both sides of the image. You can always use a Clone Stamp Tool (S) and carefully remove this line, but now we will have a simple solution. You can use the settings from the image below. Play with the scale, position, rotation, Distort and Warp tools to find a good piece. The main thing is to find a harmonious composition and balance the perspective. When you’re satisfied with the result, apply the transformation.
About the filter and workflow
I want to show the idea we follow in the examples so that you understand better how this works. Polar Coordinates filter transform our square shape to a circle and vice versa. In the first case, it turns out just a circular image. In the second case, the image transforms like inside out.

Combining all this with the rotation of the image itself, you can get a circular image of a slightly different look. Anyway, quite surreal and interesting ideas. This technique works well on textures, landscapes. It is desirable that the horizon line be a hard line so the image will look better after transformation. Choose a photo that the horizon line is about half the image. Do not be afraid to experiment and try different images, it can give unexpected results.
In the image below there are several successful examples, that I found during creation. I chose it because it seemed to be more original. But you can not stop at what achieved and it is worth experimenting more.
Step 6
Keep in mind that the document can become quite large. This can cause rendering difficulties and freeze of Photoshop. To avoid this, use the Crop Tool (C) with checked “Delete Cropped Pixels” to remove all outside the working field. Keep in mind that after that you can no longer use other parts of the image, than on the working field. You can resize the image to make it easier to work within via Image > Image Size (Cmd/Ctrl + Opt/Alt + I).

Step 7
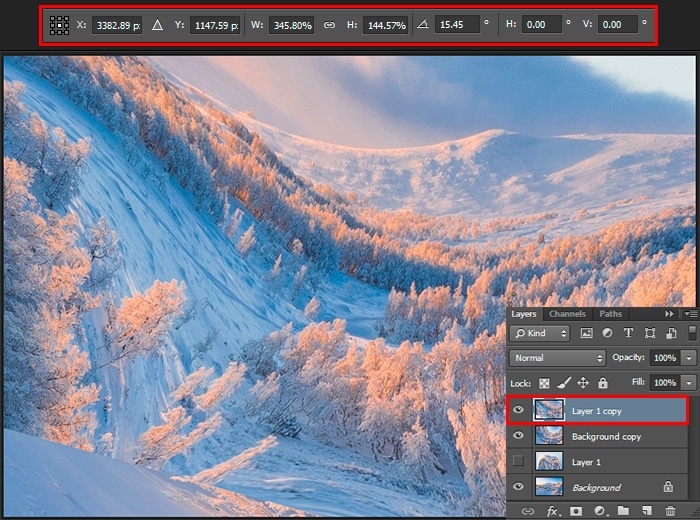
Now use an image with two hills. Duplicate layer (Cmd/Ctrl + J), we will need it further and move the layer at the top of the Layers panel. Use Free Transform Tool (Cmd/Ctrl + T or Edit > Free Transform) to scale and rotate the layer so that the landscape matches the oval image. This is very simple, especially if you reduce the Opacity on the Layers panel during the transformation mode (can do without leaving the mode).
Step 8
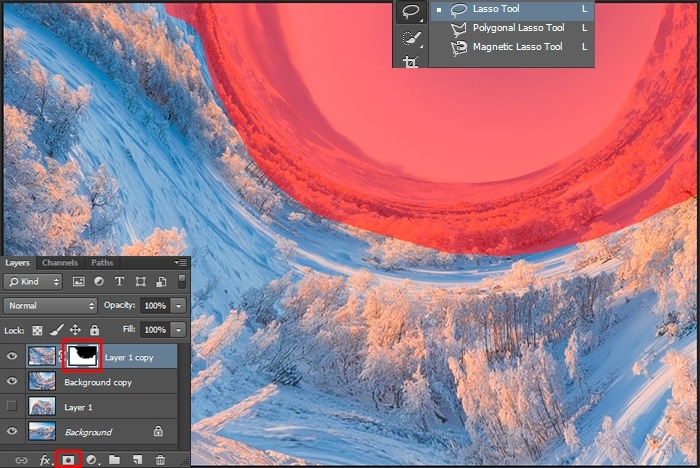
To remove unnecessary parts and blend this image with the background, take a Lasso Tool (L). Select a part of the landscape near the horizon, as shown in the image below. Add a black layer mask by holding Opt (Mac) / Alt (Win) and click on the icon at the bottom of Layers panel or go to Layer > Layer Mask > Hide Selection.
Step 9
When dealing with plant forms, it is not useful to work a hard or soft round brush, but a more organic one. I use the brush “Oil Pastel Large” from the default brush set. I set it up in Brush panel (F5 or Window > Brush) to get a random jagged edge and save it as preset. Using this brush to improve the mask. Try to make the invisible junction between vegetation.

Step 10
Take a Brush Tool (B) and set a form to saved preset, Opacity 100%, color: White. Click on the mask to make it active and paint over hard edge and trees so the edges look more natural. Watch that you take away and pay special attention to snow and the mixing of tree textures.
Step 11
Let’s do the same thing for another fragment. Duplicates layer (Cmd/Ctrl + J) from Step 7. Scale and rotate it a bit more to make it not so obvious (Cmd/Ctrl + T). Next, use the principle of Steps 7-9 to clear the fragment so that it looks something like the image below.
Step 12
Finishing work on the middle ground, start to work on the foreground. A small fragment of the oval image and from the original image placed in the lower left corner. Duplicate the oval layer (Cmd/Ctrl + J) to the top of the layers and scale it (Cmd/Ctrl + T). Do not rush to apply the transformation, make right-click in any transform mode > Warp (Edit > Transform > Warp). Move the grid, corners, borders and handles to set the direction of the fragment towards the sky. Slightly stretch the image so that it is less distorted. Try to not spoil the image.
From the strong use of warp tool may appear to blur on the image. For a fragment of the original image, you can apply distortion or find the best mapping. Of course, clear the fragments from an unnecessary background, using the technique from the previous steps.
Step 13
Now we will add the details of towards the horizon line. Several hills diversify the landscape. Let’s go back to the oval image and select a few pieces on it. Cut each to a new separate layer by using Lasso Tool (L) and Cmd/Ctrl + J. Use Warp Tool (Edit > Transform > Warp). Transform them a little so that they become more curved.
In the same vein, one by one, take each piece and fit it into the picture. All the same, that we did before. Using the brush from Step 9 and layer masks, bring the slice into a more realistic look. Sometimes, you may need to use a soft brush to blend tree textures.
Step 14
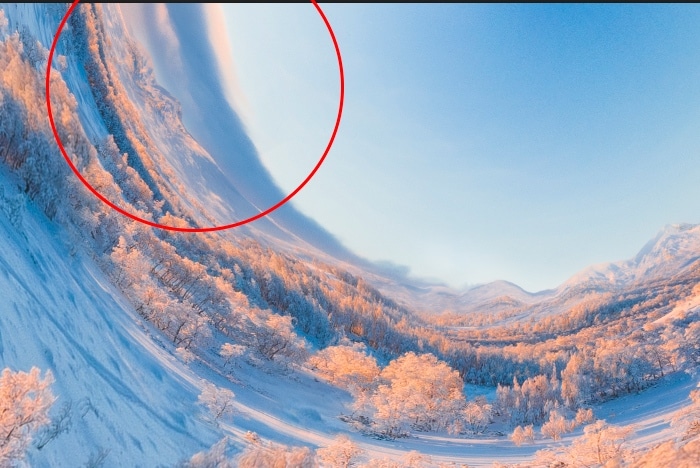
Last we create the mountains on the horizon line to hide the clear hard line. To do this, duplicate any layer with hills and apply a layer mask (right-click on the mask > apply layer mask). Use Puppet Warp Tool (Edit > Puppet Warp) and put points throughout the fragment. Some of them a little close from the edge, and pull it to create vertices.
Note that the direction of the texture matches the background, the top itself is snow-covered. Make a small margin of texture that will become foothills. This approach to detail helps to achieve realism. You can try using a filter “Wave” (Filter > Distort > Wave). It is also a good warp trick.
Step 15
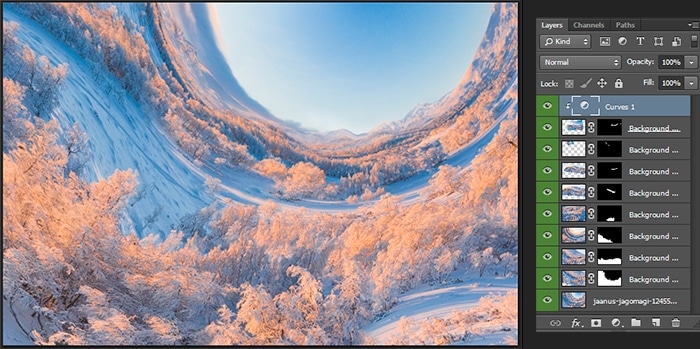
Position the resulting fragment of the mountains on the right side. Leave some free space around. Blend it harmoniously into the horizon line with transform tools and mask. To diversify the fragment and avoid the upheavals, add an atmospheric perspective. I use the “Curves” adjustment layer (Layer > New Adjustment Layer > Curves). Lighten the shadows to create a blurred look. To make the correction applied only on this layer, make a clipping mask (Cmd/Ctrl + Opt/Alt + G).

Step 16
Duplicate the layer (Cmd/Ctrl + J), flip it horizontal (Edit > Transform > Flip Horizontal). Position piece on the left side of the semicircle of the horizon, not too close to the edge. Use a layer mask and a soft round brush where you want to blend texture with the background, remove a hard edge or a distracting piece.
Step 17
On this, our composition completed. Cleanup a working document is always a good idea. Removing unnecessary layers will reduce the size of the file. Return to the Step 6 to remove pixels outside the working area. In the next few steps, we will add a little correction to integrate all the details and develop the plot to a fabulous landscape.
Step 18
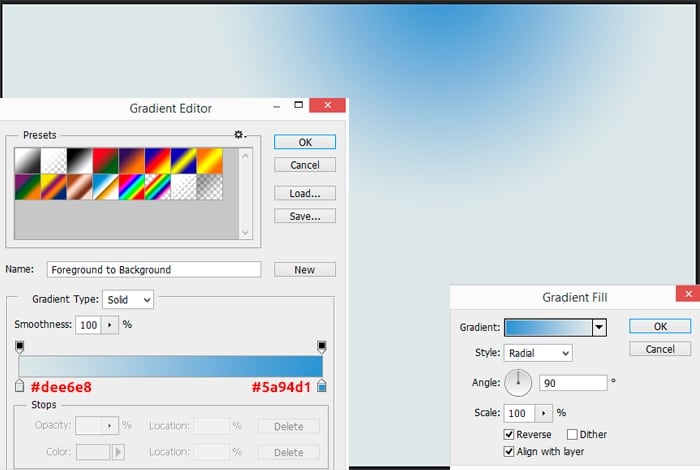
Let’s start by fine-tuning the sky. A small cloud nears the horizon after the transformation has become too large and closes the horizon. To fix this, I use “Gradient Fill” layer (Layer > New Fill layer > Gradient or use the icon at the bottom of the Layers panel). When “Gradient Fill” window is appear customize following settings: Gradient: #dfe7e9 > #5a95d2, Style: Radial, Angle: 90 degrees, Scale: 200%, Reverse. You can move the gradient while this window is active, so drag the white spot in the center of the sky.
Step 19
On the layer mask, remove everything by inverting the mask (Cmd/Ctrl + Shift + I). Use a white soft round Brush Tool (B) and restore the gradient over the sky and cloud. Use a different brush opacity and large size of the brush to create a smooth blend of background and gradient colors. In place of the cloud, restore the opacity and use a hard round brush.

Step 20
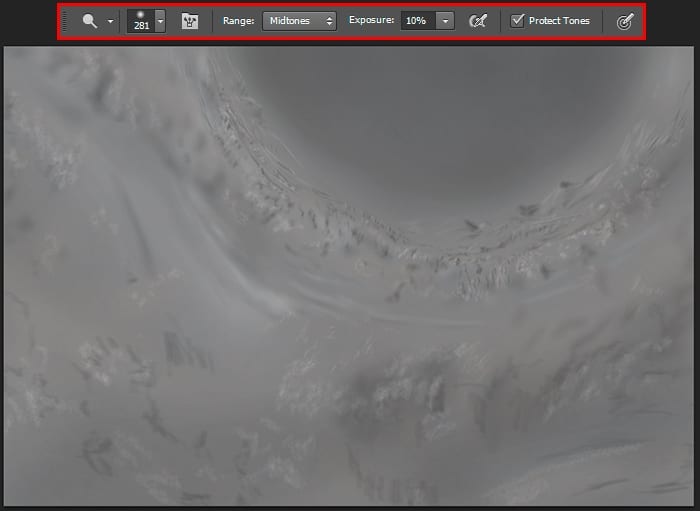
It is necessary to integrate the details with the general lighting. Only a small correction need. I use the “Dodge and Burn” technique to work on the lighting. Create a new layer with Blending Mode “Overlay” (hold down Opt/Alt and click on the icon to show extra options or Cmd/Ctrl + Shift + N). Take Dodge Tool (O) with the settings like in the image below. Set the same settings for Burn Tool (O) so, that the tools do not differ in impact. When working on with these tools, hold down Opt/Alt key to temporary switch it.
The most important thing in this technique is not to overdo it. The best rule: less is better. So use a different brush size and feel free to reduce the opacity of the layer if the effect looks too much.
Step 21
Let’s make the lighting direction more obvious. For this we use the “Gradient Fill” layer (Layer > New Fill layer > Gradient). When the “Gradient Fill” window appears, set the following settings: Gradient: Black, White, Style: Radial, Angle: 90 degrees, Scale: 200%, Reverse. Drag the white spot a little to the left from the middle of the working field. Change Blending Mode to “Overlay”, reduce layer Fill to 12%.

Step 22
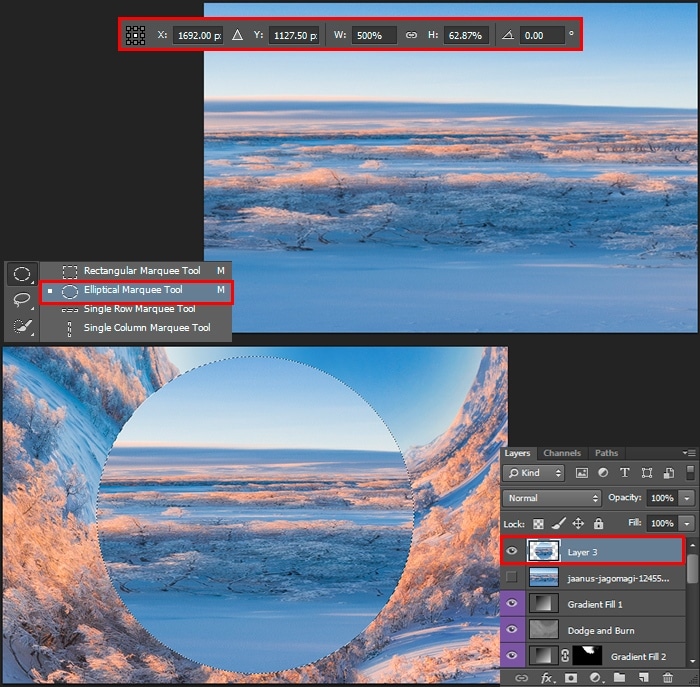
You may not believe, but the planets created from the same image that we used all this time and now I will show you how to do it. First, place Background image (File > Place or Place Embedded) into the working document. In the free transform mode, stretch the image horizontal to both sides using the Opt/Alt key (Horizontal scale: 500%). Take the Elliptical Marquee Tool (M) and create a perfect circle from the center of the working field (Shift + Opt/Alt) to the borders. Duplicate selection to a new layer (Cmd/Ctrl + J).
Step 23
Hold the Cmd/Ctrl key and click on the thumbnail to make a selection and click on the layer. Go to Filter > Blur > Motion Blur and apply with Angle: 0 degrees, Distance: 50px to smooth texture. Next, go to the Filter > Distort > Spherize. Set the greatest value and apply the filter again (Cmd/Ctrl + F).

Step 24
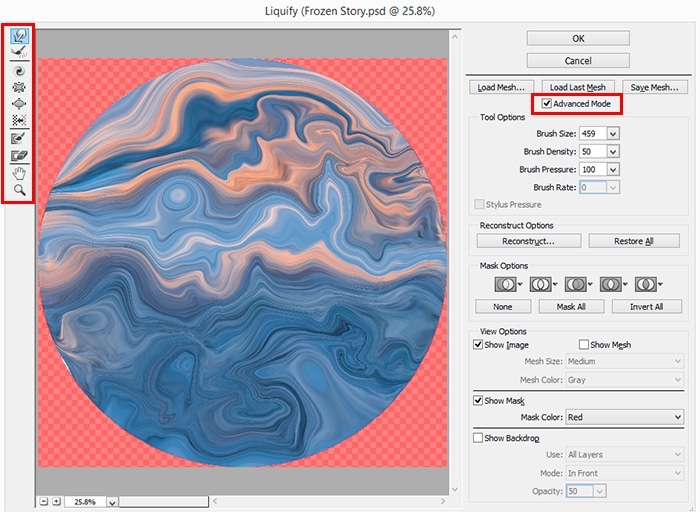
Duplicate the layer (Cmd/Ctrl + J), and make a selection. Use the “Liquify” filter (Filter > Liquify) and try all the tools presented in Advanced Mode to make the original texture. Change the brush settings too. In case to make the texture as varied as possible. Apply Spherize filter (Filter > Distort > Spherize) twice again.
Step 25
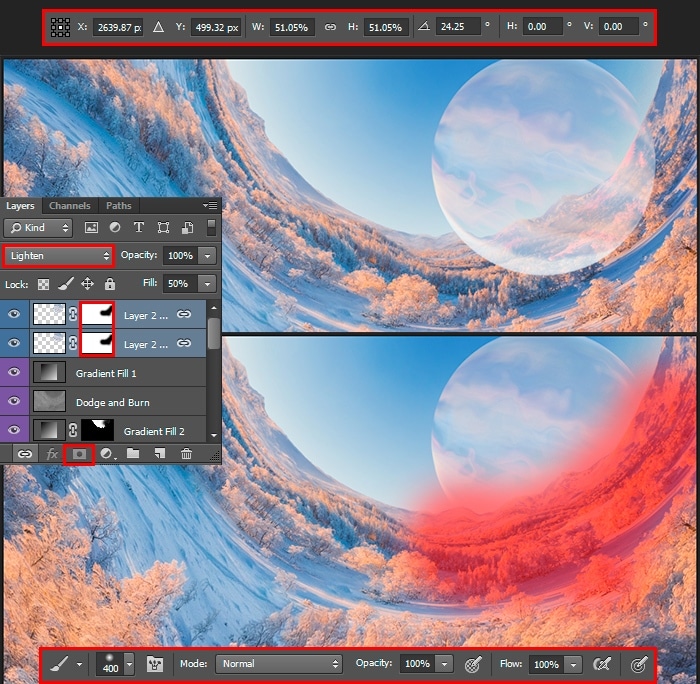
Change the Blending Mode for both layers to “Lighten” and the Fill to 64%, for the second Fill to 50%. So, the result looks more interesting. Further, any lighting and color adjustments are entire to your taste. Using the Free Transform Tool (Cmd/Ctrl + T), rotate on around 24 degrees, scale, and position the planet to leave more space for the sky.
Keep the planet proportional to the scale of the rest of the scene. Remove all unnecessary parts from the landscape with a large soft brush and a layer mask.
Step 26
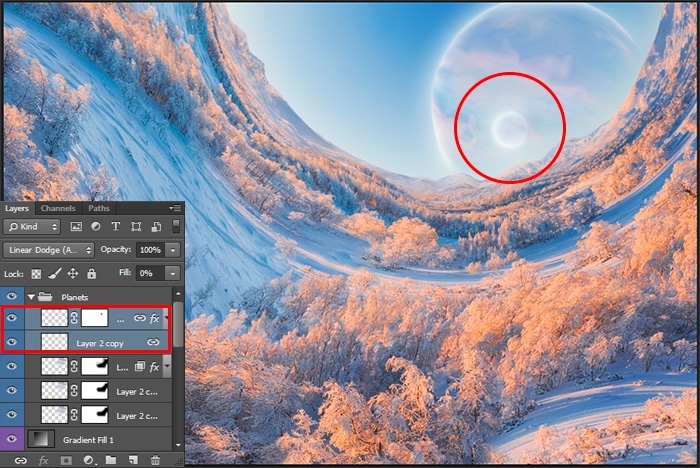
Add an atmosphere for the planet. Duplicate any one layer with the planet (Cmd/Ctrl + J). Move it to the top of the Layer panel and set the Fill to 0%. Double-click on the layer to get to the Blending Options menu. Or, you can call this menu via Layer > Layer Style > Blending Options.
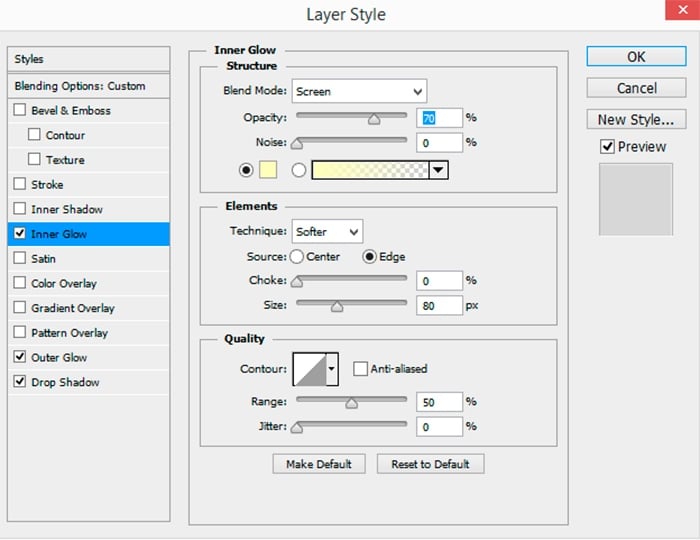
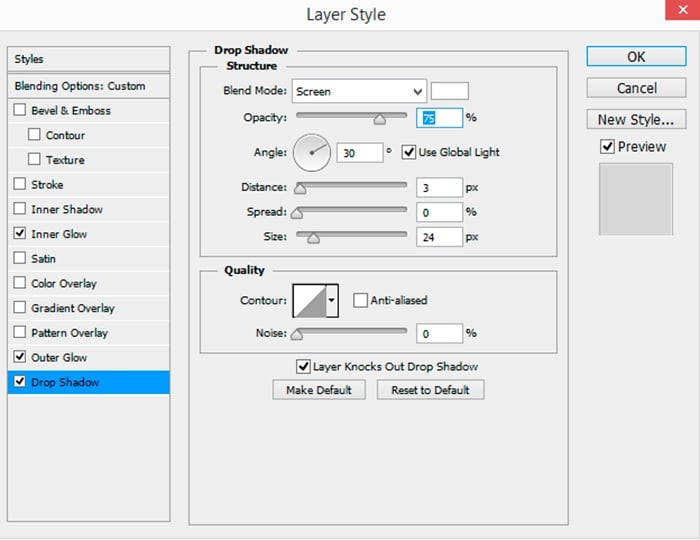
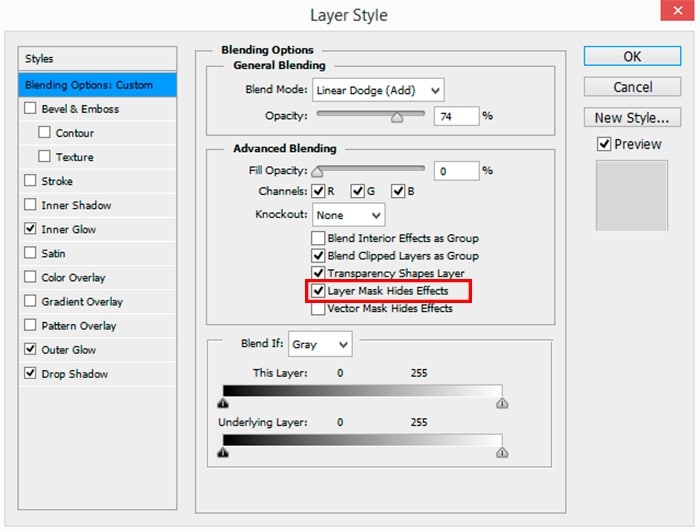
First, put a checkmark in “Layer Mask Hides Effects”. We will need this later when we make the dark side of the planet. We need three styles: “Inner Glow”, “Outer Glow” and “Drop Shadow” to create a realistic glow of the atmosphere. Experiment with settings like in the image below. Do not be afraid to use more settings, effects, styles, and techniques.

Step 27
For the effect to be better, the blending mode for the layer is worth changing to “Linear Dodge (Add)”, reduce Opacity to around 74%. On the layer mask, I removed the extra glow on the right side of the planet under the general lighting. Here are the layers with planets at this stage.

Step 28
Duplicate one layer with a planet and glow (Cmd/Ctrl + J) and scale it to a small planet. Using a layer mask, remove a part of the glow to make the shaded side of the planet a little smaller than on a large planet.
Step 29
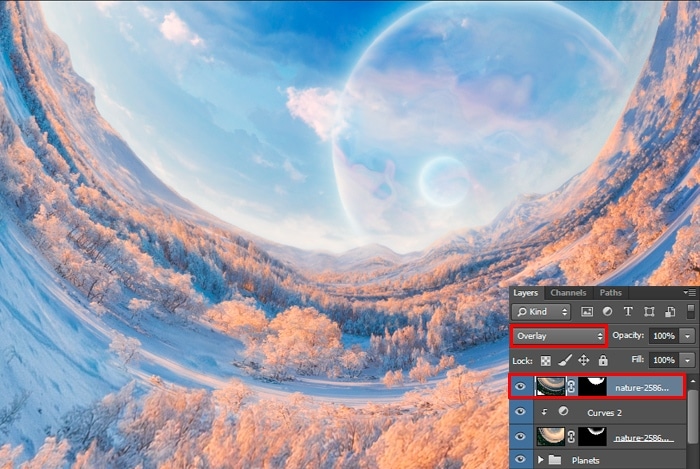
Our planets are ready and you can start creating the sky. I place Sky image into working document (File > Place or Place Embedded). Repeat Step 2 for the layer with the sky, to make it approximately as shown in the image below. Everything related to the landscape is also valid for the sky layer. You should get an oval image, located in the sky area in our artwork. Change the Blending Mode to “Overlay”, Fill to 46%. Using a layer mask, remove all unnecessary and mix the horizon line.

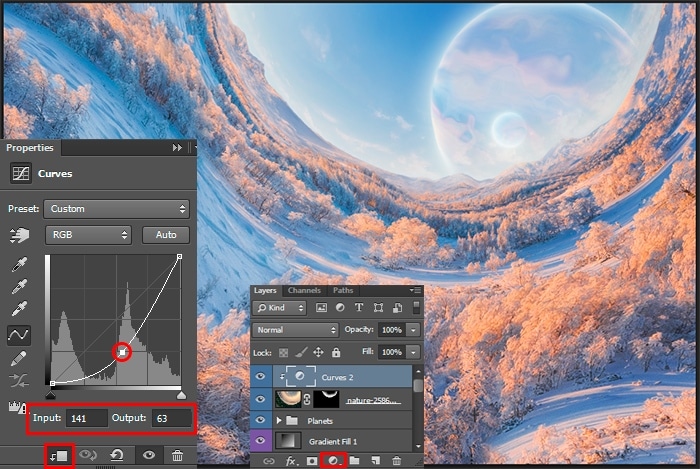
To remove the extra brightness on the horizon and to show the texture of the clouds, add “Curves” adjustment layer (Layer > New Adjustment Layer > Curves) as a clipping mask (Cmd/Ctrl + Opt/Alt + G).
Step 30
Add more clouds in the same way as before, only this time on a smaller scale and position the layer so that the clouds are all over the sky. Use “Overlay” Blending Mode. This will soften clouds and make the sky more contrast. You should have something similar as in the image below.
Step 31
Apply “Gradient Fill” layer (Layer > New Fill layer > Gradient) with gradient settings like Style: Angle, Angle: -167.91 degrees, Scale: 100%, Reverse. Customize gradient preset “Foreground to Transparent” and change left color stop to color: #d9e5ee. Move white Opacity Stop at Location: 30%. While “Gradient Fill” window is active drag and drops white spot near upper left corner. Change Blending Mode to “Linear Dodge (Add)”, reduce layer Fill to 15%.

Step 32
Duplicate this layer (Cmd/Ctrl + J), make double-click on the thumbnail to edit the settings. Set Angle: 180 degrees, left color stop to #004aaf, white Opacity Stop to Location: 60%. Move gradient to around the bottom left corner. Change Blending Mode to “Lighten”, Fill to 100%. This layer will create a slight color glow in the shadows.

Step 33
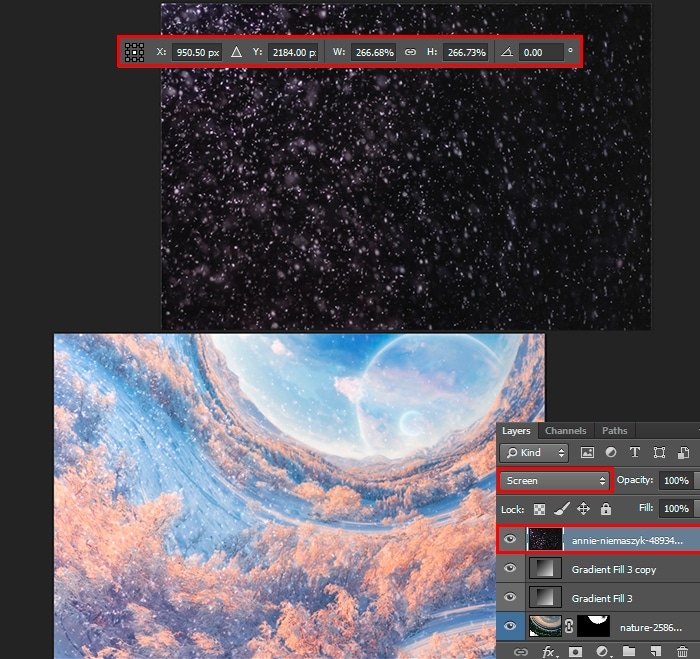
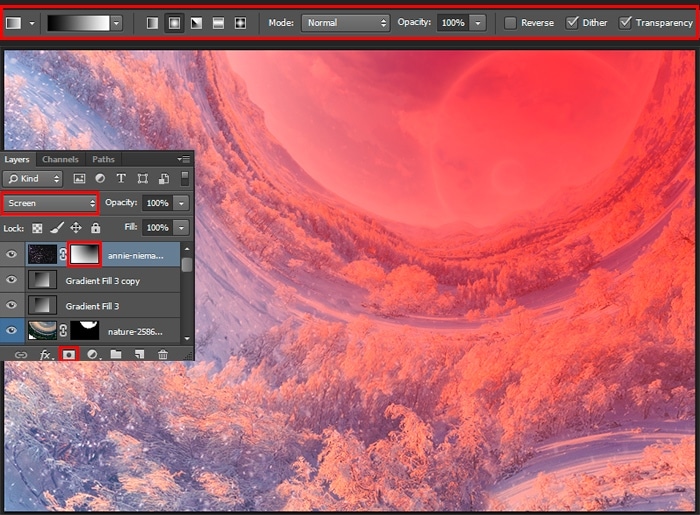
It remains to add atmospheric details. Place Snow image (File > Place or Place Embedded) into a working document. Scale image proportional with Free Transform Tool (Cmd/Ctrl + T)so that all unnecessary gone beyond the working field, leaving only the texture. Set Blending Mode to “Screen” to mix texture with the artwork.
Step 34
Take a Gradient Tool (G) with the radial mode, use preset from black to white. Add the white layer mask and draw a gradient slightly above the upper right corner to below the lower left corner. In the foreground should remain texture of the snow.
Step 35
If you want more snow, duplicate the layer (Cmd/Ctrl + J). Unlink the mask from the layer by clicking on the chain icon between thumbnails and scale the layer (Cmd/Ctrl + T). The last thing is to associate the mask with the layer again.

Conclusion
That’s all! Enjoy your final result. Here, my final surreal artwork and Photoshop project. Do not be afraid to go beyond software, style, and genre. But, most importantly does to create and experiment! Thank you for your attention and good luck to you in your creative projects! Has something to add or ask? Use the comment section below!
