In this tutorial, I will show you the steps to”Lady Holding a Fire Orb” Photo Manipulation in Photoshop. We will mainly explore some interesting methods of applying texture, selection techniques, as well as layer blending options.
The PSD file of this tutorial is available via the PSD Vault VIP members area.
Here is a preview of the final effect I have for this tutorial: (click to enlarge)
PSD Vault VIP Membership
You can download the PSD File for this tutorial via the VIP Members Area for only $6.95/Month (or less)! You will not only get this PSD File, but also 200+ other PSD Files + Extra Goodies + Exclusive Photoshop tutorials there. Signup now and get exclusive!
OK Let’s get started!
To complete this tutorial, you will need the following stocks:
Step 1
Create a new document sized 1290px * 720px with white background. Create a new layer and use the Gradient Fill tool to fill the new layer as shown below (set the Gradient Tool to “Radial Gradient” at its option bar):
Step 2
We will add the model onto our document. Load the model image into Photoshop and select the model:
Copy and paste the selection onto our document, resize and place it in the centre of the canvas:
Add the following image adjustment layers as clipping mask for this model layer:
Black and white
Levels
Layer mask on the above levels adjustment layer: (highlighted in red)
Curves
Gradient Map
Layer mask on the above Gradient Map adjustment layer:
and you will have the following effect so far:
Step 3
We will add some rock texture onto our image. Load the rock texture into Photoshop and select a piece of the rock with the Quick Selection tool, as shown below:
Copy and paste the selection onto our document, use the Free Transform tool distort and resize it. Then duplicate this layer once, and repeat this re-size process.
The goal is to form the texture into the following “Wing” shape:
Optional step: you can use a soft eraser to remove some parts of rock texture, to give it a bit more depth:
Merge those two rock layers together, then add the following image adjustment layer on top:
Black and White
Levels
Layer mask on this above levels adjustment layer:
Gradient Map
Layer mask on the above Gradient Map layer:
and here is the effect so far:
Step 4
We will further add some extra rock patterns to our image. Grad one more piece of rock texture from the stock image, and this time we will manipulate the texture so it forms a sharp angle as shown below, with the Free Transform Tool:
Apply the following Black and White adjustment to this layer:
Then duplicate this layer a few times – rotate, resize and attach them to the model as shown below:
Step 5
Noticed the lady is holding on crystal orb? We will add some fire to it. Load the fire stock image into Photoshop and select a piece as shown below:
Copy and paste the selection over to the orb, set the blending mode to “Pin Light”:
And here is the effect you will have:
Step 6
We’re almost done! For some final touchups, I added some particle effect around the model:
Use the soft brush to paint some shadow under the model:
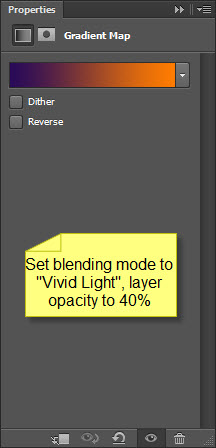
Add a Gradient Map adjustment layer to add some color to the image, withe the following settings:
Layer mask on this Gradient Map layer:
and here is the effect so far:
I further adjusted the contrast slightly, and this is my final result: (click to enlarge)
Hope you enjoy this tutorial and find it useful. Drop me a comment below if you have any question.
Till next time, have a great day!


