Close Menu
PSD VaultPSD Vault
  • VIP Area
  • Photoshop Basics
  • Photo Effect
  • Text Effect
  • Premium Tuts
  • Resources
  • Drawing
  • Inspiration
  • Web Graphics
  • Abstract
  • Freebies
  • Advertise
  • Get in Touch
  • About PSD Vault
Facebook Instagram Pinterest YouTube TikTok
Facebook Instagram Pinterest YouTube TikTok RSS
PSD VaultPSD Vault
  • VIP Area
    • Sign Up
    • Log In
  • Photoshop Basics
  • AI
  • Photoshop Error Fixes
  • Video Tutorial
  • Photo Effect
  • Text Effect
  • Premium Tuts
  • Drawing
  • Opinion
PSD VaultPSD Vault
Home»Basics»How to Use Lens Flare Filter Like a Pro in Photoshop
Basics

How to Use Lens Flare Filter Like a Pro in Photoshop

By James QuFebruary 23, 20243 Mins Read
Facebook Twitter Pinterest LinkedIn Tumblr Email
Share
Facebook Twitter LinkedIn Pinterest Email

In this tutorial, you will learn a number of useful tips and tricks about the application of the Lens Flare Filter in Photoshop.

Along the way, we will learn where to find lens flare filter in Photoshop, how to use it non-destructively and the most interesting part – making an awesome-looking special effect with it.

Lens Flare Filter – The “Amateur” Filter?

The Lens Flare filter in Photoshop has long been known as the “Amateur” filter, due to its relatively easy application. This unfortunately leads to the overuse of this filter and ugly-looking result.

I on the other hand, believe that the Lens Flare filter is one of the most versatile filters in Photoshop. With the correct settings, you can add some awesome effect for your photo with the lens flare filter.

Where to Find Lens Flare Filter in Newer Versions of Photoshop

In the latest Photoshop, the menu layout is slightly different from the previous version. You can locate the lens flare filter under Filter > Render > Lens Flare

You will have the following window, with 4 Lens Types to choose, as well as the Brightness option which you can adjust for each individual lens:

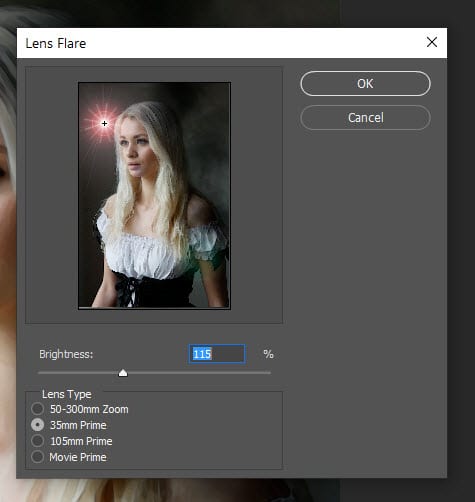
You can then hit “ok” to apply this filter on your photo.

Apply Lens Flare Filter Non-Destructively

The only problem with the above process, is that the lens flare filter was applied on the original photo layer. By doing so, we make things harder down the track if you wish to remove the filter.

A better way of applying lens flare filter without affecting the original photo, is to create a new layer on top as a dedicated layer just for the lens flare filter:

Fill this new layer with black colour:

Apply the lens flare filter on this new layer:

Change the layer blending mode to “Screen”:

and this is the effect:

As you can see, the lens flare filter is now applied on a seperate layer. You can easily turn this layer on and off to keep/remove the effect.

How to Use Lens Flare Filter to Create Special Effect

If you have difficulty with this part of the tutorial, check out this video below:

With some creative touches, lens flare filter can be used to make some very interesting effect. I will show you here how to make an awesome shining eye effect with it. Let’s get started!

Download this stock image by CathleenTarawhiti, use the steps previously described in step 2, apply the lens flare filter with 105mm prime lens type:

Move the centre of the lens flare to cover the eye of the model:

Duplicate this lens flare layer once and cover the other eye:

Duplicate the lens flare layer once more, use the Free Transform to warp this layer until it form this following shape, reduce its layer opacity to around 50%:

This is the effect you will have (I added some colours to the image):

That’s it for this tutorial! Hope it’s of use to you and taught you a thing or two about the Lens Flare filter in Photoshop 2020. There is more effect you can create with lens flare, use your imagination and experiment!

If you’re looking for more beginner Photoshop tutorial, check out the Basics section of my blog.

filter flare lens
Share. Facebook Twitter Pinterest LinkedIn Tumblr Email
James Qu
  • Website

James is a seasoned Photoshop expert with over 25 years of experience, mastering the software since its 5.0 version. As the driving force behind PSD Vault, he authors the majority of its in-depth tutorials and insightful articles.

Related Posts

Mastering Sky Replacement in Photoshop: A Comprehensive Guide

July 4, 2025

How to Effectively Change Hair Colour in Photoshop

July 2, 2025

How to Use “Find Distractions” Feature in Photoshop for Easy Photo Clean-up

June 28, 2025

Comments are closed.

Don't Miss

Why Learning Non-Destructive Editing is a Must for Every Photoshop Beginner

July 5, 2025

Mastering Sky Replacement in Photoshop: A Comprehensive Guide

July 4, 2025

How to Effectively Change Hair Colour in Photoshop

July 2, 2025

For Beginners

Basics

Mastering Sky Replacement in Photoshop: A Comprehensive Guide

By Lana WilsonJuly 4, 20256 Mins Read

How to Effectively Change Hair Colour in Photoshop

July 2, 2025

How to Use “Find Distractions” Feature in Photoshop for Easy Photo Clean-up

June 28, 2025

Photoshop June 2025 Update: Master New Features in Version 26.8

June 21, 2025

You May Also Like

Basics

Mastering Sky Replacement in Photoshop: A Comprehensive Guide

By Lana WilsonJuly 4, 20256 Mins Read
Basics

How to Effectively Change Hair Colour in Photoshop

By Monika NowakowskaJuly 2, 20252 Mins Read
Basics

How to Use “Find Distractions” Feature in Photoshop for Easy Photo Clean-up

By James QuJune 28, 20255 Mins Read
Facebook X (Twitter) Instagram Pinterest
  • About Us
  • Get in Touch
  • Advertise
  • VIP Area
  • Privacy Policy
  • Terms & Conditions
© 2025 PSD Vault. All Right Reserved.

Type above and press Enter to search. Press Esc to cancel.

Manage Consent
To provide the best experiences, we use technologies like cookies to store and/or access device information. Consenting to these technologies will allow us to process data such as browsing behavior or unique IDs on this site. Not consenting or withdrawing consent, may adversely affect certain features and functions.
Functional Always active
The technical storage or access is strictly necessary for the legitimate purpose of enabling the use of a specific service explicitly requested by the subscriber or user, or for the sole purpose of carrying out the transmission of a communication over an electronic communications network.
Preferences
The technical storage or access is necessary for the legitimate purpose of storing preferences that are not requested by the subscriber or user.
Statistics
The technical storage or access that is used exclusively for statistical purposes. The technical storage or access that is used exclusively for anonymous statistical purposes. Without a subpoena, voluntary compliance on the part of your Internet Service Provider, or additional records from a third party, information stored or retrieved for this purpose alone cannot usually be used to identify you.
Marketing
The technical storage or access is required to create user profiles to send advertising, or to track the user on a website or across several websites for similar marketing purposes.
Manage options Manage services Manage {vendor_count} vendors Read more about these purposes
View preferences
{title} {title} {title}