Close Menu
PSD VaultPSD Vault
  • VIP Area
  • Photoshop Basics
  • Photo Effect
  • Text Effect
  • Premium Tuts
  • Resources
  • Drawing
  • Inspiration
  • Web Graphics
  • Abstract
  • Freebies
  • Advertise
  • Get in Touch
  • About PSD Vault
Facebook Instagram Pinterest YouTube TikTok
Facebook Instagram Pinterest YouTube TikTok RSS
PSD VaultPSD Vault
  • VIP Area
    • Sign Up
    • Log In
  • Free Image Tools
  • Photoshop Basics
  • AI
  • Photoshop Error Fixes
  • Video Tutorial
  • Photo Effect
  • Text Effect
  • Premium Tuts
  • Drawing
PSD VaultPSD Vault
Home»Basics»All You Need to Know on How to Invert Color in Photoshop
Basics

All You Need to Know on How to Invert Color in Photoshop

By Mohammad JeprieNovember 2, 20224 Mins Read
Share
Facebook Twitter LinkedIn Pinterest Email

This is a comprehensive guide on how to invert color in Photoshop using the “invert” command. Invert command in Photoshop is not as simple as it sound, there is more than meets the eyes.

Photoshop gives you full control to alter every pixel in your image. One of Photoshop’s feature is the Invert command. We are going to dig a bit deeper into the Invert command and use some examples to help you understand its usage.

Step 1: Inverting a Flat Image

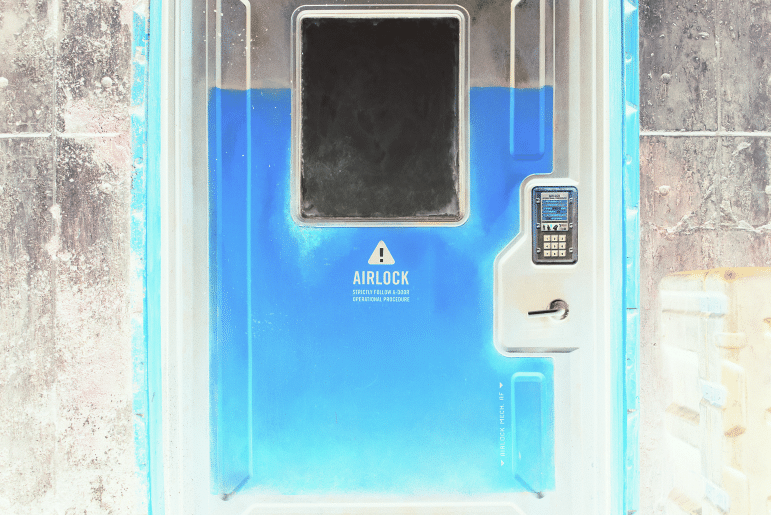
In this tutorial, we are going to use a nice photo from unsplash.

Step 2

When working with a flat image, we need to make sure that the original image remain intact. Avoid applying Invert command directly to your Background layer. You should always duplicate the Background layer to keep the original image and work with the new duplicated layer. To do this, drag the Background layer onto the New layer icon.

Step 3

Apply the Invert command by clicking on the menu Image > Adjustments > Invert or hit Ctrl + I.

Step 4

Photoshop will invert every pixels, turning its color to its exact opposite color.

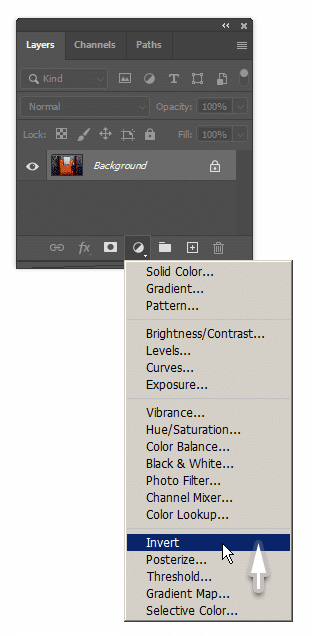
Step 5: Adjustment Layer Invert

There is other way to invert pixel without directly altering the pixels, which is using adjustment layers. Click the Adjustments icon in the lower part of the Layers Panel and select Invert.

Step 6

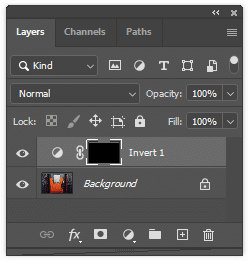
This invert adjustment layer works very much like the regular invert. If you take a look at its properties, there is no options available. It simply invert all the pixels underneath it, without directly altering them. Thus, the pixels are unharmed. If you decide to abandon the invert effect, you can simply delete the invert adjustment layer and everything will return to normal.

Step 7

The invert adjustment layer comes with extra mask. The mask works like any mask in ordinary layer, dark conceals and white reveals. Hit D to change foreground and background color to its default, white and black. Hit Ctrl + Delete to fill the mask with black. With the mask filled with black, the invert effect is hidden.

Step 8

Activate The Brush Tool, right click to select brush tip. Click and drag to invert part of the image.

Step 9

If we apply the invert effect into part of an image, we can increase its contrast and may get interesting result. Use smaller brush tip for more accurate result. Let’s try painting the electronic lock with white.

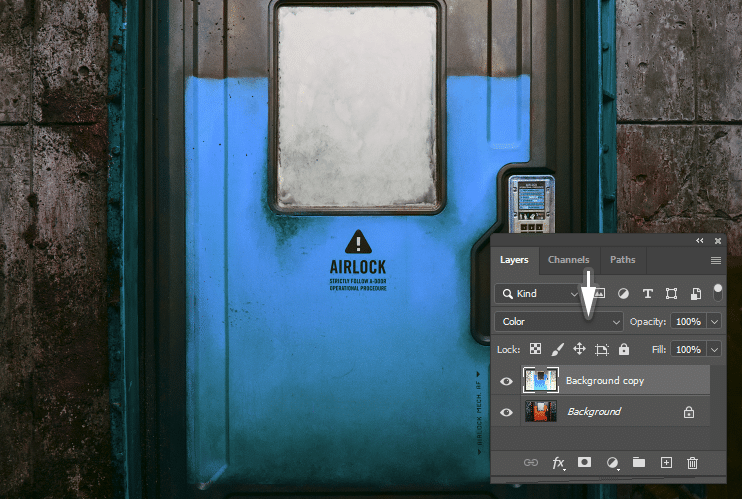
Step 10: Inverting Color Only

Inverting an image will turn it into a photo negative which seems too extreme. But do you know that we can only invert its color and retain the dark and white portion of the image? Its simple. Apply the Invert command to the duplicated layer and then change its blend mode to Color. This blend will only pass the color information to all the layers underneath it. Notice how we can effortlessly change the door color without making a single selection.

Step 11

The technique works extremely well to invert the color of this car too. In the image below, we use invert adjustment layer instead of the invert command.

Step 12: Inverting Lightness Only

If you choose Luminosity blend mode, instead of color, you only pass the lightness information to all layers beneath it. The result is the color remains but the darkness and lightness is inverted.

Step 13: Inverting Mask

The invert command is not restricted to layers, but works on mask too. This allows us to quickly reveal hidden areas and vice versa. Take a look at the images below. In the first image, the electronic lock is inverted and the rest is normal. Hit Ctrl + I and instantly the electronic lock is normal and the rest is inverted.

Step 14

Here is another image. A layer mask hides the left side of the Eiffel tower and reveals the texts underneath it. A simple “Ctrl + I” can quickly invert the mask and give different result.

That’s it! I hope this tutorial helps you understand how to invert color in Photoshop better. It’s always

color invert photoshop
Share. Facebook Twitter Pinterest LinkedIn Tumblr Email
Mohammad Jeprie
  • Website

Mohammad Jeprie is a blogger, author, and graphic designer from Indonesia. He's not an artist, but he knows a few Photoshop techniques and loves to share it with everyone.

Related Posts

Curves or Levels: Choosing the Right Tool for Stunning Edits

March 26, 2026

10 Proven Ways to Improve Photoshop Performance in 2026

March 22, 2026

How to Turn Day to Night in Photoshop: 2 Complete Methods

March 8, 2026

Comments are closed.

Don't Miss

How to Enlarge Images Without Losing Quality in Photoshop (using Super Resolution)

March 29, 2026

How to Edit Non-Destructively with Smart Objects & Neural Filters in Photoshop

March 26, 2026

Curves or Levels: Choosing the Right Tool for Stunning Edits

March 26, 2026

For Beginners

Basics

Curves or Levels: Choosing the Right Tool for Stunning Edits

By James QuMarch 26, 20265 Mins Read

10 Proven Ways to Improve Photoshop Performance in 2026

March 22, 2026

How to Use Photoshop’s Remove Tool with AI Precision

March 4, 2026

10 Genius Tips to Master Photoshop’s AI Object Selection Tool

February 27, 2026

You May Also Like

Basics

Curves or Levels: Choosing the Right Tool for Stunning Edits

By James QuMarch 26, 20265 Mins Read
Basics

10 Proven Ways to Improve Photoshop Performance in 2026

By James QuMarch 22, 202621 Mins Read
Photo Effect

How to Turn Day to Night in Photoshop: 2 Complete Methods

By James QuMarch 8, 202618 Mins Read
Facebook X (Twitter) Instagram Pinterest
  • About Us
  • Get in Touch
  • Advertise
  • VIP Area
  • Free Image Tools
  • Privacy Policy
  • Terms & Conditions
© 2026 PSD Vault. All Right Reserved.

Type above and press Enter to search. Press Esc to cancel.

Manage Consent
To provide the best experiences, we use technologies like cookies to store and/or access device information. Consenting to these technologies will allow us to process data such as browsing behavior or unique IDs on this site. Not consenting or withdrawing consent, may adversely affect certain features and functions.
Functional Always active
The technical storage or access is strictly necessary for the legitimate purpose of enabling the use of a specific service explicitly requested by the subscriber or user, or for the sole purpose of carrying out the transmission of a communication over an electronic communications network.
Preferences
The technical storage or access is necessary for the legitimate purpose of storing preferences that are not requested by the subscriber or user.
Statistics
The technical storage or access that is used exclusively for statistical purposes. The technical storage or access that is used exclusively for anonymous statistical purposes. Without a subpoena, voluntary compliance on the part of your Internet Service Provider, or additional records from a third party, information stored or retrieved for this purpose alone cannot usually be used to identify you.
Marketing
The technical storage or access is required to create user profiles to send advertising, or to track the user on a website or across several websites for similar marketing purposes.
  • Manage options
  • Manage services
  • Manage {vendor_count} vendors
  • Read more about these purposes
View preferences
  • {title}
  • {title}
  • {title}