Close Menu
PSD VaultPSD Vault
  • VIP Area
  • Photoshop Basics
  • Photo Effect
  • Text Effect
  • Premium Tuts
  • Resources
  • Drawing
  • Inspiration
  • Web Graphics
  • Abstract
  • Freebies
  • Advertise
  • Get in Touch
  • About PSD Vault
Facebook Instagram Pinterest YouTube TikTok
Facebook Instagram Pinterest YouTube TikTok RSS
PSD VaultPSD Vault
  • VIP Area
    • Sign Up
    • Log In
  • Photoshop Basics
  • AI
  • Photoshop Error Fixes
  • Video Tutorial
  • Photo Effect
  • Text Effect
  • Premium Tuts
  • Drawing
  • Opinion
PSD VaultPSD Vault
Home»Photo Effect»Create “Fury Unleashed” Digital Art in Photoshop
Photo Effect

Create “Fury Unleashed” Digital Art in Photoshop

By James QuSeptember 14, 20144 Mins Read
Share
Facebook Twitter LinkedIn Pinterest Email

In this tutorial, I will show you how to create this “Fury Unleashed” digital art in Photoshop. We will combine several objects such as tree roots, cracked ground and fire with a model, as well as to use some photo manipulation techniques to form the final effect.

Here is a preview of the final effect I have for this tutorial: (click to enlarge)

PSD Vault VIP Membership

You can download the PSD File for this tutorial via the VIP Members Area for only $6.95/Month (or less)! You will not only get this PSD File, but also 200+ other PSD Files + Extra Goodies + Exclusive Photoshop tutorials there. Signup now and get exclusive!

OK Let’s get started!

To complete this tutorial, you will need the following stocks:

Cracked Ground

Model

Tree Root Stock 1

Tree Root Stock 2

Tree Root Stock 3

Ring of Fire Stock

Step 1

Create a new document sized 1440px * 788px with black background. Load the cracked ground stock image into Photoshop and select a portion of the ground texture as shown below:

Copy and paste the selection over to our document, re-size and apply perspective to the selection as shown below:

Use a big soft eraser, remove parts of the ground as shown below:

Add the following adjustment layers as clipping masks to this ground layer:

Black and White

Layer mask on the above black and white adjustment layer:

Levels

Curves

and here is the effect so far:

Step 2

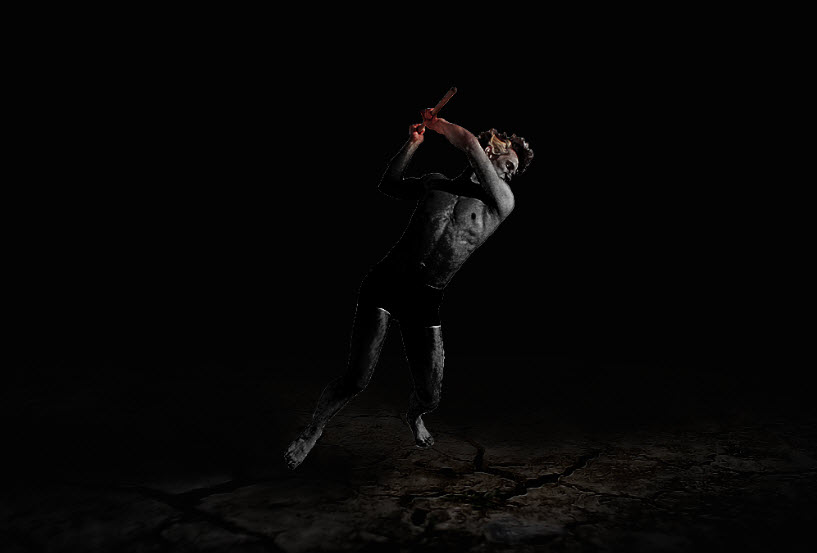
We will add the model in this step. Load the model image into Photoshop and cut out of body portion from the stock, copy and paste it over to our document and re-size it as shown below:

Add the following adjustment layers as clipping masks to this model layer:

Black and White

Layer mask on the above black and white adjustment layer (in red):

Levels

Layer mask on the above levels adjustment layer (in red):

and here is the effect so far:

Step 3

We will add some tree root patterns around the legs of the model. Load the tree root stock 1 image into Photoshop and select the following portion:

Copy and paste the selection over to our document, re-size and cover the left leg as shown below. Use a soft eraser to tidy up the edges of the roots:

Add the following adjustment layers as clipping masks to this root layer:

Black and White

Levels

Curves

and here is the effect so far:

Load the tree root stock 2 image into Photoshop. Select the left portion and paste it over to our document, re-size and place it the following position:

Add the following adjustment layer as clipping masks to this tree root layer:

Black and White

Levels

Curves

and here is the effect so far:

Step 4

Load the tree root stock 3 image into Photoshop and select the following portion on the left side of the image:

Copy and paste the selection over to our image and place it over the lower body area as shown below:

Add the following adjustment layer to this new root layer:

Black and White

Levels

and here is the effect so far:

Repeat the above process, and add another piece of root below it:

Step 5

We can add a ring of fire from the fire stock image into our design. Load the fire stock into Photoshop and select the fire, copy and past it over the document. Place the fire layer below the model layer:

We can apply the following black and white adjustment settings to this fire layer:

and here is the effect so far:

Step 6

Add some particles and clouds with a particle and cloud brush – you should be able to find lots of those over the web:

Optionally, you can add some additional fire patterns into the design, by going back to the fire stock and select a few more pieces from it:

Step 7

We’re almost done! For final touch-ups, we can apply the following selective color adjustment layer to add some colour/mood to this image:

and here is the effect so far:

We can also add some fire colour into the image with the following colour balance adjustment layer:

Make sure you mask out the left, right, bottom parts of this above colour balance adjustment layer, so the red only remain in the centre and top parts of the image.

And here is my final effect: (click to enlarge)

That’s it for this tutorial! Hope you enjoy going through it and find it useful. Drop me a comment below if you have any question.

Till next time, have a great day!

art digital fury photoshop
Share. Facebook Twitter Pinterest LinkedIn Tumblr Email
James Qu
  • Website

James is a seasoned Photoshop expert with over 25 years of experience based in Australia. As the driving force behind PSD Vault, he authors the majority of its in-depth tutorials and insightful articles.

Related Posts

Curves or Levels: Choosing the Right Tool for Stunning Edits

September 28, 2025

How to Create Double Exposure Photos in Photoshop (Easy Tutorial 2025)

September 27, 2025

How to Use Reference Image AI Feature in Photoshop

September 26, 2025

Comments are closed.

Don't Miss

How to Refine Adobe Firefly Generations Directly in Photoshop with Firefly History

October 4, 2025

Curves or Levels: Choosing the Right Tool for Stunning Edits

September 28, 2025

How to Create Double Exposure Photos in Photoshop (Easy Tutorial 2025)

September 27, 2025

For Beginners

Basics

Curves or Levels: Choosing the Right Tool for Stunning Edits

By Lana WilsonSeptember 28, 20255 Mins Read

How to Read Photoshop Histograms for Beginners

September 19, 2025

How to Master Auto-Blend Layers in Photoshop for Stunning Image Blending

September 13, 2025

10 Genius Tips to Master Photoshop’s AI Object Selection Tool

August 30, 2025

You May Also Like

Basics

Curves or Levels: Choosing the Right Tool for Stunning Edits

By Lana WilsonSeptember 28, 20255 Mins Read
Photo Effect

How to Create Double Exposure Photos in Photoshop (Easy Tutorial 2025)

By James QuSeptember 27, 20254 Mins Read
AI

How to Use Reference Image AI Feature in Photoshop

By Mario TeodosioSeptember 26, 20254 Mins Read
Facebook X (Twitter) Instagram Pinterest
  • About Us
  • Get in Touch
  • Advertise
  • VIP Area
  • Privacy Policy
  • Terms & Conditions
© 2025 PSD Vault. All Right Reserved.

Type above and press Enter to search. Press Esc to cancel.

Manage Consent
To provide the best experiences, we use technologies like cookies to store and/or access device information. Consenting to these technologies will allow us to process data such as browsing behavior or unique IDs on this site. Not consenting or withdrawing consent, may adversely affect certain features and functions.
Functional Always active
The technical storage or access is strictly necessary for the legitimate purpose of enabling the use of a specific service explicitly requested by the subscriber or user, or for the sole purpose of carrying out the transmission of a communication over an electronic communications network.
Preferences
The technical storage or access is necessary for the legitimate purpose of storing preferences that are not requested by the subscriber or user.
Statistics
The technical storage or access that is used exclusively for statistical purposes. The technical storage or access that is used exclusively for anonymous statistical purposes. Without a subpoena, voluntary compliance on the part of your Internet Service Provider, or additional records from a third party, information stored or retrieved for this purpose alone cannot usually be used to identify you.
Marketing
The technical storage or access is required to create user profiles to send advertising, or to track the user on a website or across several websites for similar marketing purposes.
Manage options Manage services Manage {vendor_count} vendors Read more about these purposes
View preferences
{title} {title} {title}