Close Menu
PSD VaultPSD Vault
  • VIP Area
  • Photoshop Basics
  • Photo Effect
  • Text Effect
  • Premium Tuts
  • Resources
  • Drawing
  • Inspiration
  • Web Graphics
  • Abstract
  • Freebies
  • Advertise
  • Get in Touch
  • About PSD Vault
Facebook Instagram Pinterest YouTube TikTok
Facebook Instagram Pinterest YouTube TikTok RSS
PSD VaultPSD Vault
  • VIP Area
    • Sign Up
    • Log In
  • Photoshop Basics
  • AI
  • Photoshop Error Fixes
  • Video Tutorial
  • Photo Effect
  • Text Effect
  • Premium Tuts
  • Drawing
  • Opinion
PSD VaultPSD Vault
Home»Text Effect»Create Unique Splash Gold Typography in Photoshop
Text Effect

Create Unique Splash Gold Typography in Photoshop

By James QuJuly 9, 20144 Mins Read
Share
Facebook Twitter LinkedIn Pinterest Email

In this tutorial, I will show you the steps used to create this unique splash gold typography in Photoshop. We will use several gold textures to form the base on the text – along the way, we will be using a number of image adjustments, dodge/burn tool, selection tool to aid our effort in creating this text.

Here is a preview of the final effect I have for this tutorial: (click to enlarge)

PSD File Download

You can download the PSD File for this tutorial via the VIP Members Area for only $6.95/Month (or less)! You will not only get this PSD File, but also 100+ other PSD Files + Extra Goodies + Exclusive Photoshop tutorials there. Signup now and get exclusive :) Find out more about the VIP Members Areas

OK Let’s get started!

To complete this tutorial, you will need the following stocks:

Font

Background Texture

Gold Texture

Bokeh

Step 1

Create a new document sized 1440px * 900px with black background. Load the background texture you downloaded and select a portion of it, copy and paste the selection over to our document. Re-size this new layer to fit our canvas size as shown below:

Use a big soft eraser, remove the following portions from this new texture layer:

Apply the following Curves adjustment layers as shown below:

and here is the effect so far:

Step 2

We will start working on the text in this step. Use the font we downloaded and type some texts on our document:

Select the text layer and move the selection over to the gold texture we downloaded, copy the selection:

Paste the selection to our document and cover the texts. Hide the original text layer and apply the following layer blending options to our gold texture layer:

Bevel and Emboss

Contour

Inner Glow

and here is the effect so far:

We can add some rough edges for our text. Grab the eraser with chalk setting:

Use this eraser to work on the edge as shown below:

and here is the effect so far:

Step 3

We can further add some gold texture onto our text. Go back to the gold texture image and use the quick selection tool to select a piece as shown below:

Copy and paste the selection over to our document, re-size and attach it to our text as shown below:

Repeat this process and add more gold pieces to our text:

Step 4

We will add some splash effect for our text in this step. Go to the gold texture and create a new layer on top of the background layer:

Use a splatter brush (you should find lots of them over the net):

Paint a splash on the new layer:

Select this brush pattern on the new layer:

Go back to the background layer and hit Ctrl + C to copy the selection:

Copy and paste the selection to our document, place the layer below the text layer and adjust its size as shown below:

Add some more splash pattern and you will have the following effect:

Step 5

We will add some bokeh effect to our texts. Load the stock into Photoshop and select a portion as shown below:

Copy and paste the selection to our document and cover our text. Use an small eraser tool as shown below:

Remove parts of the bokeh selection so the texts below can be revealed. Make sure you retain some of the lighting effects over the text:

Use the lasso tool to select another piece from the bokeh texture:

Copy and paste the selection to our text, and set the blend mode to “Hard Light”:

and here is the effect so far:

Step 6

We’re almost done! For final touches, we can flatten the image and apply some dodge/burn effect for our texts to increase its contrast:

We can also use the smudge tool to create some motions into our image:

Add a black and white adjustment layer on top:

Layer mask on this black and white adjustment layer (in red):

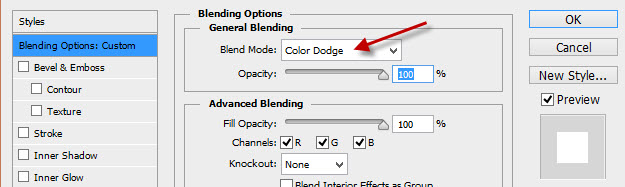
Change this blend mode of this black and white adjustment layer to “color dodge”:

and here is my final effect: (click to enlarge)

That’s it for this tutorial! Hope you enjoy going through it and find it useful. Drop me a comment below if you have any question.

Till next time, have a great day!

gold splash text typography
Share. Facebook Twitter Pinterest LinkedIn Tumblr Email
James Qu
  • Website

James is a seasoned Photoshop expert with over 25 years of experience based in Australia. As the driving force behind PSD Vault, he authors the majority of its in-depth tutorials and insightful articles.

Related Posts

Create a Dissolved Ancient Ink Text Effect in Photoshop

February 5, 2026

Create Fire Burning on Metal Text Effect in Photoshop

January 22, 2026

How to Create Realistic Frozen Text with Cracks in Photoshop

December 11, 2025

Comments are closed.

Don't Miss

Unlock the Power of Photoshop’s Generative Expand Tool

February 13, 2026

How to Use “Find Distractions” Feature in Photoshop for Easy Photo Clean-up

February 13, 2026

How to Refine Adobe Firefly Generations Directly in Photoshop with Firefly History

February 12, 2026

For Beginners

Basics

How to Use “Find Distractions” Feature in Photoshop for Easy Photo Clean-up

By James QuFebruary 13, 20265 Mins Read

How to Stay Ahead of Every Photoshop Update & Unlock Their Full Power

February 8, 2026

Dodge & Burn Tool in Photoshop – The Beginner’s Guide

January 24, 2026

How to Pixelate an Image in Photoshop

January 21, 2026

You May Also Like

Text Effect

Create a Dissolved Ancient Ink Text Effect in Photoshop

By James QuFebruary 5, 20263 Mins Read
Text Effect

Create Fire Burning on Metal Text Effect in Photoshop

By James QuJanuary 22, 20263 Mins Read
Text Effect

How to Create Realistic Frozen Text with Cracks in Photoshop

By James QuDecember 11, 20254 Mins Read
Facebook X (Twitter) Instagram Pinterest
  • About Us
  • Get in Touch
  • Advertise
  • VIP Area
  • Privacy Policy
  • Terms & Conditions
© 2026 PSD Vault. All Right Reserved.

Type above and press Enter to search. Press Esc to cancel.

Manage Consent
To provide the best experiences, we use technologies like cookies to store and/or access device information. Consenting to these technologies will allow us to process data such as browsing behavior or unique IDs on this site. Not consenting or withdrawing consent, may adversely affect certain features and functions.
Functional Always active
The technical storage or access is strictly necessary for the legitimate purpose of enabling the use of a specific service explicitly requested by the subscriber or user, or for the sole purpose of carrying out the transmission of a communication over an electronic communications network.
Preferences
The technical storage or access is necessary for the legitimate purpose of storing preferences that are not requested by the subscriber or user.
Statistics
The technical storage or access that is used exclusively for statistical purposes. The technical storage or access that is used exclusively for anonymous statistical purposes. Without a subpoena, voluntary compliance on the part of your Internet Service Provider, or additional records from a third party, information stored or retrieved for this purpose alone cannot usually be used to identify you.
Marketing
The technical storage or access is required to create user profiles to send advertising, or to track the user on a website or across several websites for similar marketing purposes.
  • Manage options
  • Manage services
  • Manage {vendor_count} vendors
  • Read more about these purposes
View preferences
  • {title}
  • {title}
  • {title}