Close Menu
PSD VaultPSD Vault
  • VIP Area
  • Photoshop Basics
  • Photo Effect
  • Text Effect
  • Premium Tuts
  • Resources
  • Drawing
  • Inspiration
  • Web Graphics
  • Abstract
  • Freebies
  • Advertise
  • Get in Touch
  • About PSD Vault
Facebook Instagram Pinterest YouTube TikTok
Facebook Instagram Pinterest YouTube TikTok RSS
PSD VaultPSD Vault
  • VIP Area
    • Sign Up
    • Log In
  • Photoshop Basics
  • AI
  • Photoshop Error Fixes
  • Video Tutorial
  • Photo Effect
  • Text Effect
  • Premium Tuts
  • Drawing
  • Opinion
PSD VaultPSD Vault
Home»Text Effect»Create Meteorite Text Effect in Photoshop
Text Effect

Create Meteorite Text Effect in Photoshop

By James QuSeptember 15, 20184 Mins Read
Share
Facebook Twitter LinkedIn Pinterest Email

In this tutorial, I will demonstrate the steps I took to create this meteorite text effect in Photoshop. We will render a 3D text in Photoshop and apply rock & fire texture over it to form our final effect.

Techniques include layer blending, image adjustments, painting with custom brush and filter effects. Have a try!

The PSD file of this tutorial is available to buy on PSD Vault Shop, or via the PSD Vault VIP members area.

Note: I made this Photoshop tutorial in Photoshop CC 2018 – some screenshot may have different layout from earlier versions. Some brushes are exclusive to Photoshop CS6 or above.

Here is a preview of the final effect: (click to enlarge)

PSD Vault VIP Membership

You can download the PSD File for this tutorial via the VIP Members Area for only $6.95/Month (or less)! You will not only get this PSD File, but also 200+ other PSD Files + Extra Goodies + Exclusive Photoshop tutorials there. Signup now and get exclusive!

OK Let’s begin!

To complete this tutorial, you will need the following stocks:

Earth

Space (Nebula) Background

Rock

Fire

Smoke Brushes

Step 1

Create a new document sized 1300px * 780px with black background. Load the earth stock image into Photoshop, select the entire planet as shown below:

Paste the selection over to our document, place the earth to the following position:

Apply the following adjustment layers on top of the earth layer:

Levels

Vibrance

And this is the effect so far:

Step 2

Load the space stock image in Photoshop, copy and paste the entire image to our document:

Step 3

We will be working on our text in this step. Load the rock stock image into Photoshop, type some texts onto it:

Select the text you just typed, go to the background layer and make a copy, paste it over to our document.

We will use the 3D function in Photoshop CC to turn this text into a 3D render.

Note: If you have an early version of Photoshop and don’t have the 3D function, you can download my render here.

Select “New 3D Extrusion from Selected Layer”:

Have a play with the 3D settings, until you’re happy with the shape of the 3D text:

Once you’re happy with the 3D effect, go to 3D > Render 3D Layer and render this text. This will take a few minutes:

Convert this layer to a smart object, use the free transform tool to adjust its shape & size:

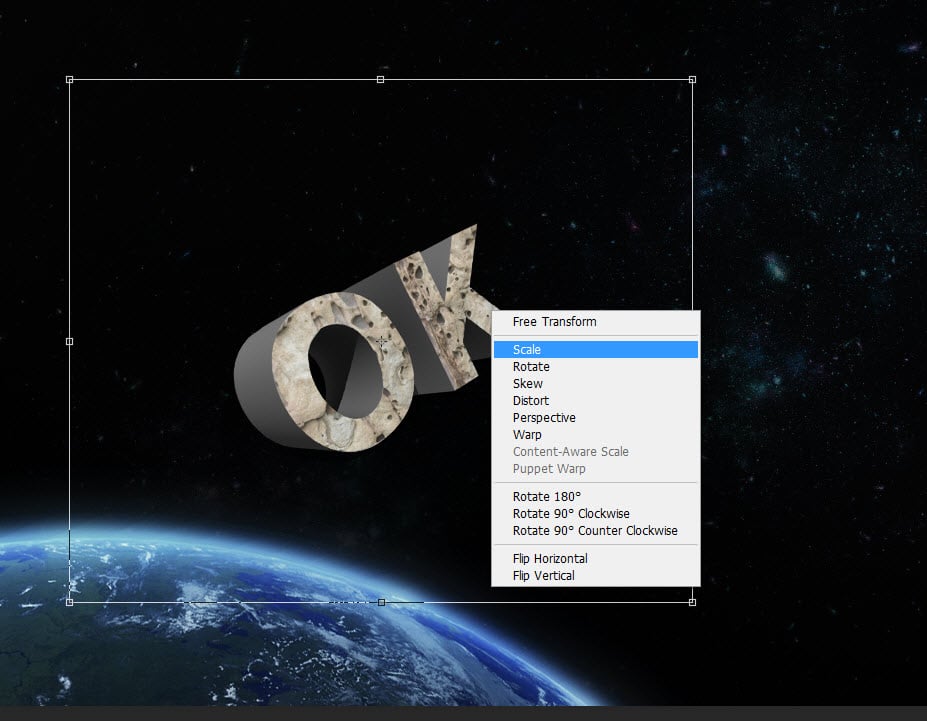
Then select the render layer and move the selection over to the rock texture, copy and paste the texture back to our document:

Change the layer blend mode to “Hard Light” for this new rock layer:

Use a soft eraser, remove the edge of the text as shown below:

Apply the following Black and White adjustment layer as clipping mask to this rock text layer:

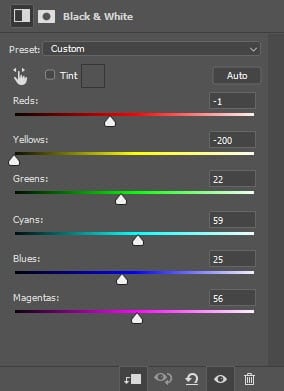
Lower the layer opacity for this Black and White adjustment layer to “65%”:

and here is the effect so far:

Use a particle brush, paint some particles around the text to from a break-apart effect:

Step 4

Load the fire stock into Photoshop, select the entire image and copy it over to our document:

Adjust its shape as shown below with the free transform tool:

Change the layer blend mode to “lighten” for this fire layer:

Use a soft eraser to remove parts of the fire and reveal the text below:

Step 5

We can add a few small meteorites to our document. Go back to the fire stock and use the lasso tool to select the following area:

Copy and paste the selection to our document, adjust its size and place it to the following area:

Duplicate this layer a few times, attached the duplicated layer around the text, as well as around the canvas:

Use the smoke brush, paint some smoke around the text as shown below:

I further applied a few colour adjustments to the image, and this is my final result: (click to enlarge)

That’s it for this meteorite text effect Photoshop tutorial! Hope you enjoy it and drop me a comment below if you have any questions.

effect meteorite text
Share. Facebook Twitter Pinterest LinkedIn Tumblr Email
James Qu
  • Website

James is a seasoned Photoshop expert with over 25 years of experience based in Australia. As the driving force behind PSD Vault, he authors the majority of its in-depth tutorials and insightful articles.

Related Posts

Create a Diablo-Inspired Dark Grunge Text Effect in Photoshop

February 22, 2026

Create a Dissolved Ancient Ink Text Effect in Photoshop

February 5, 2026

Create Fire Burning on Metal Text Effect in Photoshop

January 22, 2026

Comments are closed.

Don't Miss

How to Create a Wood Texture Face Effect in Photoshop (Updated 2026)

March 15, 2026

How to Turn Day to Night in Photoshop: 2 Complete Methods

March 8, 2026

How to Use Photoshop’s Remove Tool with AI Precision

March 4, 2026

For Beginners

AI

How to Use Photoshop’s Remove Tool with AI Precision

By James QuMarch 4, 20264 Mins Read

10 Genius Tips to Master Photoshop’s AI Object Selection Tool

February 27, 2026

Mastering Sky Replacement in Photoshop: A Comprehensive Guide

February 25, 2026

How to Use “Find Distractions” Feature in Photoshop for Easy Photo Clean-up

February 13, 2026

You May Also Like

Text Effect

Create a Diablo-Inspired Dark Grunge Text Effect in Photoshop

By James QuFebruary 22, 202612 Mins Read
Text Effect

Create a Dissolved Ancient Ink Text Effect in Photoshop

By James QuFebruary 5, 20263 Mins Read
Text Effect

Create Fire Burning on Metal Text Effect in Photoshop

By James QuJanuary 22, 20263 Mins Read
Facebook X (Twitter) Instagram Pinterest
  • About Us
  • Get in Touch
  • Advertise
  • VIP Area
  • Privacy Policy
  • Terms & Conditions
© 2026 PSD Vault. All Right Reserved.

Type above and press Enter to search. Press Esc to cancel.

Manage Consent
To provide the best experiences, we use technologies like cookies to store and/or access device information. Consenting to these technologies will allow us to process data such as browsing behavior or unique IDs on this site. Not consenting or withdrawing consent, may adversely affect certain features and functions.
Functional Always active
The technical storage or access is strictly necessary for the legitimate purpose of enabling the use of a specific service explicitly requested by the subscriber or user, or for the sole purpose of carrying out the transmission of a communication over an electronic communications network.
Preferences
The technical storage or access is necessary for the legitimate purpose of storing preferences that are not requested by the subscriber or user.
Statistics
The technical storage or access that is used exclusively for statistical purposes. The technical storage or access that is used exclusively for anonymous statistical purposes. Without a subpoena, voluntary compliance on the part of your Internet Service Provider, or additional records from a third party, information stored or retrieved for this purpose alone cannot usually be used to identify you.
Marketing
The technical storage or access is required to create user profiles to send advertising, or to track the user on a website or across several websites for similar marketing purposes.
  • Manage options
  • Manage services
  • Manage {vendor_count} vendors
  • Read more about these purposes
View preferences
  • {title}
  • {title}
  • {title}