Close Menu
PSD VaultPSD Vault
  • VIP Area
  • Photoshop Basics
  • Photo Effect
  • Text Effect
  • Premium Tuts
  • Resources
  • Drawing
  • Inspiration
  • Web Graphics
  • Abstract
  • Freebies
  • Advertise
  • Get in Touch
  • About PSD Vault
Facebook Instagram Pinterest YouTube TikTok
Facebook Instagram Pinterest YouTube TikTok RSS
PSD VaultPSD Vault
  • VIP Area
    • Sign Up
    • Log In
  • Photoshop Basics
  • AI
  • Photoshop Error Fixes
  • Video Tutorial
  • Photo Effect
  • Text Effect
  • Premium Tuts
  • Drawing
  • Opinion
PSD VaultPSD Vault
Home»Photo Effect»Create Dark Summoner Photo Effect in Photoshop
Photo Effect

Create Dark Summoner Photo Effect in Photoshop

By James QuDecember 16, 20223 Mins Read
Share
Facebook Twitter LinkedIn Pinterest Email

In this tutorial, you will learn how to create dark summoner photo effect in Photoshop. This interesting photo effect looks good, and is relatively easy to make. You can use techniques in this tutorial for posters, book art, games and more!

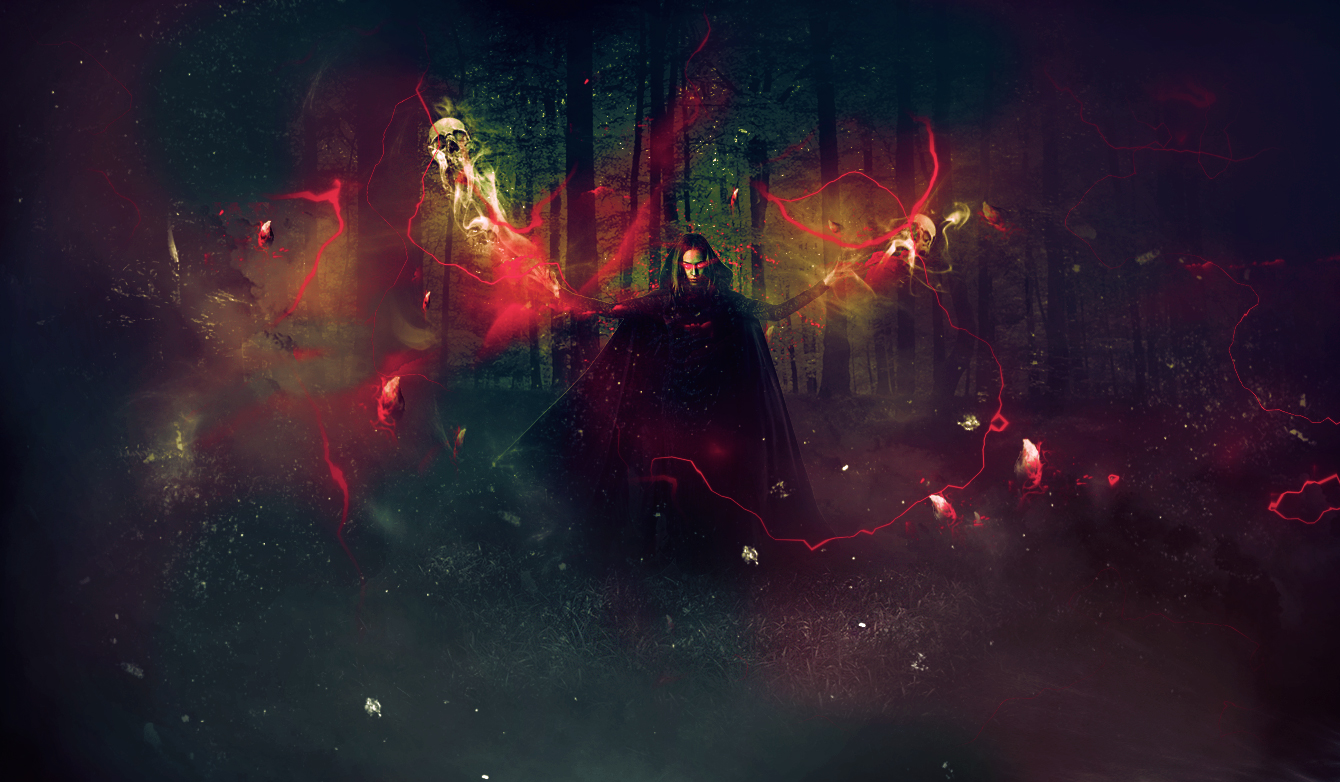
The scene is set in a dark forest environment, where the summoner performs her dark magic.

The PSD file of this tutorial is available to buy on PSD Vault Shop, or via the PSD Vault VIP members area.

Here is a preview of the final effect I have for this tutorial: (click to enlarge)

PSD Vault VIP Membership

You can download the PSD File for this tutorial via the VIP Members Area for only $6.95/Month (or less)! You will not only get this PSD File, but also 100+ other PSD Files + Extra Goodies + Exclusive Photoshop tutorials there. Signup now and get exclusive!

OK Let’s get started!

To complete this tutorial, you will need the following stocks:

Model by faestock

Forest

Rock

Skull

Lightning Brushes

Smoke Brushes

Step 1

Create a new document sized 1340px * 728px with black background, use any cloud Photoshop brushes or fog Photoshop brush or the cloud

Load the forest stock image into Photoshop, place it onto our background:

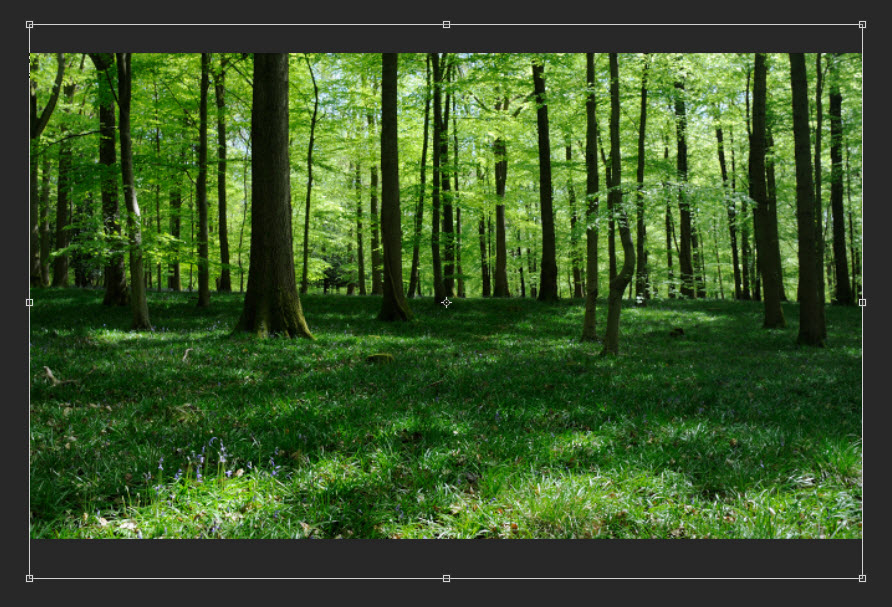
Use a big soft erase, fade the following portion of the forest:

Apply the following adjustment layers onto this forest layer:

Black and White

Levels

Layer mask on the above levels adjustment layer:

Curves

Layer mask on the above curves adjustment layer:

And this is the effect so far:

Step 2

Load the model stock image into Photoshop, cut out the model and place it at the centre of the canvas:

Use a soft eraser to fade the edge of the robe as shown below:

Apply the following image adjustment layer as clipping masks to this model layer:

Black and White

Levels

Curves

Use a soft, red brush to paint around the eyes of the model:

Use the smoke brush set to paint some smoke effect to the hands:

Step 3

Load the skull stock png file into Photoshop, simply select the entire document and copy it onto our document:

Desaturate the photo with Ctrl + Shift + U, then move the skull to the smoke area as shown below:

Step 4

Load the rock stock image into Photoshop. We will use this to make some flying rock effect around the model.

Select any piece of small rock from the stock image:

Copy and paste the selection onto our document, use the burn tool to darken the bottom part of the rock:

Use the smoke brush to paint some smoke effect at the bottom of the rock:

Repeat this process, add a few rocks flying around the model:

Step 5

We’re onto the final touches of this dark summoner photo effect! Use a soft, dark brush, paint some shadow underneath of the model:

Use a particle brush, paint some red dusts around the model:

Use the lightning brush, paint some lightning effect around the canvas:

I added some colour effect around the forest, and this is the final result I have: (click to enlarge)

That’s it for this tutorial. Hope you enjoy making this dark summoner photo effect in Photoshop! If you have any questions for this tutorial, please let me a comment below and I will try my best to answer it.

dark manipulation photo summoner
Share. Facebook Twitter Pinterest LinkedIn Tumblr Email
James Qu
  • Website

James is a seasoned Photoshop expert with over 25 years of experience based in Australia. As the driving force behind PSD Vault, he authors the majority of its in-depth tutorials and insightful articles.

Related Posts

How to Create Instant Professional Blurred Backgrounds in Photoshop with AI Depth Blur

January 18, 2026

How to Perform Flawless Photoshop AI Distraction Removal

January 11, 2026

Quick AI Portrait Relighting for Dramatic Effects in Photoshop

December 31, 2025

Comments are closed.

Don't Miss

Exploring Third-Party AI Models in Photoshop: Which One Suits Your Graphic Workflow?

January 26, 2026

Dodge & Burn Tool in Photoshop – The Beginner’s Guide

January 24, 2026

Create Fire Burning on Metal Text Effect in Photoshop

January 22, 2026

For Beginners

Basics

Dodge & Burn Tool in Photoshop – The Beginner’s Guide

By Maria SemelevichJanuary 24, 20268 Mins Read

How to Pixelate an Image in Photoshop

January 21, 2026

How to Resize Images Without Losing Quality in Photoshop

January 8, 2026

Photoshop Clipping Masks – Everything You Need to Know

January 7, 2026

You May Also Like

Photo Effect

How to Create Instant Professional Blurred Backgrounds in Photoshop with AI Depth Blur

By James QuJanuary 18, 20263 Mins Read
AI

How to Perform Flawless Photoshop AI Distraction Removal

By Lana WilsonJanuary 11, 20263 Mins Read
Photo Effect

Quick AI Portrait Relighting for Dramatic Effects in Photoshop

By James QuDecember 31, 20253 Mins Read
Facebook X (Twitter) Instagram Pinterest
  • About Us
  • Get in Touch
  • Advertise
  • VIP Area
  • Privacy Policy
  • Terms & Conditions
© 2026 PSD Vault. All Right Reserved.

Type above and press Enter to search. Press Esc to cancel.

Manage Consent
To provide the best experiences, we use technologies like cookies to store and/or access device information. Consenting to these technologies will allow us to process data such as browsing behavior or unique IDs on this site. Not consenting or withdrawing consent, may adversely affect certain features and functions.
Functional Always active
The technical storage or access is strictly necessary for the legitimate purpose of enabling the use of a specific service explicitly requested by the subscriber or user, or for the sole purpose of carrying out the transmission of a communication over an electronic communications network.
Preferences
The technical storage or access is necessary for the legitimate purpose of storing preferences that are not requested by the subscriber or user.
Statistics
The technical storage or access that is used exclusively for statistical purposes. The technical storage or access that is used exclusively for anonymous statistical purposes. Without a subpoena, voluntary compliance on the part of your Internet Service Provider, or additional records from a third party, information stored or retrieved for this purpose alone cannot usually be used to identify you.
Marketing
The technical storage or access is required to create user profiles to send advertising, or to track the user on a website or across several websites for similar marketing purposes.
  • Manage options
  • Manage services
  • Manage {vendor_count} vendors
  • Read more about these purposes
View preferences
  • {title}
  • {title}
  • {title}