Close Menu
PSD VaultPSD Vault
  • VIP Area
  • Photoshop Basics
  • Photo Effect
  • Text Effect
  • Premium Tuts
  • Resources
  • Drawing
  • Inspiration
  • Web Graphics
  • Abstract
  • Freebies
  • Advertise
  • Get in Touch
  • About PSD Vault
Facebook Instagram Pinterest YouTube TikTok
Facebook Instagram Pinterest YouTube TikTok RSS
PSD VaultPSD Vault
  • VIP Area
    • Sign Up
    • Log In
  • Photoshop Basics
  • AI
  • Photoshop Error Fixes
  • Video Tutorial
  • Photo Effect
  • Text Effect
  • Premium Tuts
  • Drawing
  • Opinion
PSD VaultPSD Vault
Home»Photo Effect»Create Colourful Fiery Portrait in Photoshop
Photo Effect

Create Colourful Fiery Portrait in Photoshop

By James QuMay 7, 20254 Mins Read
Share
Facebook Twitter LinkedIn Pinterest Email

In this tutorial, I will show you the steps I took to create this awesome fiery portrait in Photoshop. This is a beginner-intermediate level tutorial aiming to give some practices on layer blending, selection and colouring techniques in Photoshop. Some steps can be a little tricky, but why not have a try!

The PSD file of this tutorial is available via the PSD Vault VIP members area.

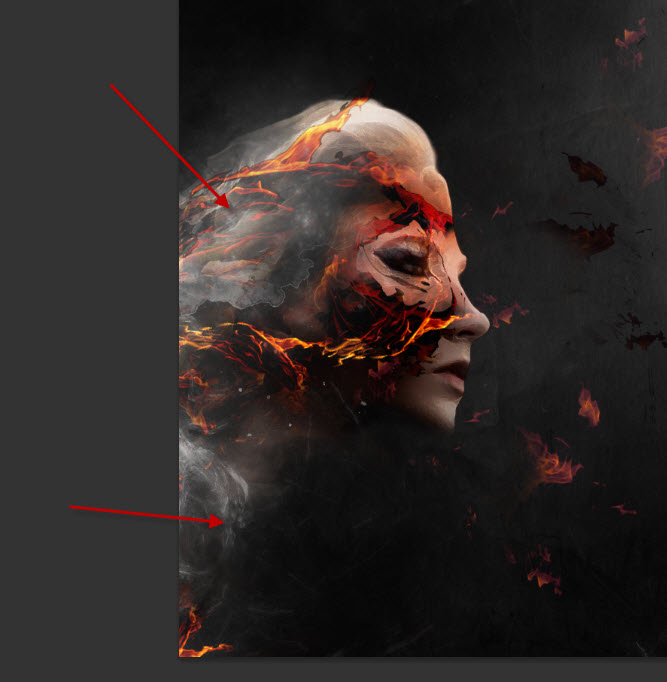
Here is a preview of the final effect I have for this tutorial: (click to enlarge)

PSD Vault VIP Membership

You can download the PSD File for this tutorial via the VIP Members Area for only $6.95/Month (or less)! You will not only get this PSD File, but also 250+ other PSD Files + Extra Goodies + Exclusive Photoshop tutorials there. Signup now and get exclusive!

OK Let’s get started!

To complete this tutorial, you will need the following stocks:

  • Model by MariaAmanda
  • Fire Texture
  • Background Texture

Step 1

Create a new document sized 800px * 1132px with black background. Load the following blue background texture from the texture pack, copy and paste it over to our document. Resize the texture to fit the size of our canvas:

Add the following image adjustment layers to this background texture layer:

Black and White

Curves

and here is the effect you will have:

Step 2

We will work on the model in this step. Load the model image into Photoshop and select the upper body area, paste it over to our document:

Reduce the size of this model layer a bit and move it to the left bottom corner of the canvas:

Apply the following Surface Blur filter to this model layer to smooth the skin out:

Optional step: if you have Photoshop cs6 or above, apply the Oil Painting filter with the following settings to get a even smoother result for the model layer:

Apply the following Accented Edges filter settings as shown below:

Use the dodge and burn tool to burn the following area slightly:

Then, add the following image adjustment layers as clipping masks to this model layer:

Black and White

Levels

Curves

Attached the following layer mask to this model layer:

and you will have the following effect so far:

Step 3

We will add the fire stock into our mix in this step. Load the fire image into Photoshop and use the quick selection tool select a few pieces:

Copy and paste the selection to our document and reduce its size, move it to the hair/facial area of the model and change the blending mode to either “screen” or “soft light”:

Repeat the above step and add some more fire over the face, make sure you play with the blending mode for each new fire layer and see what result those blending modes give you:

This is my result so far:

Step 4

We will be adding a few extra effects for our image in this step. We can create a new layer and paint some cloud effect around the following area, with a cloud/smoke brush, or with the cloud filter:

We will go back to the fire stock image and select the entire fire:

Copy and paste the selection over to our document and place it above the model layer. Use the free transform tool to flip it horizontally, set its blending mode to “color burn”:

and here is the effect you will have:

Step 5

We’re almost done! For final touches, we can flatten the image and duplicate the background layer, apply the following Accented Edges filter settings to the duplicate layer:

Add the following layer mask to this duplicate layer:

Change the layer blending mode to “overlay” for this duplicated layer:

and here is the effect you will have:

I further add some colors for the photo with the selective color adjustment layer (I will leave the settings to you, feel free to apply whatever colour scheme you like!), and here is my final effect: (click to enlarge)

You can check out this video tutorial below if you wish to learn more about colouring techniques using adjustment layers:

That’s it for this tutorial! Hope you enjoy going through it and find it useful. Drop me a comment below if you have any question.

Till next time, have a great day!

effect fire photo photoshop portrait
Share. Facebook Twitter Pinterest LinkedIn Tumblr Email
James Qu
  • Website

James is a seasoned Photoshop expert with over 25 years of experience based in Australia. As the driving force behind PSD Vault, he authors the majority of its in-depth tutorials and insightful articles.

Related Posts

Unlock the Power of Photoshop’s Generative Expand Tool

February 13, 2026

VIP Exclusive Photoshop Tutorial – “The Real Her”

February 7, 2026

How to Create a Fairytale Composition in Photoshop

February 6, 2026

3 Comments

  1. Rilane on January 22, 2014 10:10 AM

    Great step by step tutorial :) I need something opposite environment from the flames and face slightly obscured…

  2. Clipping Path on July 21, 2014 3:38 PM

    What a crativity!!! Just loved the way you did this portrait :)

  3. Shahana Akter on June 27, 2015 7:03 PM

    It’s very cool and i’ll try to do soon.

Don't Miss

Unlock the Power of Photoshop’s Generative Expand Tool

February 13, 2026

How to Use “Find Distractions” Feature in Photoshop for Easy Photo Clean-up

February 13, 2026

How to Refine Adobe Firefly Generations Directly in Photoshop with Firefly History

February 12, 2026

For Beginners

Basics

How to Use “Find Distractions” Feature in Photoshop for Easy Photo Clean-up

By James QuFebruary 13, 20265 Mins Read

How to Stay Ahead of Every Photoshop Update & Unlock Their Full Power

February 8, 2026

Dodge & Burn Tool in Photoshop – The Beginner’s Guide

January 24, 2026

How to Pixelate an Image in Photoshop

January 21, 2026

You May Also Like

AI

Unlock the Power of Photoshop’s Generative Expand Tool

By Lana WilsonFebruary 13, 20264 Mins Read
Photo Effect

VIP Exclusive Photoshop Tutorial – “The Real Her”

By Bram VanhaerenFebruary 7, 20261 Min Read
Photo Effect

How to Create a Fairytale Composition in Photoshop

By Maria SemelevichFebruary 6, 202619 Mins Read
Facebook X (Twitter) Instagram Pinterest
  • About Us
  • Get in Touch
  • Advertise
  • VIP Area
  • Privacy Policy
  • Terms & Conditions
© 2026 PSD Vault. All Right Reserved.

Type above and press Enter to search. Press Esc to cancel.

Manage Consent
To provide the best experiences, we use technologies like cookies to store and/or access device information. Consenting to these technologies will allow us to process data such as browsing behavior or unique IDs on this site. Not consenting or withdrawing consent, may adversely affect certain features and functions.
Functional Always active
The technical storage or access is strictly necessary for the legitimate purpose of enabling the use of a specific service explicitly requested by the subscriber or user, or for the sole purpose of carrying out the transmission of a communication over an electronic communications network.
Preferences
The technical storage or access is necessary for the legitimate purpose of storing preferences that are not requested by the subscriber or user.
Statistics
The technical storage or access that is used exclusively for statistical purposes. The technical storage or access that is used exclusively for anonymous statistical purposes. Without a subpoena, voluntary compliance on the part of your Internet Service Provider, or additional records from a third party, information stored or retrieved for this purpose alone cannot usually be used to identify you.
Marketing
The technical storage or access is required to create user profiles to send advertising, or to track the user on a website or across several websites for similar marketing purposes.
  • Manage options
  • Manage services
  • Manage {vendor_count} vendors
  • Read more about these purposes
View preferences
  • {title}
  • {title}
  • {title}