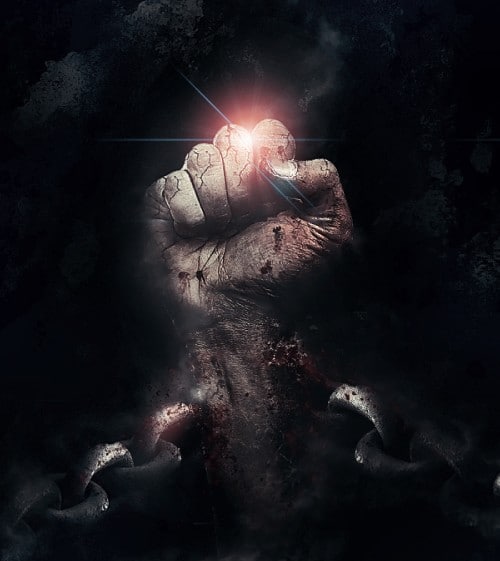
Welcome to this intermediate-level Photoshop tutorial where I’ll guide you through the process of crafting a Chained Arm with Blood Stain Effect in Photoshop, seamlessly blending arm manipulation & realistic blood effects.
This tutorial involves combining multiple images, utilising custom brushes, and employing various tools and adjustments to achieve a dramatic and realistic outcome. Feel free to follow along and unleash your creativity!
The PSD file of this tutorial is available via the PSD Vault VIP members area.
We will be combining several images together and use custom brushes to render the blood effect. We will be using some image adjustments as well as tools such as the background eraser tool and the quick selection tool.
We will also list a number of useful tips and tricks about adding blood effect in Photoshop.
Here is a preview of the final effect I have for this tutorial: (click to enlarge)

PSD Vault VIP Membership
You can download the PSD File for this tutorial via the VIP Members Area for only $6.95/Month (or less)! You will not only get this PSD File, but also 200+ other PSD Files + Extra Goodies + Exclusive Photoshop tutorials there. Signup now and get exclusive!

OK Let’s get started!
To complete this tutorial, you will need the following stocks:
Step 1
Create a new document sized 800px * 900px with black background. Create a new layer, use either a cracked or a grunge brush, paint some texture over the background layer, set the layer opacity to be around 30% for a subtle effect:

Load the arm image into Photoshop, select the arm with the magic wand tool:

Copy and paste the selection into Photoshop, resize and position it as shown below:

Step 2
Add the following 2 adjustment layers as clipping mask to this arm layer:
Black and White

Levels

On the Level adjustment layer mask, use a big soft eraser to erase the top left part of the fist, and you will have the following effect:

Step 3
Now let’s add the chain into the composition. Load the Chain stock image into Photoshop – Now we want to cut of the chain from the rest of the image: grab the background eraser tool from the toolbox:

Apply the following setting for the background eraser tool:

Unlock the background layer of this chain image, erase the textures around chain with the background eraser tool – this creates some dusty effect around the chain:

Once you’ve done than, use the quick selection tool to select a portion of the chain and its surroundings:

Copy and paste the selection onto our canvas, resize and rotate it with the free transform tool, attach it to the right side of the arm:

Step 4
Add the following 3 adjustment layer as clipping mask to this chain layer:
Black and White

Levels

Curves

Use a soft erase to remove the edges around the chain to fade it into the background:

and here is the effect so far:

Use the cloud filter and a cloud brush, add a new layer of cloud over the chain for some dramatic effect: (set layer blending mode to around 20%)

Make a new folder and put those adjustment layers and the chain layers into the new folder, then duplicate the folder and flip it horizontally, move it the left:

Use the crack brush as an eraser, apply a layer mask on the arm layer, and use this crack eraser to add some cracking texture on the arm:

Step 5
Now let’s add some blood and stain to the arm. Select a dark red colour, grab the water splash brush we downloaded, and paint over a new layer (set layer blending mode to “Color Burn”):

and you will have some dark black spot over the arm and fist area:

Duplicate this layer and change the layer blending mode of the duplicated layer to “Color”, and you will have some red colour over the black spots, creating a stained effect:

Add some more blood splash around the arm with the dark red brush:

You can add some motion to the image by adding a new layer, paint or render some cloud on it, and apply some motion blur to this new layer:

Set layer opacity to be around 30%, attach the motion blur layer to the fist – this adds a air flowing effect to the image:

Step 6
OK we’re almost done! We can add some final touches to the image. Go back to the arm layer and apply the following unsharp mask settings:

This will bring out more details from the arm:

Add some soft highlight around the chain with a soft white brush with 20% flow and opacity setting:

Also I added some lens flare effect over the figure:

And here is the final effect I have for this tutorial: (click to enlarge)

Additional Tips for Adding Realistic Blood Effects in Photoshop:
1. Use High-Quality Brushes:
- Find or create high-resolution blood splatter brushes for a more detailed and realistic look.
- Experiment with different brush sizes to vary the intensity of the blood effects.
2. Blend Modes Matter:
- Experiment with different blend modes to achieve the desired look. “Color Burn” and “Overlay” often work well for blood effects.
- Adjust the layer opacity to control the intensity of the blood.
3. Layer Duplication:
- Duplicate blood layers and experiment with different blend modes on each layer to create depth and variety.
- This can simulate different shades and highlights within the blood.
4. Add Variation:
- Blood is not uniform. Vary the size, shape, and opacity of blood splatters to make it look more natural.
- Consider using different brushes for arterial spray, drips, and pooled blood.
5. Texture and Shadows:
- Add texture to the blood using noise or grain filters. This adds a subtle level of detail.
- Use the Dodge and Burn tools to add highlights and shadows for a three-dimensional effect.
6. Layer Styles for Depth:
- Apply inner and outer glow layer styles to the blood layers to simulate depth and translucency.
- Experiment with bevel and emboss settings to create a raised or sunken appearance.
7. Adjustment Layers:
- Use adjustment layers like Hue/Saturation and Color Balance to fine-tune the color of the blood to match the overall scene.
- Consider adding a Gradient Map for more control over color variations.
8. Motion and Blur:
- For dynamic scenes, use motion blur on the blood splatters to simulate movement.
- Apply different amounts of blur to create a sense of speed or impact.
9. Layer Order:
- Pay attention to the layer order. Placing blood layers behind or in front of other elements can change the visual impact.
- Experiment with layer masks to reveal or hide parts of the blood as needed.
10. Realistic Drying Effects:
- Add subtle cracks or texture to the dried areas of the blood to simulate the drying process.
- Use a cracked brush or custom texture for this purpose.
Additional Tricks for Creating Custom Blood Effects in Photoshop:
1. Custom Brushes:
- Create your own blood brushes with varying shapes, splatters, and drips.
- Adjust brush settings like scattering, spacing, and shape dynamics for a natural look.
2. Layer Styles for Texture:
- Experiment with layer styles like Pattern Overlay using grunge or blood-like textures.
- This adds a textured quality to the blood.
3. Dynamic Brush Effects:
- Animate blood using the Timeline feature in Photoshop for a dynamic and moving blood effect.
- This is especially effective for horror or action-themed designs.
4. Layer Effects for Wetness:
- Simulate wetness by adding a subtle gloss effect using layer styles like Inner Glow.
- Adjust the opacity and color to mimic the reflective nature of wet blood.
5. Photo Blending:
- Integrate real blood textures or images by blending them into your design.
- Adjust blending modes and opacity to seamlessly incorporate real textures.
These techniques will enhance the authenticity of the blood stains in your Chained Arm with Blood Stain Effect.
That’s it for this tutorial! Hope you enjoy it and find it useful :) Till next time, have a great day!

2 Comments
wow, this is cool, thanks for this tutorial :)
It looks just like movie poster, what could be better is a hand rising from the water, with effects ofcourse, and sun risig right above the hand, now thats an idea for next tutorial :)