In this Photoshop tutorial, I will show you the processes I used to create this dark witch fantasy scene in Photoshop. We will combine and manipulate several stock images to achieve this effect. We will come across techniques such as layer blending, image adjustments, free transform tool and a number of other manipulation techniques.
The PSD file of this tutorial is available via the PSD Vault VIP members area.
This is an intermediate level difficulty tutorial and require prior knowledge of basic Photoshop commands, as well as using layer masks in Photoshop to complete.
Here is a preview of the final effect I have for this tutorial: (click to enlarge)

PSD Vault VIP Membership
You can download the PSD File for this tutorial via the VIP Members Area for only $6.95/Month (or less)! You will not only get this PSD File, but also 200+ other PSD Files + Extra Goodies + Exclusive Photoshop tutorials there. Signup now and get exclusive!
OK Let’s get started!
To complete this tutorial, you will need the following stocks:
Step 1
Create a new document sized 1400px * 800px with black background. Load the rock texture in Photoshop and select the following portion with the Lasso Tool (set its Feather setting to 40%)

Copy and paste the selection to our document. Use the Distort command from the Free Transform tool to manipulate this texture, so it forms a flat, ground shape:

Use a soft eraser to fade the edge of the ground as shown below:

Apply the following adjustment layers as clipping masks to this ground layer:
Black and White

Levels

and here is the effect so far:

Use the cloud filter, or a cloud brush, paint some cloud effect around the canvas:

Step 2
We will work a forest background for our design. Load the forest stock into Photoshop and select the trees as shown below:

Copy and paste the selection onto our document, re-size and position it above the ground and at the centre of the canvas:

Use a soft eraser to fade the bottom of the trees so it blends into our ground:

Add the following adjustment layers as clipping masks to our trees layer:
Black and White

Levels

Curves

and here is the effect so far:

Press Ctrl + G and group the tree layer and its adjustment layers, duplicate the group twice and place the duplicated groups on the left and right side. Reduce their size to a smaller scale.
Here is the effect so far:

Step 3
We will start working on the witch in this step. Load the model image into Photoshop and cut out of the model, place it to the centre of the canvas:

Use a soft eraser to fade the side and bottom of the model:
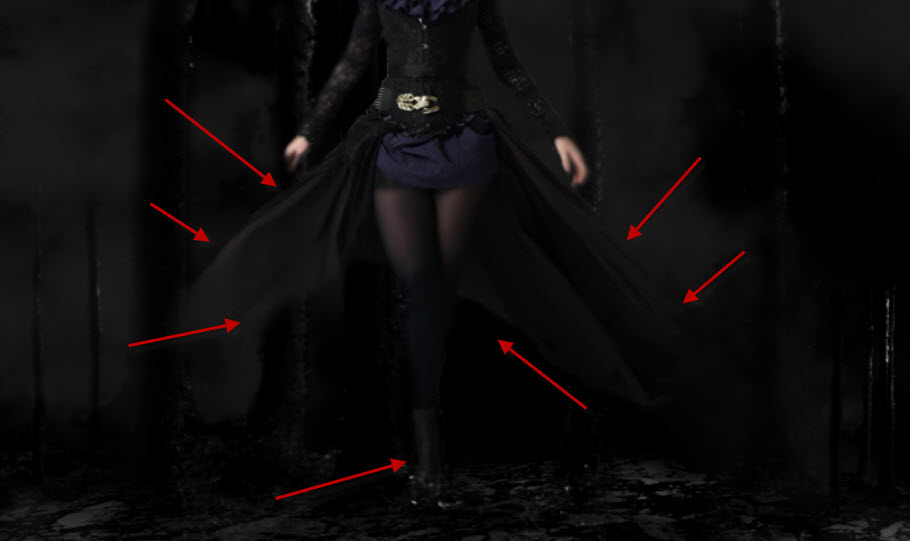
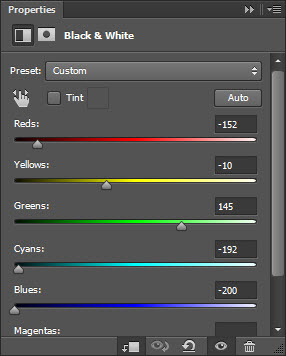
Add the following adjustment layers on top:
Black and White (set opacity to 70%)
Levels

Curves

and here is the effect so far:

Step 4
We will work on the magic effect in this step. Load the nebula stock image into Photoshop and make a selection as shown below with the lasso tool:

Copy and paste the selection over to our document, apply the following Levels image adjustment:

Change the layer blending mode to “Screen”:

Attach the effect to left hand, and here is the effect so far:

Repeat the above process, add a smaller magic effect to the top left:

Step 5
We will add some floating rocks around the witch. To do this, go back to the rock stock image and select the following piece:

Copy and paste your selection to our document, reduce its size and change the layer opacity to around 80%:

Add the rocks around the model:


Step 6
We will add traces of magic around the witch in this step. We will use the nebula image again.
Select the following piece from the stock image:

Copy and paste the selection over to our document, use the Warp Tool to warp it as shown below:

and this is the effect you will have after the warp:

Duplicate this magic trace layer a few times and scatter them around the witch:

Step 7
We will work on the wings for the witch in this step. Load the moth stock image into Photoshop and select it:

Paste the selection to our document and reduce it size. Place this new layer under the model layer:

Apply the following levels adjustment to the moth layer:

and here is the effect so far:

Ok we’re into the final touches of this design. We can paint some cloud on the feet area of the witch:

Also add some hair for the witch:

Slightly tune into colour with a selective colour adjustment layer, and here is the final effect I have: (click to enlarge)
That’s it for this tutorial! Hope you enjoy it and find it useful. Till next time, have a great day!
1 Comment
Very good Photoshop tutorials
http://blog.freebiespsd.com/2015/05/new-photoshop-tutorials-to-learn.html