Typography is more than just arranging text—it’s an art form. If you’re looking to add a unique, eye-catching twist to your designs, the Liquify Filter Typography Effect in Photoshop is a game-changer. This effect transforms ordinary text into a fluid, dynamic masterpiece, perfect for posters, social media graphics, or creative projects.
In this tutorial, we’ll walk you through the steps to create this mesmerizing effect, along with pro tips to take your typography to the next level. Whether you’re a beginner or a seasoned designer, you’ll find this guide easy to follow and full of creative inspiration.
The PSD file of this tutorial is available via the PSD Vault VIP members area.
Here is a preview of the final effect I have for this tutorial: (click to enlarge)

PSD Vault VIP Membership
You can download the PSD File for this tutorial via the VIP Members Area for only $6.95/Month (or less)! You will not only get this PSD File, but also 250+ other PSD Files + Extra Goodies + Exclusive Photoshop tutorials there. Signup now and get exclusive!

To complete this tutorial, you will need the following stocks:
Step 1
Create a new document with the default white background with the size of 1275px in width, and 610 in height. Load the Page Texture image into Photoshop and select a portion of the paper texture, copy and paste it onto our document:

Use a soft eraser to fade the edges of the page as shown below:

Add the following 2 adjustment layers on top of this paper texture:
Hue/Saturation

Levels

And here is the effect so far:

Step 2
We will add the letters onto our document. Use any font you like and type some texts:

Duplicate this text layer once, and hide the original text layer, then right-click on the duplicated layer and choose “Rasterize Type/Layer”:

Then grab the liquify tool (Filter > Liquify), use the the following settings:

Manipulation the text until they form the following shape:


We will add some drawing patterns over the black texts – I use the following brush settings:

We will use the brush above to paint some white and blue dashes over the text, as shown below:


Step 3
We will add some extra effect for our text – We can add a bit of shadow for the text by duplicating our rasterized text layer, then compress it down with the free transform tool:

Optional: we can also add some particles around the text with a particle brushset:

Use the watercolor brush we downloaded, paint some watercolor pattern around the text, as well as behind the text (set a smaller brush size):

Step 4
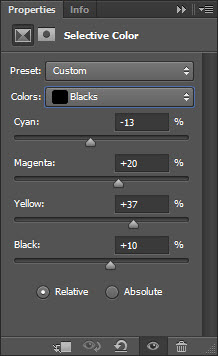
We’re almost done! For final touches, I added the following Selective Color adjustment over all the previous layers:
White

Blacks

Optional Step (CS6 only): flatten the image, and duplicate the background layer, and apply the following Oil Paint filter (Filter > Oil Paint):

Use a soft eraser to remove the following parts for the oil paint layer:

and here is the final effect: (click to enlarge)

Pro Tips for a Stunning Result
- Experiment with Different Fonts: Each font will react differently to the Liquify Filter. Try out a few to see which one works best for your design.
- Use Reference Images: Look at examples of melted or flowing typography for inspiration and guidance.
- Play with Brush Settings: Adjust the brush size, pressure, and density in the Liquify Filter to achieve different effects.
- Combine with Other Filters: Try combining the Liquify Filter with other Photoshop filters like Wave or Displace for even more creative possibilities.
Why This Effect Works
The Liquify Filter Typography Effect is a fantastic way to add movement and personality to your text. It’s perfect for:
- Eye-catching posters and flyers
- Social media graphics
- Album covers or book titles
- Creative branding and logos
This effect transforms static text into a dynamic visual element, making it impossible to ignore.
Conclusion
Creating a Liquify Filter Typography Effect in Photoshop is a fun and rewarding way to elevate your designs. With just a few simple steps, you can turn ordinary text into a fluid, artistic masterpiece. Whether you’re designing for personal projects or professional clients, this technique is sure to impress.
So, fire up Photoshop, unleash your creativity, and start experimenting with the Liquify Filter today. Your typography will never be the same!

3 Comments
Nice tuts
fine post and this tools has helpful. thanks for a sharing this info..
Thanks! :)