Close Menu
PSD VaultPSD Vault
  • VIP Area
  • Photoshop Basics
  • Photo Effect
  • Text Effect
  • Premium Tuts
  • Resources
  • Drawing
  • Inspiration
  • Web Graphics
  • Abstract
  • Freebies
  • Advertise
  • Get in Touch
  • About PSD Vault
Facebook Instagram Pinterest YouTube TikTok
Facebook Instagram Pinterest YouTube TikTok RSS
PSD VaultPSD Vault
  • VIP Area
    • Sign Up
    • Log In
  • Photoshop Basics
  • AI
  • Photoshop Error Fixes
  • Video Tutorial
  • Photo Effect
  • Text Effect
  • Premium Tuts
  • Drawing
  • Opinion
PSD VaultPSD Vault
Home»Photo Effect»The Creation of “Imminent Danger” Digital Art in Photoshop
Photo Effect

The Creation of “Imminent Danger” Digital Art in Photoshop

By James QuJuly 23, 20134 Mins Read
Share
Facebook Twitter LinkedIn Pinterest Email

In this tutorial, I will show you the steps of The Creation of “Imminent Danger” Digital Art in Photoshop, with elements such as urban building, grunge brushset and surreal lighting effect.

The PSD file of this tutorial is available to buy on PSD Vault Shop, or via the PSD Vault VIP members area.

The aim of this tutorial to show you the methods you can use to mix grunge brushsets and stock image to create a unique environment, as well as the use of image adjustment layers to manipulate photos.

Here is a preview of the final effect I have for this tutorial: (click to enlarge)

PSD Vault VIP Membership

You can download the PSD File for this tutorial via the VIP Members Area for only $6.95/Month (or less)! You will not only get this PSD File, but also 200+ other PSD Files + Extra Goodies + Exclusive Photoshop tutorials there. Signup now and get exclusive!

OK Let’s get started!

To complete this tutorial, you will need the following stocks:

Model by ~tigersgirl

Flag

City Building

Grunge Brush

Cloud Brush

Step 1

Create a new document sized 1290px * 700px with black background. Create a new layer and use the grunge brushset you downloaded, paint some subtle grunge texture over the background:

Load the model image into Photoshop, and select the model as shown below with Quick Selection tool:

Copy and paste the selection into our document, resize it as shown below:

We want to sharpen the image a little bit, so go ahead and use Filter > Sharpen > Unsharp Mask with the following settings:

Add the following adjustment layers as clipping masks to this model layer:

Black and White

Layer mask on this black and white adjustment layer: (achieved with the grunge brushset)

Levels

Curves

As you can see, the layer mask on the black and white adjustment layer did much work for us and created this dirty texture, and here is the effect so far:

Step 2

We can add attach a flag to the model for some extra flavour. Load this flag image into Photoshop and select the flag portion:

Copy and paste the flag over to our document, place it below the model layer, and use the grunge brush as eraser to remove parts of flag as shown below:

Add the following adjustment layers as clipping mask to this flag layer:

Black and white

Levels

Curves

and here is the effect so far:

We want to group these flag layers into a folder, then duplicate this folder twice and attached them to the position shown below. This creates an impression that the flag is flying behind the model:

Step 3

We can add the building to our image now. Load the building stock into Photoshop and select the following portion:

Copy and paste the selection over to our document, place it below the model layer but above the flag layer groups, resize and position it as shown below:

Optionally you can duplicate this building layer and flip it vertically, attach the duplicate layer to the position below:

Use the grunge brushset, erase some parts of the building as shown below:

Add the following 3 adjustment layers as clipping mask to this building layer:

Black and White

Levels

Curves

and here is the effect so far:

Step 4

We will want to add some supernatural lighting effect around the image. Grab the Rectangular Marquee Tool and set its Feather to 20px:

Draw a selection and fill it with colour as shown below:

Load the cloud brush into Photoshop, and select one of them as eraser:

Remove the edges with this cloud brush:

Duplicate this layer once, and apply the following Hue/Saturation settings to the duplicated layer:

Compress the duplicated layer with free transform tool as shown below:

Merge the two layers and set a perspective to the merged layer as shown below:

Duplicate the selected layer a few times, adjust the size of each layer and the effect is shown below:

Step 5

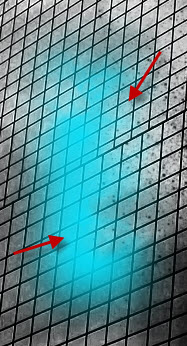
We’re almost done! To add some extra effects, we can use the cloud brush and paint some subtle cloud effect to the image:

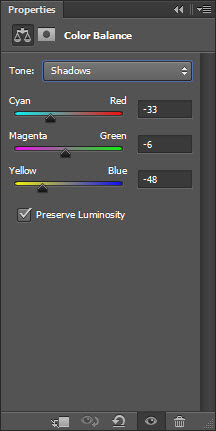
I further adjusted the colour with a colour balance adjustment layer: (Settings are as below)

This is my final result: (click to enlarge)

urban-scene-with-grunge-texture-flatten

Hope you enjoy this tutorial and find it useful. Drop me a comment below if you have any question.

Till next time, have a great day!

art brush city digital grunge urban
Share. Facebook Twitter Pinterest LinkedIn Tumblr Email
James Qu
  • Website

James is a seasoned Photoshop expert with over 25 years of experience based in Australia. As the driving force behind PSD Vault, he authors the majority of its in-depth tutorials and insightful articles.

Related Posts

How to Give Your Portrait Cyberpunk Effect in Photoshop

November 15, 2025

How to Edit Non-Destructively with Smart Objects & Neural Filters in Photoshop

October 25, 2025

Create Surreal Motorbike Racing Scene in Photoshop

October 18, 2025

4 Comments

  1. Louie on July 24, 2013 6:38 PM

    ahm do you have any tutorial regarding on how to make your photo like a terminator???

  2. 雨 林 on July 27, 2013 12:01 PM

    很好的教程,另外 人物照片找不到了。

  3. 雨 林 on July 27, 2013 12:44 PM

    我错了,图还在,是我点错链接了、 。。。。。

  4. utkarsh2point0 on November 9, 2013 2:01 AM

    Good article!

Don't Miss

How to Give Your Portrait Cyberpunk Effect in Photoshop

November 15, 2025

Create Realistic Neon Text Effect in Photoshop

November 8, 2025

How to Enlarge Images Without Losing Quality in Photoshop (using Super Resolution)

November 6, 2025

For Beginners

Basics

How to Create Relistic Burning Car Effect in Photoshop

By James QuOctober 17, 20251 Min Read

How to Pixelate an Image in Photoshop

October 16, 2025

How to Stay Ahead of Every Photoshop Update & Unlock Their Full Power

October 11, 2025

Curves or Levels: Choosing the Right Tool for Stunning Edits

September 28, 2025

You May Also Like

Photo Effect

How to Give Your Portrait Cyberpunk Effect in Photoshop

By James QuNovember 15, 20253 Mins Read
Photo Effect

How to Edit Non-Destructively with Smart Objects & Neural Filters in Photoshop

By James QuOctober 25, 20253 Mins Read
Photo Effect

Create Surreal Motorbike Racing Scene in Photoshop

By James QuOctober 18, 202512 Mins Read
Facebook X (Twitter) Instagram Pinterest
  • About Us
  • Get in Touch
  • Advertise
  • VIP Area
  • Privacy Policy
  • Terms & Conditions
© 2025 PSD Vault. All Right Reserved.

Type above and press Enter to search. Press Esc to cancel.

Manage Consent
To provide the best experiences, we use technologies like cookies to store and/or access device information. Consenting to these technologies will allow us to process data such as browsing behavior or unique IDs on this site. Not consenting or withdrawing consent, may adversely affect certain features and functions.
Functional Always active
The technical storage or access is strictly necessary for the legitimate purpose of enabling the use of a specific service explicitly requested by the subscriber or user, or for the sole purpose of carrying out the transmission of a communication over an electronic communications network.
Preferences
The technical storage or access is necessary for the legitimate purpose of storing preferences that are not requested by the subscriber or user.
Statistics
The technical storage or access that is used exclusively for statistical purposes. The technical storage or access that is used exclusively for anonymous statistical purposes. Without a subpoena, voluntary compliance on the part of your Internet Service Provider, or additional records from a third party, information stored or retrieved for this purpose alone cannot usually be used to identify you.
Marketing
The technical storage or access is required to create user profiles to send advertising, or to track the user on a website or across several websites for similar marketing purposes.
  • Manage options
  • Manage services
  • Manage {vendor_count} vendors
  • Read more about these purposes
View preferences
  • {title}
  • {title}
  • {title}