Learn how to create a silhouette based composite in Photoshop without using camera and photography knowledge. You’ll learn how to use silhouette images, combining them, creating the silhouette using selection. You’ll be also brushing up your painting skills. Let’s begin!
This tutorial is written exclusively for PSD Vault by digital artist Bunty Pundir.
The PSD file of this tutorial is available via the PSD Vault VIP members area.
Here is a preview of the final effect: (click to enlarge)

Tutorial Resources
PSD Vault VIP Membership
You can download the PSD File for this tutorial via the VIP Members Area for only $6.95/Month (or less)! You will not only get this PSD File, but also 200+ other PSD Files + Extra Goodies + Exclusive Photoshop tutorials there. Signup now and get exclusive!

Step 1
Start by creating a new document in Photoshop by selecting File > New and then give the following values:

Step 2
Download the landscape 1 image and then place it to the main docucment using File > Place Embedded command.

Step 3
Place the landscape 2 image above the landscape 1 layer like I did in the below image.

Activate the Transform Tool (CTRL + T) and use the right handle to resize the image to get the view of the city lights and get rid from the couple as well.

Step 4
Change the blending mode of the landscape 2 layer to Darken to blend it. Here you can see the results after changing the blending mode:

Step 5
Place the sky image on top of all layers and make sure to resize the image so it can cover the entire canvas. We’ll be using this image to darken the sky and make subtle clouds appearance in the sky as well.

Change the blending mode to Overlay and reduce the opacity to 71%.

Step 6
Convert the Sky layer into Smart Objects by right clicking on it and then choose Convert to Smart Objects. Go to Filter > Blur > Gaussian Blur and then set the Radius to 78.4px to blur the sky.

Results after using blur:

Step 7
Import the concept art brushes by Jonas De Ro and then choose the indicated cloud brush.

Create a new layer by pressing CTRL + SHIFT + N and name it “cloud painted”. Change the foreground color to #0d1b6a and using the cloud brush paint some clouds. For the best results reduce the brush opacity and flow around 50%-60% (probably less). Here you can see how I painted the clouds.

Reduce the opacity to 23% to make the cloud appearence very subtle.

Step 8
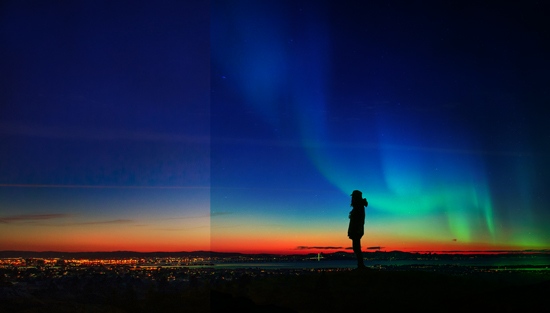
Place the aurora 1 image to the main document. Go to Edit > Transform > Flip Horizontal and flip the image. I’m only interested in its aurora parts that’s why I am using the half of the image. Just place it like shown in the below image to get the aurora light parts.

To blend the image with existing sky, simply change the blending mode to Overlay.
Step 9
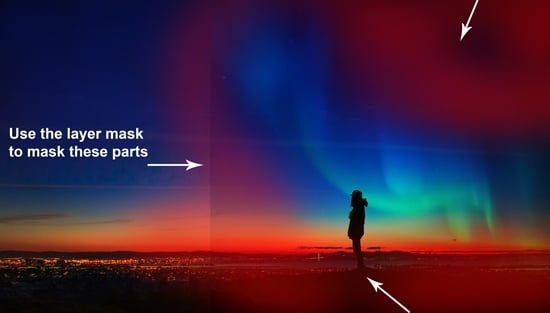
You can clearly see there are a lot of unwanted parts visible of the aurora 1 image like you can see the hard edges. We need to get rid of them using a layer mask. Go to Layer > Layer Mask > Reveal All to add a mask to aurora and then mask the parts highlighted in red color using a basic soft black brush.
Results after masking:

Step 10
Now place the aurora image again to the main document. This time I didn’t flipped it but I resized the image pretty much to get the aurora lighting again. You can see how I enlarged the image using the Transform Tool (CTRL + T).

Now change the blending mode to Soft Light.

Step 11
I added a layer mask and then mostly I erased the bottom parts of the aurora using a soft basic black brush. You can see the below image for reference.

Results after masking:

Step 12
We’ll add some lanterns to the scene so add the lantern image. Now flip it horizontally by selecting Edit > Transform > Flip Horizontal.

Change the blending mode to Screen to remove the black backgournd.

Step 13
Now use the layer mask to get rid of the selected parts as I only wanted to add small lanterns to the sky to make them look like they are pretty far and high.

Results after masking:

Step 14
Add the Levels adjustment layer to lantern image and then use the setting to increase the contrast. Don’t forget to use this layer as Clipping Mask (click on the highlighted icon).

Here are the results so far:

Step 15
I duplicated the lantern (including Levels adjustments) several times to create a collection of the lantern in the sky. You can see the results here:

Step 16
Create a new layer and name it “lantern glow”. Use the color #371d0c to paint the glow on the lanterns using a soft brush.

Change the blending mode to Linear Dodge to light them up further.

Step 17
Make a Levels adjustment on top of all layers and then use the settings to increase the brightness of the entire scene a bit.

Results:

Step 18
We blended many images using Blend Modes and you can notice there are a lot of other images parts visible are on the silhouette of the landscape 1 layer. I want it to be completely black and I don’t want there any part over it. To fix this, I made the selection of the landscape using Pen Tool (P)and while the selection is still active, I filled the selection with black color on a new layer. You can fill the selection by selecting Edit > Fill then choose black in the drop-down content list.

Step 19
So we have the silhoutte in black but the contrast isn’t matching with background. To fix this, I reduced the contrast of the silhoutte using a Levels adjustment.

Results with matching contrast:

Step 20
So we are heading towards the end of the tutorial. Glad you made that, now make a Color Balance adjustment layer to add mostly blue tones to the composite.

Results:

Step 21
I used the Levels to increase the contrast for the entire scene.

Results:

Step 22
I painted the sky on a new layer using the #ce653a with a hard round brush.

Step 23
At the end, I painted some hairs for the model using a hard round black brush

Final outcome:
That’s it for this tutorial! Hope you enjoy it and learnt lots :)