Digital Artist Maria Semelevich exclusively wrote this tutorial for PSD Vault.
This tutorial shows how to create a beautiful and realistic summer tropical landscape. We consider the features of the construction of the landscape and the image perspective, and apply some interesting techniques for working with color and toning images.
Also, we examine the properties of different adjustment layers and tools in Photoshop. In the process of creating, I tell a lot of interesting methods and techniques that will be useful in your work.
The PSD file of this tutorial is available to buy on PSD Vault Shop, or via the PSD Vault VIP members area.
What you’ll be creating
First, I will create a background with several images and bring them to the general lighting. Then I will add birds and palm trees to create a more expressive and interesting story/composition in an artwork. The next stage will be improving lighting and working on missing colors of the sky and water. Finally, we’ll finish it up with final color correction and sharpening. At the end of a tutorial, I will show you three interesting additions that will make your pictures more fashionable or unusual.
Do not regret investing time in some steps and experiment to get the best results! You’ll need Photoshop, starting from CS version, inspiration, and good mood! Turn on your favorite music and take a cup of tea :)
I used Photoshop CC 2017 without additional tools or plugins.
PSD Vault VIP Membership
You can download the PSD File for this tutorial via the VIP Members Area for only $6.95/Month (or less)! You will not only get this PSD File, but also 200+ other PSD Files + Extra Goodies + Exclusive Photoshop tutorials there. Signup now and get exclusive!

Resources
- Coast (5184×3456) – Pixabay
- Boats (5472×3648) – Pixabay
- Seagull (2883×1922) – Pixabay
- Palm trees (4928×3264) – Pixabay
- Jungle Beach (5472×3648) – Stockvault
- Flare (1920×1080) – Pixabay
- Birds and feather brush set – Maria Semelevich
Step 1
Open Photoshop and create a new document with aspect ratio 16:9 by using Cmd/Ctrl + N shortcut or go to File > New… Set Width: 2560px, Height: 1440px, Resolution: 200 Pixels/inch, Color Mode: RGB color/ 8bit, Background Contents: black. Name it as you wish and everything else leave as default. Place (File > Place/ Place Embedded…) “beach-731147” image into working document. In Free Transform mode (Cmd/Ctrl + T or Edit > Free Transform) change size proportionally (Shift key) to around 13.64% for horizontal and vertical scale, position the photo approximately, in the upper right part of the working field and then apply the transformation.

Step 2
Now bring the image in a more suitable form, make basic photo corrections and show all the beauty of the photo with a “Camera Raw” filter. Go to Filter > Camera Raw Filter or use Cmd/Ctrl + Shift + A shortcut. In the window that appears, make the following settings in tab “Basic”. First, I will correct the lighting and the contrast of the image. I will lighten the shadows and remove the excessive brightness from the brightest places of the image so that the photo becomes harmonious. Use the images below to recreate the filter settings. Do not rush to apply the filter, but go to the tab “Detail” and set following settings: Luminance: 25, Luminance Detail: 50, Luminance Contrast: 0, Color: 5. Then I restore the vanished colors of the sky, added more saturation to the blue colors of water and sky and slightly changed the color of the vegetation to create a warmer and sunny atmosphere. Go to tab “HSL/Grayscale” and apply the settings from the image below. Apply the filter to the changes take effect.


Step 3
Create a new layer (Cmd/Ctrl + Shift + N) with “Overlay” Blending Mode. Use Brush Tool (B) with Soft Round form, Size: 150px, Opacity: 20%, color: #333528 and draw over jungles on the left side of the image, as shown in the image below. Make this layer a Clipping Mask (Cmd/Ctrl + Opt/Alt + G or hold Opt/Alt key and click between layers) to apply adjustments only on a layer below.

Step 4
Place (File > Place/ Place Embedded…) “jungle-beach-sri-lanka168425” image into working document and in Free Transform Mode resize an image on the width of the working field, that it covers all working area and move it a little down to approximately match horizon line and ocean texture of both images.

Step 5
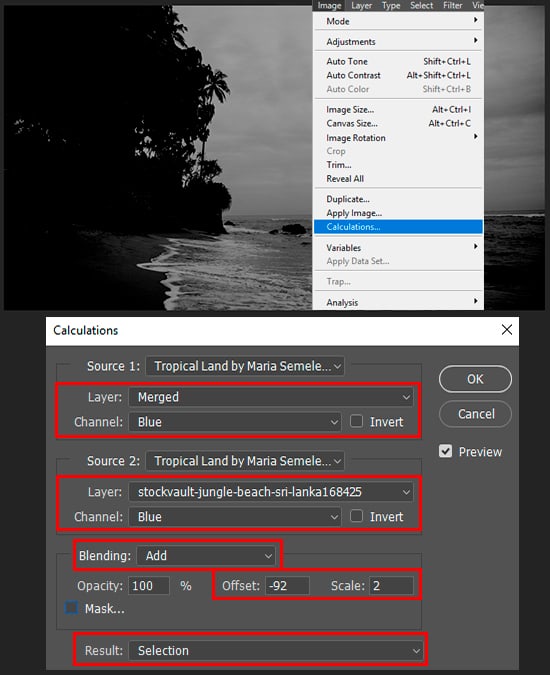
Now we need to separate the sky from vegetation and the ocean. Since I’m interested in clear edges of vegetation, it does not matter to me if the sand and waves disappear, because I will mix the ocean with the photo below with a brush. To quickly create the desired selection, I applied “Calculations” command from Image > Calculations… In the dialog box that appears, set for Source 1 Layer: “stockvault-jungle…” ( the same layer as Source 2) or merged, for both sources set Channel: Blue, Blending: Add. And now the most interesting is to choose the optimal settings. First, I used the maximum value for Scale is 2. Then, click and drag Offset value, until you get the black silhouette of the desired object (in this case, the vegetation). Positive ” Offset” values are added whites, and negative values are added blacks. If you experiment with the settings, try to achieve a balance between the details / small debris and contrast. Sometimes it’s easier to reduce the settings and get a more accurate selection and remove the fine details on the layer mask manually. With active selection hold Opt/Alt and click on “Add layer mask” icon at the bottom of Layers panel or go to Layer > Layer Mask > Hide Selection…
Step 6
So, let’s start improving the layer mask. Apply “Levels” adjustment (Cmd/Ctrl + L or Image > Adjustments > Levels) to a layer mask. Simply move the sliders until you have reached a strong contrast and hard edges. If you need to clean up edges and details, you can simply use the Dodge or Burn Tool (O), or a Brush Tool (B) with “Overlay” and “Normal” blend modes. To see a layer mask, hold Opt/Alt and click on layer mask thumbnail.

Step 7
Use Brush Tool (B) with Soft Round form, Size: 100-280px, Opacity: 30-70%, color: white to mix the texture of the waves of this image with the image below on a layer mask. Restore the beach and blend rock with stones on the background. With a hard round black brush, remove palm trees. Take your time and try to work as carefully as possible so that there are no noticeable seams and joints. Do not worry about the color at this stage, a little later we will quickly fix it. To get rid of white stroke around leaves and make more accurate edges, apply “Minimum” filter from Filter > Other > Minimum with Radius around 0.6 pixels, Preserve: Roundness.

Step 8
Now we need to slightly correct the lighting of this image so that it blends better with the background. Create a new layer (Cmd/Ctrl + Shift + N) with “Overlay” Blending Mode. Use Brush Tool (B) with the settings from Step 3 change colors to #222111 for shadows and #d7d6bc to create the light. Create one more layer with “Screen” Blending Mode, Opacity: 77%. use color #d7d6bc Set both layers as Clipping Masks (Cmd/Ctrl + Opt/Alt + G) to jungle beach photo.

Step 9
So that the coast line at the junction of the photos looked more realistic, I added smaller stones. To do this, duplicate layer “beach-731147” (Cmd/Ctrl + J or go to Layer > Duplicate layer) and move it at the top of layer stack. With Free Transform Tool (Cmd/Ctrl + T or Edit > Free Transform) reduce the scale of an image, so that the stones are slightly smaller and move an image to the place of the rock from the second photo. Apply black layer mask (hold Opt/Alt and click on “Add layer mask” or Layer > Layer Mask > Hide All…) and with small white soft round brush (Brush Tool (B)), restore the stones, as shown in the image below.

Step 10
Now we need to do the same for the wave fragment in the same place to hide the shortcomings of the shoreline. Duplicate layer “jungle-beach-sri-lanka” (Cmd/Ctrl + J), place it at the top of the layer stack and delete a layer mask, by dragging mask’s thumbnail to trash icon at the bottom of Layer Panel or go to Layer > Layer Mask > Delete. Reduce the scale of the image with Free Transform Tool and place it around the stones. Next, just like in the previous step, add a black mask and restore the waves and mix the textures.

Step 11
Now, when the composition is ready we will start working on the details. In this step, we remove the distracting objects, garbage from the image and fix the flaws and irregularities. Create a new layer (Cmd/Ctrl + Opt/Alt + Shift + N) at the top of layer stack and take a Clone Stamp Tool (S) with Hard Round form, Size: 40-100px, Opacity: 100%, Sample: All Layers. Hold Opt/Alt and take the samples near retouched area and point-wise remove garbage, distracting objects, people and birds in the distance. Very useful to use “Clone Source” panel (Window > Clone Source), when you need a sample of a larger or smaller scale or change the angle of the sample. Create a new layer every time you make a successful correction of the object or small area. This will help to better control the result and be safe, about previous corrections and do not undergo modifications. When you finish, merge them all into one layer (Cmd/Ctrl + E).

Step 12
The next step is to fix the posterization of the sky after applying “Camera Raw” filter. It is necessary to soften the hard lines and create a soft transition of color and texture on a sky. For this I used two tools – Smudge Tool and Blur Tool with the settings – Soft Round brush preset, Size: 100-250px, Strength: 50-100%, checkmark “Sample All Layers”. On a new layer (Cmd/Ctrl + Opt/Alt + Shift + N), with Smudge Tool starting near the lines, make a stroke in the according to a direction of the clouds/sky and return the brush back to create a soft transition and blur the line. You should not have visible bands or anything like that in an artwork. Have patience and be careful! To soften the correction, use Blur Tool. Group all layers in layer stack (Cmd/Ctrl + G or ) and name it “BEACH”.

Step 13
Place (File > Place/ Place Embedded…) “thailand-2262894” image into working document. In Free Transform mode place image, as shown in the image below. Try to ensure that the horizon lines of both images are approximately consistent. Now you need to loosen the color of the water slightly so that it more closely matches the general atmosphere. Apply “Hue/Saturation” image adjustments as Smart Filter via Cmd/Ctrl + U or go to Image > Adjustments > Hue/Saturation. In the window that appears set color range to Cyan, Hue: +23, Saturation: -11, Lightness: +73. Hide all with a black layer mask and use small white soft round brush (Brush Tool (B)) with Opacity: 100% to restore the boats, people on the beach and blend water texture with the background.

Step 14
To slightly liven up the shore in the foreground, I added an image of the birds in the foreground. Place “sea-1760172” image into working document and resize and Rotate it on 15.64 degrees, as shown in the image below. With Pen Tool (P) make a path around birds and shadows. Convert this path to a selection and add a layer mask to hide the background. Duplicate this layer (Cmd/Ctrl + J or go to Layer > Duplicate layer) and on a top layer mask remove shadows, on bottom layer – birds. Duplicate layer with shadows (Cmd/Ctrl + J) and use Move Tool (V) to move it right behind bird in a fly. On a layer mask remove other shadows with Brush Tool (B) and merge it with previous shadow’s layer (Cmd/Ctrl + E) and change Blending Mode of this layer to “Multiply”, reduce Opacity to 32%. In the work, it is very convenient to link the layers. For example, you have a separate layer with birds and a layer with its shadow. By linking them, if you move or scale the layer, then the second one will change according to the first one. To use this function, highlight the desired layers with Cmd/Ctrl or shift key on Layer panel and click on “Link layers” at the bottom of layer panel or go to Layer > Link Layers. If you want to add more birds in different parts of the image, highlight all layers on a Layer panel with birds and it shadows and duplicate it (Cmd/Ctrl + J). With Free Transform Tool(Cmd/Ctrl + T) reduce its scale and place it on a midground stones.


Step 15
Now add a few flocks of birds at a distance. Load “Birds and feather” brush set into Photoshop and use Brush Tool (B) with bird presets “Large birds flock 000” and “Mid birds flock 3” Size: 130-380px, Opacity: 100%, white color and draw a few flocks of birds in the background of the image. Use Eraser Tool (E) to remove unnecessary birds and make the flocks more organic look. Group all layers with birds (Cmd/Ctrl + G) with a name “BIRDS” and create a new layer with “Soft Light” Blending Mode as clipping mask to a group (Cmd/Ctrl + Opt/Alt + G).

Step 16
On the created layer, using a brush, correct lighting on the birds according to the light source. Restore to default foreground and background colors (D), take a Brush Tool (B) with Size 150px, Opacity: 20% and just start painting over the birds, with white color to lightening the shadows and applying light, in accordance with the light source. Also, apply “Levels” adjustment layer (Layer > New Adjustment Layer > Levels… or use “Create new fill or adjustment layer” icon at the bottom of Layer Panel) as clipping mask to a group and set Output Levels to 45/231. It is a little reduce the contrast of the original image and the created shadows, which will help harmoniously unite the birds with the surrounding atmosphere.

Step 17
Additionally, I can suggest you add a little movement to the birds to create the impression of flying. This step is optional and you can use it at will. Highlight all layers with birds and it’s adjustments, except layer with flocks of white birds on the background at a Layer panel and use Cmd/Ctrl + Opt/Alt + E to create layer with merged content of selected layers or you can duplicate selected layers (Cmd/Ctrl + J) and convert it to Smart Object (Layer > Smart Objects > Convert to Smart Object) and apply “Motion Blur” filter from Filter > Blur > Motion Blur. In the window that appears, set Angle to -22 and Distance to 15 pixels and click OK. Move this layer behind a group of birds at a Layer panel and reduce Opacity to 55%.

Step 18
Now let’s add the foreground elements. I used a plant suitable in form to other plants from the original images. You can adapt creepers, leaves of tropical plants, ferns and palms. All that grows in tropical warm countries. Place (File > Place/ Place Embedded…) “palm-trees-2208081” image as is into a document and apply “Calculations” (Image > Calculations…) command again to create a selection. Then, add a black layer mask (hold Opt/Alt and click on “Add layer mask” icon). Apply “Curves” adjustment to a layer mask by highlighting mask’s thumbnail and press Cmd/Ctrl + M or go to Image > Adjustments > Curves. In the window that appears, use click and drag tool to make a hard contrast between background and palm trees. Be careful and do not lose the details of the palm trees! After that apply “Minimum” filter from Filter > Other > Minimum with Radius around 0.3 pixels, Preserve: Roundness.


Step 19
Duplicate palm trees layer once (Cmd/Ctrl + J), remove one of the palm tree from the layer mask, and on the other layer, remove the one that remained on a previous layer to separate them. Now start to create the composition and play with an arrangement of the palm trees. Arrange the palm trees in the upper left corner to create an impression of motion. Use Free Transform Tool (Cmd/Ctrl + T) to Scale or Rotate palm trees and find the more interesting look or flip it. Also add one copy of the palm, that you like at the bottom of the working field, for the bush imitation. To create a depth of field, use one more copy with very large size. Convert that layer into Smart Object (Layer > Smart Objects > Convert to Smart Object) and apply “Gaussian Blur” filter from Filter > Blur > Gaussian Blur, with Radius: 10 pixels to make it out of focus. I group all layers with palm trees (Cmd/Ctrl + G) and name it “FG_PALM”.

Step 20
To palm trees look realistic in the atmosphere, we need to slightly adjust their color and luminosity. I use two adjustment layers – “Curves” and “Levels”. Add “Curves” adjustment layer (Layer > New Adjustment layer > Curves…) as clipping mask to a group with palm trees. Use settings from image below to lighten the palms so that they correspond to the overall brightness and color of the rest of the vegetation in an artwork. Change layer Blending Mode to “Lighten”. Next, add a “Levels” adjustment layer as a clipping mask with Output Levels: 0/120. Inverse layer mask (Cmd/Ctrl + I) of adjustment layer and with white soft brush, Opacity: 50% restore effect to create shadow, as shown in the image below.

Step 21
Now we will work on lighting to remove the flaws in the image, unite with the background the introduced objects and create a tropical atmosphere in the image. We will start with creating a rough light, where you need a more rigid interference in the luminosity of the image. Create a new layer with “Multiply” Blending Mode, Opacity around 17% and another one layer with “Screen” Blending Mode. Use Soft Round black brush with Opacity: 50% and darken the left side of the image to create a soft shadow from plants on the shore. On the second layer, brighten the hard shadows with white color and Brush Opacity: 10-30% in the background of the picture. Also, create lighting from the light source on the objects that we added to match overall lighting and create a softer atmosphere.

Step 22
Now let’s work on the details. For this, I used the so-called “Dodge and Burn” technique. Create a new layer with “Overlay” Blending Mode (Cmd/Ctrl + Shift + N) and now to choose from to use Brush Tool (B) with black and white colors and Opacity: 5-20% to create light and shadow or Dodge/Burn Tools (O) in general, which is more convenient for you. And slowly start adding light and shadows according to the light source, add more volume, emphasize the edges, add details to boat’s shadows and sky, and fix the lighting. But do not overdo it and do not forget that you can create several layers with corrections or use an Eraser Tool (E) if you make a mistake. Change the settings, depending on your situation. There is a lot of manual and accurate work, so do not rush and use Zoom Tool (Z) to better see details.

Step 23
Now we will add a little fog, in order to emphasize the humidity in the atmosphere and at the same time to enhance the atmospheric perspective. Create a new layer with “Screen” Blending Mode and use Soft Round or if you have use cloud brush with color #c0c0c0 and Opacity: 5% to accurately apply fog on the background and midground of an artwork.

Step 24
The image looks a little lifeless and faded, because there is a lack of color on some parts of the image, such as the sky and water. The adjustment layers as “Hue / Saturation” only increases color, but you need to add a color. We’ll fix this, by creating a new layer (Cmd/Ctrl + Shift + N) with “Color” Blending Mode, Opacity around 79%. Use Eyedropper Tool (I) or hold Opt/Alt key in Brush Tool (B) mode. Set up Brush Tool in the following way: Soft Round preset, Opacity: 5%. Now you need to take a sample of the color, increase its saturation with Color Picker and add it to the image where it does not enough. For water and sky, I used colors #768985 and #4173a9, for rocks – # 645c41. Carefully paint over water and the sky, so that makes a smooth junction and without visible strips from the brush. Apply color several times, where there is not enough color to align the key with the original image and enhance saturation.

Step 25
Now, create a merged copy of all visible layers (Cmd/Ctrl + Opt/Alt + Shift + E) at the top of Layer panel and apply “High Pass” filter (Filter > Other > High Pass…) with Radius: 10 pixels. Change Blending Mode to “Soft Light” and reduce Opacity to 65%, Fill to 85%. Add a layer mask (Layer > Layer Mask > Reveal All) and take a Brush Tool (B) with Soft Round form, Size: 300px, Opacity: 100% and black color to remove the effect on the background mountains. This effect a very similar to HDRI photo and help to reveal some fine details in an artwork.

Step 26
After we have expanded the color palette of the image and restored the missing colors, you can increase the saturation of the entire image. To do this, add “Hue/Saturation” adjustment layer (Layer > New Adjustment Layer > > Hue/Saturation) with Saturation: +10 and change Blending Mode to “Color” to adjustment layer affected only the color, not a luminosity.

Step 27
To create a more joyful and sunny atmosphere, I used several copies of lens flare image. Place image “lens-2468352” and transform it, that the luminous part was of approximate size with the sun in the upper left part of the image. Apply “Hue/Saturation” adjustment as a smart filter (Cmd/Ctrl + U or go to Image > Adjustments > Hue/Saturation) with Hue: -180 to make it yellowish as the sun and change Blending Mode to “Screen”. Two other layers with flare I add on foreground palms and at the bottom of the right corner, over waves. You can change the color of the flare near the sea to your liking, I used Hue: -31. Also do not hesitate to remove excess details of flare, using the layer mask and brush.

Step 28
Adjust the contrast of the image with “Brightness/Contrast” adjustment layer (Layer > New Adjustment Layer > Brightness/Contrast…). Set Brightness: -10, Contrast: +20 and Opacity for this layer 75%.

Step 29
To darken foreground and edges of an artwork, I use “Gradient Fill” adjustment layer (Layer > New Fill Layer > Gradient…) with settings: black and white preset and add pointer with color #474747 at Location: 62%, Style: Radial, Angle: 90 degrees, Scale: 200%, check “Reverse”. In gradient settings window re-position the gradient, to a place of boats. Set the layer to “Overlay” Blending Mode and use Opacity: 32%, Fill: 49% to reduce the effect.

Step 30
Also, you can sharpen the final result, if you want. Create a merged copy of image (Cmd/Ctrl + Opt/Alt + Shift + E), convert it to Smart Object (right click on layer > Convert to Smart Object) and apply “High Pass” filter (Filter > Other > High Pass…) with Radius: 1 pixels. Reduce Fill to 50% and change Blending Mode to “Linear Light”.

Summary
Now a few tips how to add interesting effects to the finished image. Maybe you will find them useful and interesting in your artworks. You can use a white or black vignette to darken the edges or focus the viewer’s attention. Add “Gradient Fill” adjustment layer (Layer > New Fill Layer > Gradient) with Style: Radial, Angle: 90 degrees, Scale: 200%, Preset “Black, White”, Location: 40% for white color slider as “Multiply” Blending Mode and Opacity around 40% for black vignette. Or make the same, only for white as the primary color and use “Screen” Blending Mode for a white vignette.
A good source of inspiration is a “Solid Color” fill layer with different blend modes. Just go to Layer > New Fill Layer > Solid Color… and set a color to #3b1aa5 for example. Change layer Blending Mode to “Lighten” and reduce Opacity to 30%. Play around with color to find more interesting solutions and looks.
Also, try experimenting with “Color Lookup” adjustment layer (Layer > New Adjustment Layer > Color Lookup) and try different files, like 3DLut or Abstract. You will find there are many original and interesting effects, ranging from vintage photography to nightlife. Also, do not hesitate to experiment with the blending modes for this layer.


Conclusion
That’s all, enjoy your final result! Here my final results. Go ahead and do not be afraid to experiment! Thank you for your attention and good luck to you in your creative projects! Have any questions or comments? Do not hesitate to ask with comment section below!

1 Comment
wow
Thank you