In this tutorial, I will show you the steps I took to Create a Water Girl Photo Manipulation (Mixing with Splatter Brushes) in Photoshop. This is an intermediate level tutorial so some steps can be a bit tricky, but why not have a try :)
The PSD file of this tutorial is available via the PSD Vault VIP members area.
Along the way, I will show you how you can use the water splash brushes and splatter brushes on your stock photo, in order to create some nice splashing effect on it. I will also show you some basic photo retouch skills for retouching the model.
Here is a preview of the final effect I have for this tutorial: (click to enlarge)
PSD Vault VIP Membership
You can download the PSD File for this tutorial via the VIP Members Area for only $6.95/Month (or less)! You will not only get this PSD File, but also 200+ other PSD Files + Extra Goodies + Exclusive Photoshop tutorials there. Signup now and get exclusive!
OK Let’s get started!
To complete this tutorial, you will need the following stock: (registration required for those images)
Water Splash Brush (pick one from the list)
Step 1
Create a new document sized 800px * 1100px with black background, create a new layer and use the gradient tool to add the following gradient:
Use the cloud brush or cloud filter, add some cloud around the canvas for some ambience:
Step 2
Load the model image into Photoshop, cut out the girl and paste it onto our document, resize and position it to the place shown below:

Tidy up the edge of her hair with a small soft eraser:


Use the Spot Healing Brush Tool to remove some dark spots around the girl’s face:

The correct way to do this is to apply a brush size similar to the size of the dark spot, and do a single click on the spot:

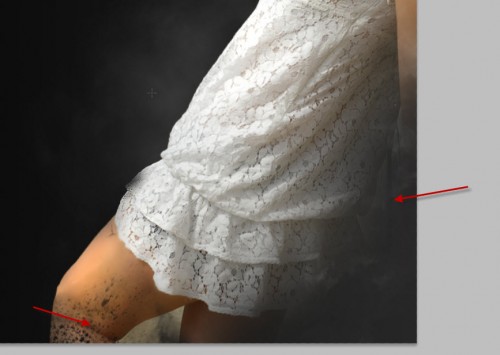
Add a layer mask on this model layer, erase the lower right portion of the girl (so it fades into the background cloud). Then on the layer mask, apply some splatter brush effect on the leg area:
I also added some trace of splatter on the girl’s face with the splatter brush:

and here is the effect so far:
Step 3
Now we’re onto adding some adjustments and water splash effect for this girl. Firstly add the following 3 image adjustment layers as clipping mask to the model layer:
Black and White (Set layer blending mode to “Hue”, opacity around 90%)

Levels (Set layer opacity to around 70%)

Layer Mask on the Levels adjustment layer: (I used the cloud brush, as well as soft black brush on it)

Curves (Set layer opacity to around 70%)

and here is the effect so far:

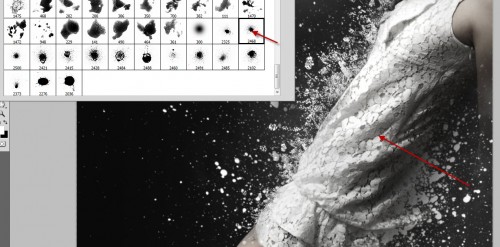
Create a new layer under the model layer, use the water splash brush you downloaded, paint some splashing patterns to the position shown below:
Hint: use free transform tool to adjust the splash size as you paint.

Also use the splatter brush to added some splatter effect under the model:

and here is the effect so far:

Optional: I added some rough vexel hair on the girl: (For more details about vexel hair, you can check out this tutorial here on PSD Vault)

Create a new layer on top of all previous layers, add some big water stream from the water splash brush pack, use free transform tool to adjust their angel:

Step 4
We’re almost done! For some final retouching, I would like to slightly sharpen the image a bit. Here I used the High Pass Filter to achieve this sharpen effect.
Flatten the image, then duplicate the background layer once, then go to Filter > Other > High Pass:

Apply the following settings for the High Pass filter:
Then change the layer blending mode for this high pass layer to Vivid Light:

And you can see now we have more details on the girl’s dress, as well as on the water splash:

Step 5
To spice up the effect a bit, I duplicate the flattened background one more time, and apply the following Radial Blur setting to the duplicated layer:
Erase the upper and lower left portions of the radial blur layer with a big soft eraser, and set the layer opacity to around 40%, you will have the following effect:
As you can see, this will create some nice lighting effect for the image, as well as adding some motion flow.
I also darken the back of the model a bit with the burn tool (exposure 5%, soft 120px brush):
Some further colouring and lighting effect are added as well, and here is the final effect I have for this tutorial: (click to enlarge)
That’s it for this Photoshop tutorial! I hope you enjoy this and find it useful and inspirational. Till next time, have a great day!


9 Comments
lookg nice
thx..
one small fail….in the right lower corner you can still see the room.If you look closely
wow! amazing Photoshop tutorial! I’ll try soon :)
where????
wow! love lovely…nice technique….
How did u get some of the color on the girl back? layer mask on the black and white?
I would love to know that too!
How did you get the color of the girl back?????