In this Photoshop tutorial, we are going to draw a colourful Soundwave, music playing gif using vector shape and gradient map. Towards the end of the tutorial, we will also briefly cover the topic of gradient map in case you’re new to this Photoshop feature.
The PSD file of this tutorial is available via the PSD Vault VIP members area.

Preview
Below is the final result.
PSD Vault VIP Membership
You can download the PSD File for this tutorial via the VIP Members Area for only $6.95/Month (or less)! You will not only get this PSD File, but also 250+ other PSD Files + Extra Goodies + Exclusive Photoshop tutorials there. Signup now and get exclusive!
OK Let’s get started!








 And now we have these gradient that made up of rainbow color.
 When we use this gradient in gradient-map, the color of the box will be mapped according to the gradient color, hence the name.
 You may find it easier to understand the concept when we apply it to an actual image. Click the Create an Adjustment Layer icon, the black and white circle, and then select gradient-map.

 If you use standard black to white gradient, you get the good old black and white photo.
 Select any type of gradient in the Properties panel.
 Click the gradient preview to edit the gradient. Try to change the color position by clicking and dragging the color stop. If you click lower part of the gradient bar, you can add new color stop for extra color in the gradient.

 However, we don’t usually use this extreme gradient-map. Most of us want it to be much subtler. Here’s an image with standard gradient-map out of the box.
 By reducing its layer Opacity and set its blending mode to Soft Light we have made the photo appears warmer.


 If you want to, you can add more colors and changing the position of the color stop to control the end result. So, for a fast black and white you can settle with Black & White adjustment layer. But, for total control you might want to use gradient-map.
Step 1
Start by making a new file. Click File > New. You can choose any size. We can easily resize the canvas at the end of the project.
Step 2
Activate the Line Tool. In the Options Bar, set its Weight to 3 px and select Shape as its mode. Click and drag while holding the Shift key to draw a vertical 3 px width line shape.
Step 3
While the line is still selected, hit Ctrl + Alt + T to transform and duplicate it. Hit the Right Arrow key a few times to move the duplicated line to the right.
Step 4
Make sure the shape is still selected. Now hit Ctrl + Shift + Alt + T to repeat the duplication and transformation process. Keep doing this until we have enough lines.
Step 5
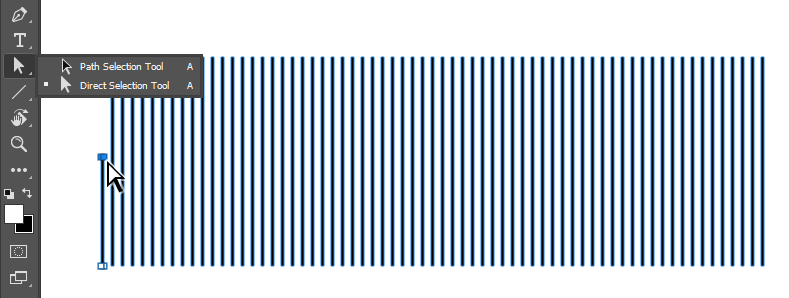
Activate the Direct Selection Tool and then select the top points of the line and drag it down to shorten it.
Step 6
Repeat this to the other lines until we have combination of tall and short lines.
Step 7
You can keep the shape if you want to. Here, I want it to be centered vertically. Select all the shapes using the Path Selection Tool and then click Vertical Centers in the Options Bar.

Step 8
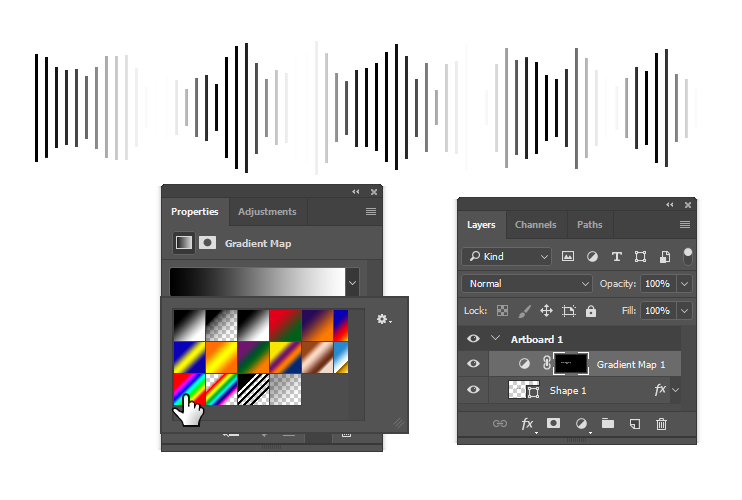
Double click the wave layer shape to open up the Layer Style dialog box. In the dialog box, activate Gradient Overlay. Make sure to set its Angle to 0 degree to get the gradient in a straight line. Click the gradient preview box to edit it.
Step 9
A Gradient Editor dialog box will pop up. You can use it to modify the gradient. Click on the lower part of the gradient bar to add color stop and then select its color from the Color box. Apply combination of white and black colors into the gradient.
Step 10
Hit the OK button to accept the result.
Step 11
Next, we want to add gradient-map adjustment layer to the wave. We don’t want it to affect the background. In order to do that, we need to limit its effect by selecting the wave. Hold Ctrl and then click the wave layer thumbnail.
Step 12
Click the Create an Adjustment Layer icon and then select gradient-map. The gradient-map will only affecting the wave. In the Properties panel, choose rainbow for the gradient.

Step 13
I think the background color should be black. Add a new Solid Color adjustment layer. Place it at the bottom of the layer stack.


Step 14
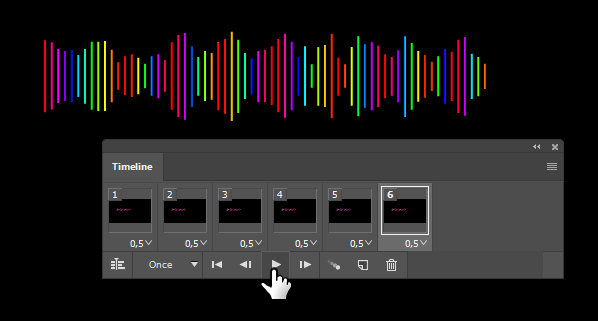
It’s time to add animation. Open up the Timeline panel. By default, the panel is hidden. You can open it using the menu Window > Timeline. Make sure to select Create Frame Animation. Click the button to start making frame based animation.

Step 15
By default, the frame lasts for 0 second. We want to change that to 0.5 seconds.
Step 16
Add new frame by clicking the New Frame icon. The icon is very similar to the Add new layer in the Layers panel.
Step 17
Double click the wave layer shape in the Layers panel. Change the Scale of the Gradient Overlay to 101%.
Step 18
So, in the first frame the scale of the Gradient Overlay is 100%. In the second frame, it grows to 101%. Let’s keep this going. Add the third frame and set it to 102%. Continue until we have the Scale growing and then return to 100%.
Step 19
Hit the Play icon to animate the wave.
Step 20
To make the animation run faster, change the duration of the frames. To change all the durations at once, select the frames by clicking the first frame and then Shift – clicking the last frame and finally select the new duration.
Step 21
The animation should be much faster now.
Step 22
By default, the animation only runs once. You can change it to Forever to make it looping continuously.
Step 23
In the beginning of this tutorial we don’t really care about the canvas size. To remove excess canvas, select the Artboard in the Layers panel and then drag the canvas bounding box.
Step 24
We have remove the excess canvas in the artboard but not in the animation. You can see it in the frame animation thumbnail. We need to fix this, otherwise we will have empty canvas in our final animation.
Step 25
It is easy to fix this. Just click Image > Trim with Transparent Pixels selected.

Step 26
To export the animation as an animated gif file we have to use the legacy Save for Web feature. You can find it under the File > Export menu. You can not use the newer Export As feature. Both can save a gif image but only the Save for Web have animation. In the file type option, you have to select GIF. JPEG and PNG don’t support animation. You can tweak the setting to reduce the color. Therefore, reducing the file size. This works great if you’re going to upload the image on the internet. However, since most people have fast internet these days I tend to skip it and just click the Save button.
Final Result
This is the final result. If you want to change the color of the wave, you only need to double click the gradient-map adjustment layer and edit the gradient. Hope you enjoy the tutorial as much as I do. I also add another wave with different color combination.

Further Readings – Gradient Map
What Does Gradient Map Do?
When converting a colored image into black and white image, you are simply changing the darkest color into black and the lightest color into white, and those between into gray. gradient-map uses the same principle. It will change the color of an image with the color in a gradient, not just black, gray, and white. Take a look at the following image. We have several boxes with dark to light color. And now we have these gradient that made up of rainbow color.
 When we use this gradient in gradient-map, the color of the box will be mapped according to the gradient color, hence the name.
 You may find it easier to understand the concept when we apply it to an actual image. Click the Create an Adjustment Layer icon, the black and white circle, and then select gradient-map.

 If you use standard black to white gradient, you get the good old black and white photo.
 Select any type of gradient in the Properties panel.
 Click the gradient preview to edit the gradient. Try to change the color position by clicking and dragging the color stop. If you click lower part of the gradient bar, you can add new color stop for extra color in the gradient.

 However, we don’t usually use this extreme gradient-map. Most of us want it to be much subtler. Here’s an image with standard gradient-map out of the box.
 By reducing its layer Opacity and set its blending mode to Soft Light we have made the photo appears warmer.

Make a Black and White Photo Using gradient-map
We know that we can make a black and white photo using gradient-map. But, we already have Black & White adjustment layer to do that in Photoshop. So, what’s the difference?Step 1
Open up this free image from unsplash. Click the adjustment layer icon and select gradient-map.

Step 2
With black to white gradient we will get a simple black and white photo.
Step 3
Click the gradient preview to open the Gradient Editor dialog box. By changing the gradient, we can control when the black or white color starts. For example, by dragging the white color stop to the middle of the gradient we are adding more white into the black and white.

Step 4
The opposite happen when we move the black color stop to the middle. Now, we have larger range of black.
Step 5
The interesting thing is we can add another color into the mix. Click lower part of the gradient to add a new color stop.
Step 6
Click the color box to select a certain color. In this case, use dark brown.

Step 7
Now we have added dark brown tint into the image. If you want to, you can add more colors and changing the position of the color stop to control the end result. So, for a fast black and white you can settle with Black & White adjustment layer. But, for total control you might want to use gradient-map.
