Close Menu
PSD VaultPSD Vault
  • VIP Area
  • Photoshop Basics
  • Photo Effect
  • Text Effect
  • Premium Tuts
  • Resources
  • Drawing
  • Inspiration
  • Web Graphics
  • Abstract
  • Freebies
  • Advertise
  • Get in Touch
  • About PSD Vault
Facebook Instagram Pinterest YouTube TikTok
Facebook Instagram Pinterest YouTube TikTok RSS
PSD VaultPSD Vault
  • VIP Area
    • Sign Up
    • Log In
  • Free Image Tools
  • Photoshop Basics
  • AI
  • Photoshop Error Fixes
  • Video Tutorial
  • Photo Effect
  • Text Effect
  • Premium Tuts
  • Drawing
PSD VaultPSD Vault
Home»Basics»How to Make a GIF in Photoshop: A Step-by-Step Guide
Basics

How to Make a GIF in Photoshop: A Step-by-Step Guide

By James QuJune 20, 20253 Mins Read
Share
Facebook Twitter LinkedIn Pinterest Email

This simple tutorial will show you how to make a GIF image in Photoshop. Along the way, you will learn how to import photos, set timing, and save your GIF. You’ll be able to produce beautiful animations quickly with the help of this guide.

What’s a GIF image?

A GIF – which is short for Graphics Interchange Format — is an image file. GIFs, unlike other image formats, are frequently animated. GIF images are widely used in social media, email marketing and website content.

Here is a preview of the final outcome of this tutorial:

Step 1

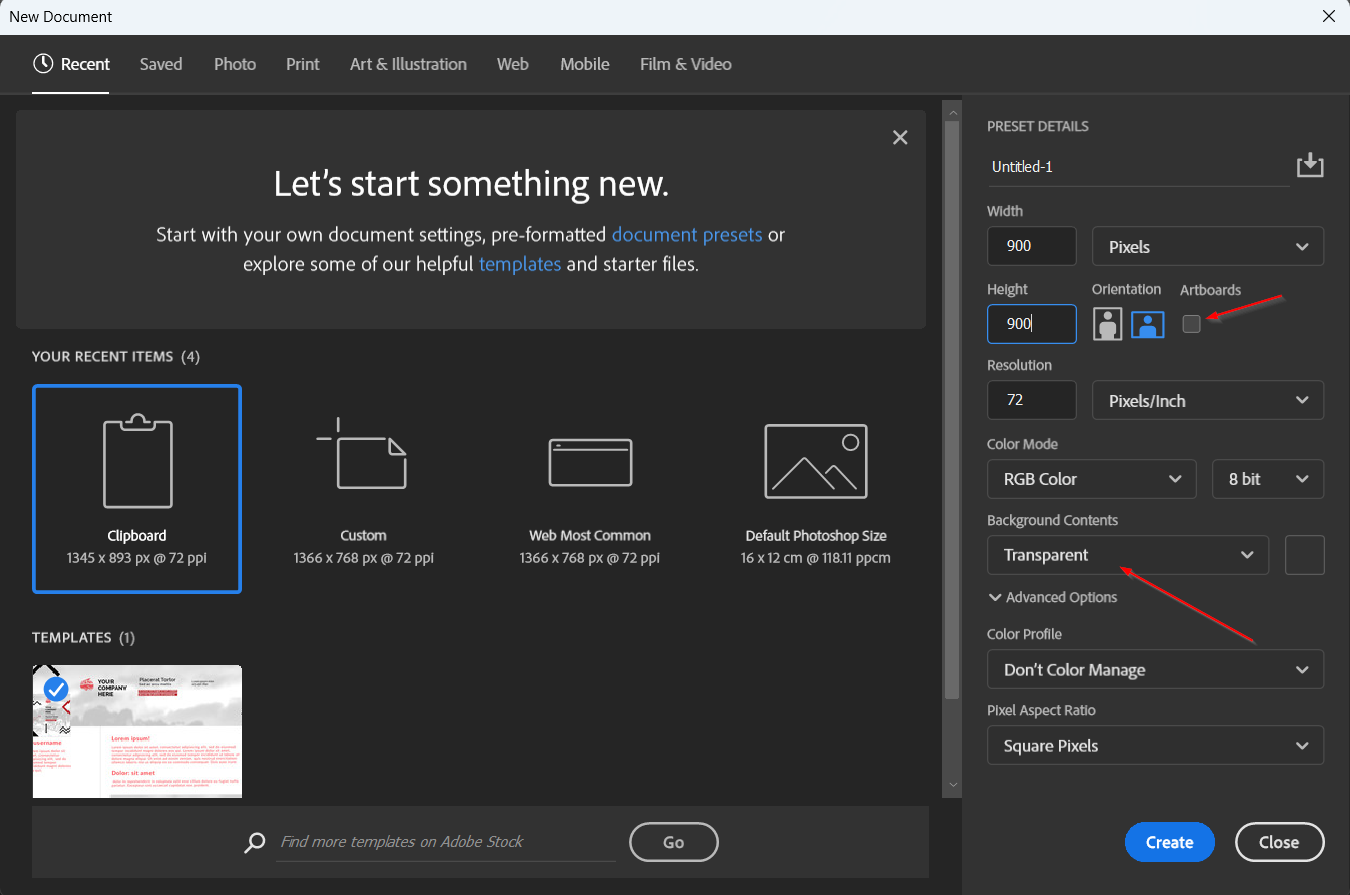
Open Photoshop and create a new file. Go to File > New or use the shortcut key Ctrl + N (Windows) or Command + N (Mac).

Set the dimensions for your GIF image and make sure the Background Contents is set to “Transparent.”

Step 2

We will import the images you want to use in your GIF in this step. Go to File > Scripts > Load Files into Stack, or use the shortcut key Ctrl + Shift + Alt + O (Windows) or Command + Shift + Option + O (Mac).

Select the images you want to use and click “Open.”

Step 3

Normally you will select the images on your computer, and here is an option you will do just that:

Step 4

You should now have a new layer for each of the images you imported.

The image I selected were cropped to fit the size of the canvas – you might want to do the same but you can always adjust them after your imported them.

Select all of the layers by holding down the Shift key and clicking on the first and last layers.

Step 5

Go to Window > Timeline or use the shortcut key Alt + Shift + Ctrl + T (Windows) or Option + Shift + Command + T (Mac) to open the Timeline panel.

Step 6

In the Timeline panel, click on the “Create Frame Animation” button, which is located to the right of the “Create Video Timeline” button.

Step 7

You should now have a timeline with each of your layers represented as a frame.

You can click and drag the frame to adjust their length:

You can also set the looping options for your GIF.

Step 8

Preview your GIF by clicking the “Play” button in the Timeline panel.

Save your GIF by going to File > Save for Web or use the shortcut key Alt + Shift + Ctrl + S (Windows) or Option + Shift + Command + S (Mac).

In the “Save for Web” dialog box, select “GIF” as the file type and adjust any other settings as needed. Click “Save” to save your GIF.

That’s it, you will have a beautiful GIF image as a result:

Thanks for reading! Drop me a comment if you have any questions. Until next time, have a great day!
gif photoshop
Share. Facebook Twitter Pinterest LinkedIn Tumblr Email
James Qu
  • Website

James is a seasoned Photoshop expert with over 25 years of experience based in Australia. As the driving force behind PSD Vault, he authors the majority of its in-depth tutorials and insightful articles.

Related Posts

Live Gradients in Photoshop – How to Master It

June 27, 2026

How to Create Vintage Photo Effects in Photoshop – A Step-by-Step Guide

June 26, 2026

Dodge and Burn in Photoshop: 3 Methods From Basic to Professional

June 20, 2026

Comments are closed.

Don't Miss

Live Gradients in Photoshop – How to Master It

June 27, 2026

How to Create Vintage Photo Effects in Photoshop – A Step-by-Step Guide

June 26, 2026

Create Epic Wormhole Space Scene in Photoshop

June 25, 2026

For Beginners

Basics

Live Gradients in Photoshop – How to Master It

By James QuJune 27, 20263 Mins Read

Dodge and Burn in Photoshop: 3 Methods From Basic to Professional

June 20, 2026

How to Use “Find Distractions” Feature in Photoshop for Easy Photo Clean-up

June 12, 2026

How to Invert a Layer Mask in Photoshop (Complete Guide)

June 6, 2026

You May Also Like

Basics

Live Gradients in Photoshop – How to Master It

By James QuJune 27, 20263 Mins Read
Photo Effect

How to Create Vintage Photo Effects in Photoshop – A Step-by-Step Guide

By James QuJune 26, 20266 Mins Read
Basics

Dodge and Burn in Photoshop: 3 Methods From Basic to Professional

By James QuJune 20, 202616 Mins Read
Facebook X (Twitter) Instagram Pinterest
  • About Us
  • Get in Touch
  • Advertise
  • VIP Area
  • Free Image Tools
  • Privacy Policy
  • Terms & Conditions
© 2026 PSD Vault. All Right Reserved.

Type above and press Enter to search. Press Esc to cancel.

Manage Consent
To provide the best experiences, we use technologies like cookies to store and/or access device information. Consenting to these technologies will allow us to process data such as browsing behavior or unique IDs on this site. Not consenting or withdrawing consent, may adversely affect certain features and functions.
Functional Always active
The technical storage or access is strictly necessary for the legitimate purpose of enabling the use of a specific service explicitly requested by the subscriber or user, or for the sole purpose of carrying out the transmission of a communication over an electronic communications network.
Preferences
The technical storage or access is necessary for the legitimate purpose of storing preferences that are not requested by the subscriber or user.
Statistics
The technical storage or access that is used exclusively for statistical purposes. The technical storage or access that is used exclusively for anonymous statistical purposes. Without a subpoena, voluntary compliance on the part of your Internet Service Provider, or additional records from a third party, information stored or retrieved for this purpose alone cannot usually be used to identify you.
Marketing
The technical storage or access is required to create user profiles to send advertising, or to track the user on a website or across several websites for similar marketing purposes.
  • Manage options
  • Manage services
  • Manage {vendor_count} vendors
  • Read more about these purposes
View preferences
  • {title}
  • {title}
  • {title}