In this tutorial, I will show you the steps I took to Design a Dawn of War Style Concrete Text Effect in Photoshop. I try to break this tutorial down into some fine details and hopefully will give beginners some ideas of how to apply textures to font, plus masking and image adjustments. Have a try!
This text effect is inspired by the Dawn of War game box art.
The PSD file of this tutorial is available via the PSD Vault VIP members area.
If you’re having difficulty with the steps in this tutorial, I suggest you go to the basic section of PSD Vault and practice those tutorials first, then come back and do this one.
Here is a preview of the final effect: (click to enlarge)
PSD Vault VIP Membership
You can download the PSD File for this tutorial via the VIP Members Area for only $6.95/Month (or less)! You will not only get this PSD File, but also 200+ other PSD Files + Extra Goodies + Exclusive Photoshop tutorial there. Signup now and get exclusive!
Ok Let’s get started!
To complete this tutorial, you will need the following stock:
Step 1
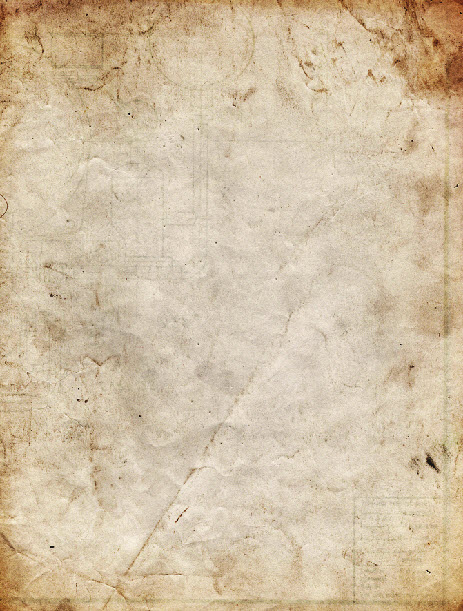
Create a new document size 720px * 900px, load the paper texture into Photoshop, hit Ctrl + A to select the entire texture and copy it, paste it onto our document and resize it to fit:
We will be adding a few image adjustment layers for this texture to darken it a bit. You can find those commands under Layer > New Adjustment Layer:

Hue Saturation

Levels

Mask on Levels Adjustment layer

Curves
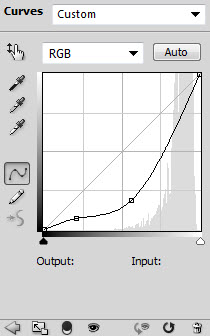
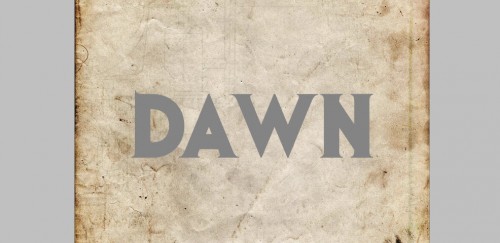
and here is the effect so far:
Step 2
Use the font we downloaded to type some text on the canvas:
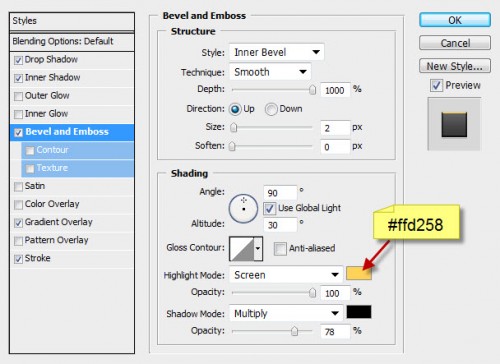
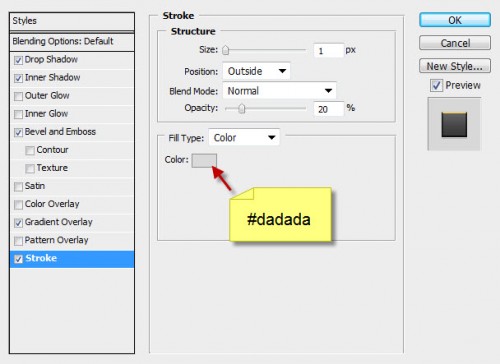
Apply the following layer blending effect to the text layer:
Drop Shadow

Inner Shadow
Bevel and Emboss
Gradient Overlay
Stroke
and here is the effect so far:

As you can see, because this bevel effect we added, the text has a nice shinning finish on top:
Step 3
Now we will add some shadow for the text. Firstly Ctrl + Left-click the thumbnail of the text layer to load its selection:
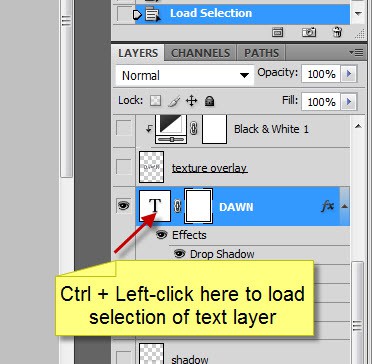
You will see the marching ants around the text:

Create a new layer under the text layer, fill the selection with black colour ON THIS NEW LAYER:

Apply the following Gaussian Blur settings to this shadow layer:

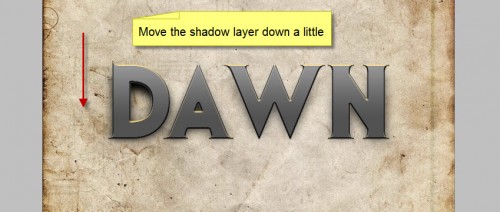
After the blur, move this shadow layer a little lower:
and you have a nice shadow under the letter:

Erase the top right of the shadow with a soft eraser as we don’t really need it:

Duplicate this shadow layer once and compress it down with Free Transform tool, this will form some shadow under the text. Adjust the layer opacity to around 50% for better effect:

and here is the effect so far:

Step 4
Now use the previous method described, load the selection of the text layer again:
Click on the Rectangular Marquee Tool, then move your mouse over the selection, you will see the mouse shape change into something like below:
Click and drag the selection onto the concrete texture:
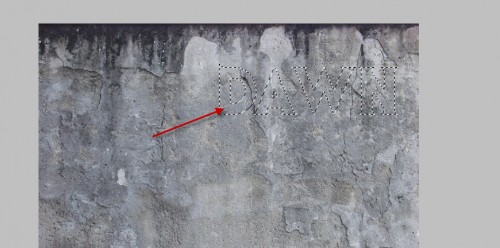
Copy and paste the selected texture onto the text:

Add the following two adjustment layers as clipping mask on the texture layer:
Black and White
Curves

and here is the effect so far:

Step 5
We’re almost done. For some final touches, we can add some adjustment layers on top of all layers:
Black and White

Mask on Black and White adjustment layer:

Levels
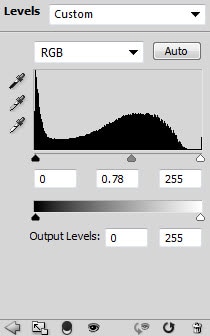
Selective Color
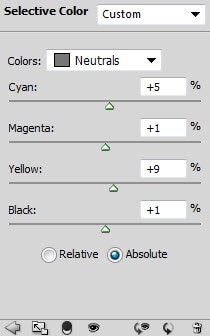
Mask on Selective Color layer:

and I have the following final effect: (click to enlarge, I added some splatter brush to the image to spice it up a bit.)
That’s it for this tutorial! Hope you enjoy this tutorial and find it useful! Till next time, have a great day!






43 Comments
nice details & I love the close up screen shots to see what you’re referencing, in regards to the Windows you’re using in PS – very useful & many techniques to be extrapolated for other things – thanks!
Great Tutorial and techniques well explained.
Thanks for sharing…
Bookmarked!!
Very difficulty for me, but this is greatest tutorial! Thank you very much!
super good,sir.
Awesome tutorial man, just a repeated “In this tutorial” at the beginning :)
Well spotted Alex :) thanks for pointing it out
ohh nice!!
Nice tutorial, my result:
http://kepfeltoltes.hu/110408/dawnofwar_www.kepfeltoltes.hu_.jpg
i am unable to do this becoz of the mask . i dont know hw to use it . any one plzz help
http://www.psdvault.com/basics/a-beginners-guide-to-photoshop-masks-part-one/
This is a great tutorial for masking!
nice tutorial … pity that for non-experts like me, badly explained and confusing steps … shame really :-(
Very confusing.
@Steve: which part are you having trouble with?
couldn’t follow up, a lot of confusing steps.
When I mask the levels, mine is white. When I try to drag and drop the text over to the concrete texture, it doesn’t do the way you are showing.
Nice work!…Thanks..^^
vere good
Very cool tutorial, really love the use of texture in this! I featured here It here: http://www.inspiks.com/best-tutorials-april-2011/
i like this …. really good idea ….
Nice typo tut. Maybe adding a bit of color would look nice too. As grunge effect it’s awesome
nice work
Duplicate this shadow layer once and compress it down with Free Transform tool, this will form some shadow under the text. Adjust the layer opacity to around 50% for better effect:
Don’t know what to do.. i am german so sorry. But i rly can’t figure what to do, i make a new layer, copy the text shadow and then press ctrl + t, but then? when i transform it, it transform just the text shadwo, did i have to do something else before?
@Favorite: yes you’re on the right path. You just need to duplicate this shadow layer created earlier, then compress it down with free transform tool (CTRL +T), as shown in the screenshot.
Hope this helps
I did what you said to the letter and got different results on every step =.= Fail.
my result was also different
great tut tanks
Extremely cool thing.added on my website right now!
outstanding work!
Yeah, I didn’t get the same result. There’s a couple steps missing. After you cut and paste the texture, there’s something that hasn’t been included. Just cuttting and pasting a layer basically covers up all the blending effects. This is a crap tutorial. Where’s the rest of it?
Ok guys, I figured out what the one missing thing was in the tutorial. When you copy over the texture, you have to set it as an overlay over on the right hand side next to where you set the opacity for the layer. This will get you the result. Very cool.
Good tutorial. Just forgot that last little part ;)
pretty cool, gotta overlay that texture though.
I got nothing remotely close to that
cool concrete texture!
Thanks for the share! will try this real soon…
Tried this one but the result was not that good…will practice more! :)
not explained well
Waste of time. Terrible tutorial. Thanks for wasting your time and mine.
Not exactly the same as the tutorials final but still came out with a rather decent effect that I think looks pretty epic. http://prntscr.com/b3jsn That is my result
Well , that was really clear ! Like MUD…….oh well on to the next one ….ho hum
I’m stuck on step 4 .. Can someone please help :( I don’t understand where the concrete texture came from :S
I really like what you guys tend to be up too. This type of clever work and exposure!
Keep up the very good works guys I’ve incorporated you guys to our blogroll.
Thanks for the tutorial but im confused :(
@Kousar. The concrete texture should be opened into a separate tab right at the beginning to save time.
~
i also struggled a bit but if you read the comments and fix the overlay issue and load the texture and concrete at the same time. it sort of works of. i skipped the masking thing as no matter how i tried it did not work.
~
And by the way, all you guys who said it was a terrible tutorial, shame on you. instead of asking for assistance or help you b*tch and moan. you did not pay for this tutorial and this was done by somebody who gave his time and effort and it IS difficult to write tutorials because, yes, sometimes you DO forget to list the twenty thousand steps involved.