In this tutorial, I will show you the steps I took to create this Abstract Manipulation with Tree Bark Texture and Brush Elements. Along the way, you will learn how you can apply layer masks to image adjustment layers to create unique effect, as well as learning to blend texture and to use various elements to create great abstract effect.
The PSD file of this tutorial is available via the PSD Vault VIP members area.
This is an intermediate level tutorial so some steps can be tricky, but why not have a try!
Here is a preview of the final effect I have for this tutorial: (click to enlarge)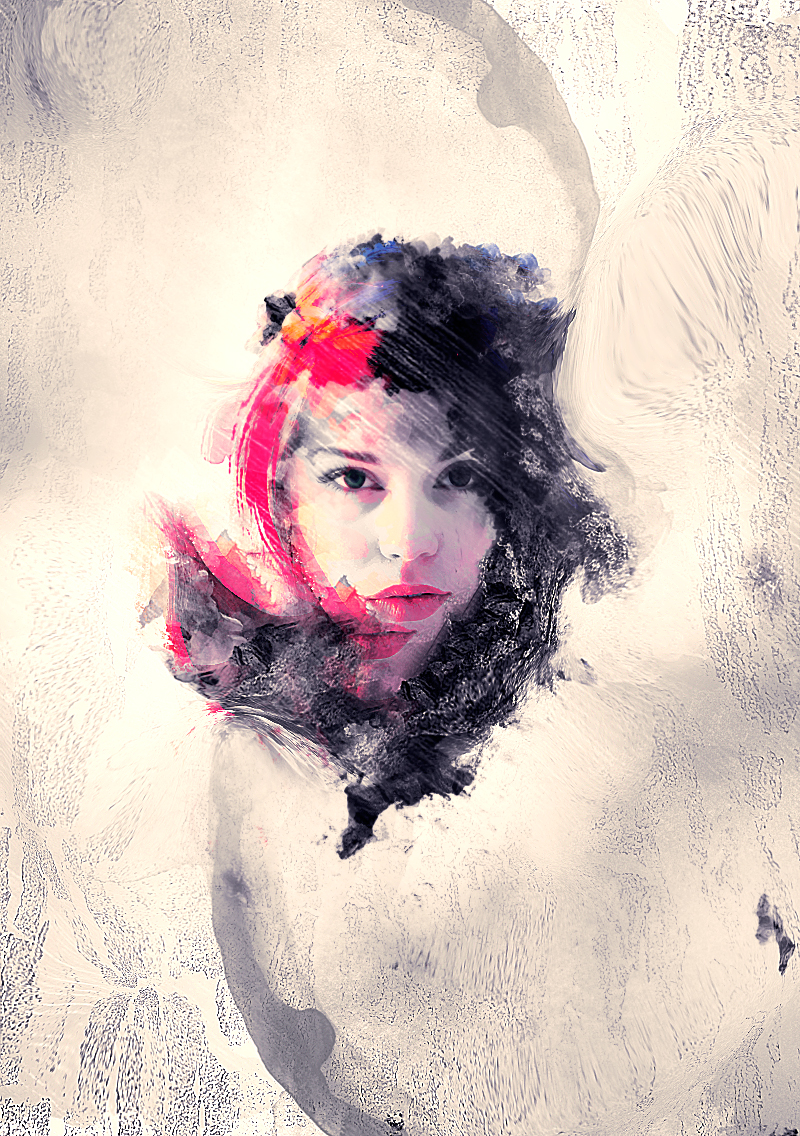
To complete this tutorial, you will need the following stocks:
Girl Photo by ~Mirish
Grunge Brushsets (Pick a few from the list)
Video Tutorial
If you have any trouble with Step 3, I have a video tutorial here to show you exactly how to apply the tree bark texture over the model’s face:
PSD Vault VIP Membership
You can download the PSD File for this tutorial via the VIP Members Area for only $6.95/Month (or less)! You will not only get this PSD File, but also 200+ other PSD Files + Extra Goodies + Exclusive Photoshop tutorials there. Signup now and get exclusive!

Step 1
Create a new document sized 800px * 1136px, fill the background layer with #cccec9 color. We will add some textures onto the background – Load the tree bark texture into Photoshop, use the rectangular marquee tool to select a portion of it as shown below:

Copy and paste the selection onto our document, resize it to fit the size of the canvas. Apply the following image adjustments to it:
Black and White

Levels

Set the layer blending mode to “Subtract” (for versions other than CS6, you can use “overlay” mode instead)

Add a highlight to the centre with a soft white brush:

Then create a new layer, and apply some grunge brush paintings over it – I have the following effect below:

Step 2
Load the girl image into Photoshop, cut out the girl and paste it over to our document:

Apply the following surface blur settings to this girl layer:

Use any grunge brushset as eraser, remove the edges of the girl as shown below: (make sure you adjust the brush size accordingly as you paint)

Add the following 3 adjustment layer as clipping mask to this girl layer:
Black and White

Layer mask on the black and white adjustment layer:

Levels

Layer mask on the levels adjustment layer:

Curves

and here is the effect so far:

Step 3
We will add some bark textures around the face – use quick selection tool to select a piece on the bark image, and copy & paste to our document, as shown below:

Distort the new bark layer as show below:

Select this new layer, and apply the following “Refine Edge” options: (by doing so, it will give a rough edge for this tree bark layer)

Apply the following 3 image adjustments to this bark layer:
Black and White

Levels

Curves

Then we can duplicate this layer a few times, then move them around the face as shown below:

Step 4
We’ve now done the textures and painting parts. Let’s flatten the image and duplicate the background layer, grab the clone stamp tool:

Set the brush to soft round for this clone stamp tool:

Define the following portion as the clone source, then paint around the girl’s face, as shown below:

Apply the following layer mask to this new layer to hide some portion:

You can apply some liquify filter effect to various parts of the photo as well:

and here is the effect so far:

Step 5
We will fine-tune the image a bit and add some colour effect to it. We will do them via adjustment layers as below: (from bottom to top)
Curves

Layer Mask on the Curves adjustment layer:

Selective Color


Color Balance

and you will have the following final effect: (click to enlarge)
That’s it for this tutorial! Hope you enjoy it and find it useful! Drop me a comment below if you have any question.
Till next time, have a great day!
17 Comments
it was artistic and great, i enjoyed it, thank you
Didn’t mention important steps, like that you would have to re-select the bark every time you made a new adjustment layer, that you should use the “Q” command, ect. Didn’t finish the tutorial.
This is a great tutorial, superb photomanipulation tips!
amazing tutorial!
i didnt understand when the background become red!
i din get step two…can u plz tell how can i add the clipping mask to girl layer ??do i need to add 3 more layers of the 3 levels mentioned in step 2 or what?
amazing.i love it
How do you do step 2. You do not elaborate at all on it. You simply say apply clipping mask. Though when I do what you say with your directions, no red appears. So for beginners out there, can you please explain??
amazing really but few things i dont get the highlight part did you just erase
then did you colour the brush grey or did it actually become like that from the effect and why did the screen turn pink but other than than that crazy
I mean wow!
Great Tutorial. Everything is listed step by step.
What a tutorial this is and you have plenty of these..I am highly impressed with this website as I want to learn Photoshop, such tutorials are great sources for me..I will try to master some of these and definitely trying this one over my image. Thank you for great work.
i dnt understand y it turned pink suddenly.stuck in step 2 plyz help out.realy wanted to learn
Hi there, the pink area is just layer mask. If you press the “\” on your keyboard you will see the same effect.
Dude,come on.Please,please FIX Step 2!! It makes no sense!!! I don’t get that red stuff and all the sudden decorating around her face.Please explain in detail,including making those layer/clipping masks!!
this is a very incomplete tutorial….several steps were skipped and I had to wrack my brains to figure out what it was done. If you guys showed the layers and not only the photo, it would a big help.
i agree i got very confused and now i’m wondering? lol